A HUD 或 頭戴顯示器 是一組用於遊玩期間始終可見或可訪問的 UI 元素,例如得分顯示、生命值計量和菜單按鈕。包含 HUD 對大多數體驗來說至關重要,因為它會顯示有助於玩家在遊戲目標中取得成功的信息。
一個常見的 HUD 元素是左側有圖示的生命值計量器,可以轉換為計時條、進度條或類似的條件。
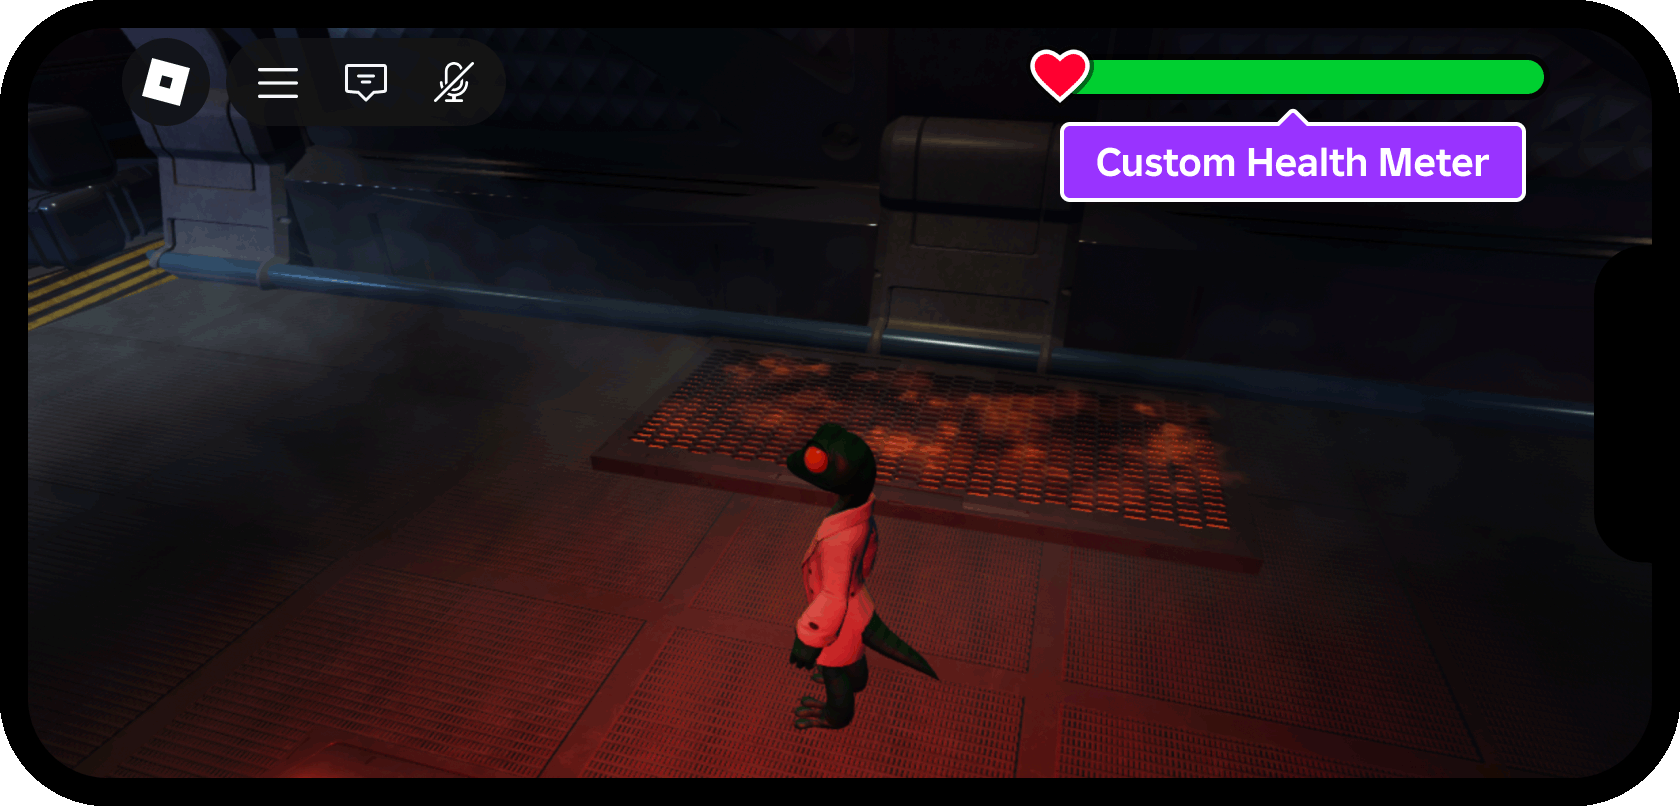
使用 危險空間站 作為起點,並使用 UI基礎 - HUD計量器 作為完成的參考地點,本教學展示:
- 設置並使用 裝置模擬器 來在多個模擬畫面上測試你的設計。
- 使用 StarterGui 作為設計和儲存容器的用途。
- 如何在內置 Roblox 控件和裝置窄邊/島上放置/尺寸用戶介面元素,例如現代手機上的相機窄邊。
- 如何使用自己的測量儀來替換預設 Roblox 生命值計量器,並將其連接到角色的生命等級。
- 如何動畫健康計量表的中心部分,並將顏色設置在五個顏色減坡點之間(紅色、橙色、黃色、藍綠色、綠色)。
啟用裝置模擬器
Roblox 本質上是跨平台的,因為玩家可以在 PC 或控制台上發現並加入體驗,然後稍後拿起手機並繼續他們離關閉的地方。移動裝置(手機和平板)的螢幕空間最少,因此重要的是您的使用者介面元素能適應較小的螢幕,並且對玩家清晰可見。
在平台間測試使用者介面設計的最佳方法是 Studio 的 裝置模擬器。此工具提供預設選擇的裝置,並允許您添加自己的自訂預設。
在 Studio 中開啟 危險空間站 樣板。
從 測試 標籤,切換到 裝置 工具。

從主視角上方的欄位直接選擇電話模擬器,例如 iPhone X 或 Samsung Galaxy A51 。然後,將視窗尺寸設為 適合窗口 以利用 Studio 中的最大空間。

創建一個屏幕容器
一個 ScreenGui 容器包含用戶介面對象 (GuiObjects) 以在玩家的屏幕上顯示 (在此教學中,整個生命計量表)要將 ScreenGui 和其子對象顯示給每個加入體驗的玩家,請將它放置在 StarterGui 容器內。當玩家加入並其角色首次重生時,ScreenGui 和其內容將複製到位於 PlayerGui 容器內的那個玩家的容器中,該容器位於 Players 容器內。

要插入空的 ScreenGui:
在 導航器 窗口中,尋找 StarterGui。

將鼠標懸停在容器上,點擊 ⊕ 按鈕,然後插入 ScreenGui 。

重命名新容器 HUDContainer 來反映其用途。

利用安全區域
現代手機利用整個螢幕,但通常包括斑點、切割和其他佔用螢幕空間的元素。每個 Roblox 體驗也包括 頂部欄控制 ,可快速存取主選單、聊天、排行榜等。
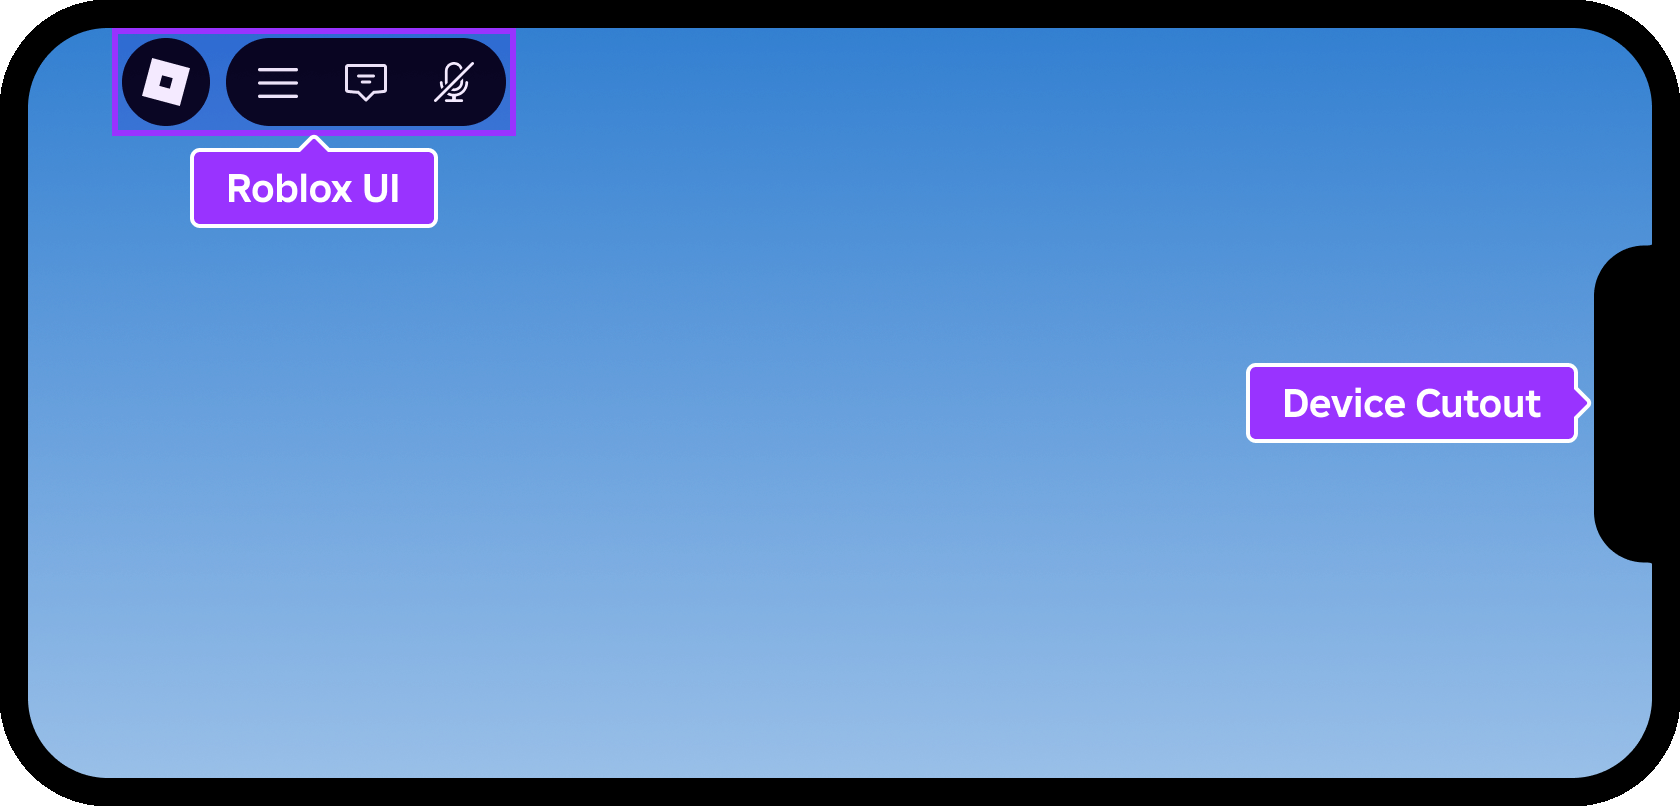
為了確保玩家能夠無障礙地查看和訪問所有界面,Roblox 提供了 ScreenInsets 屬性,用於控制 安全區 插入的內容,以便在 ScreenGui 中包含內容。你在 ScreenGui 內放置的每個用戶介面對象都相對於插入範圍。
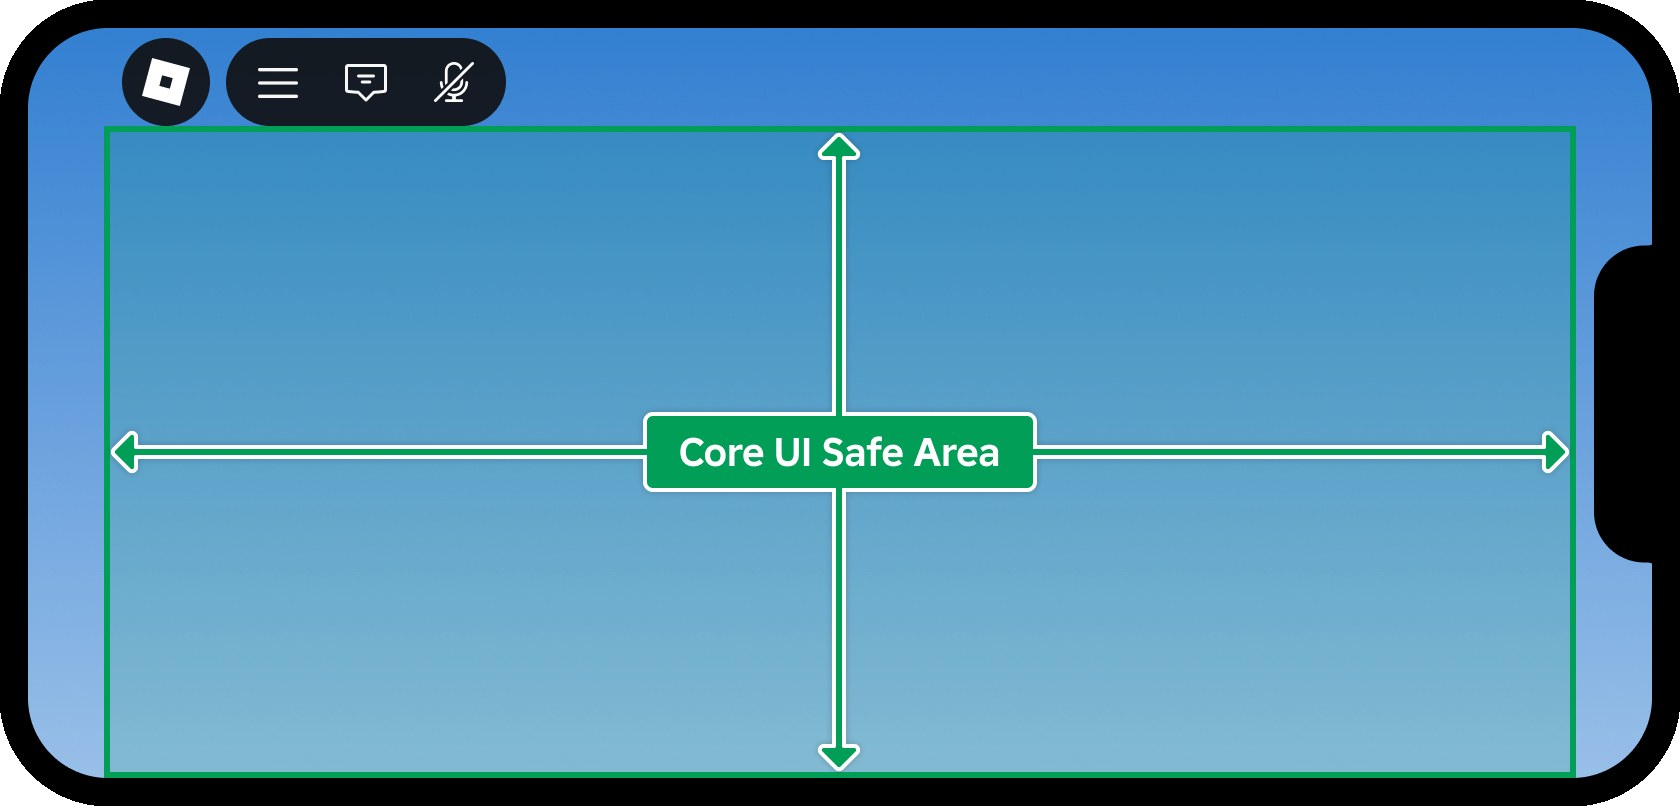
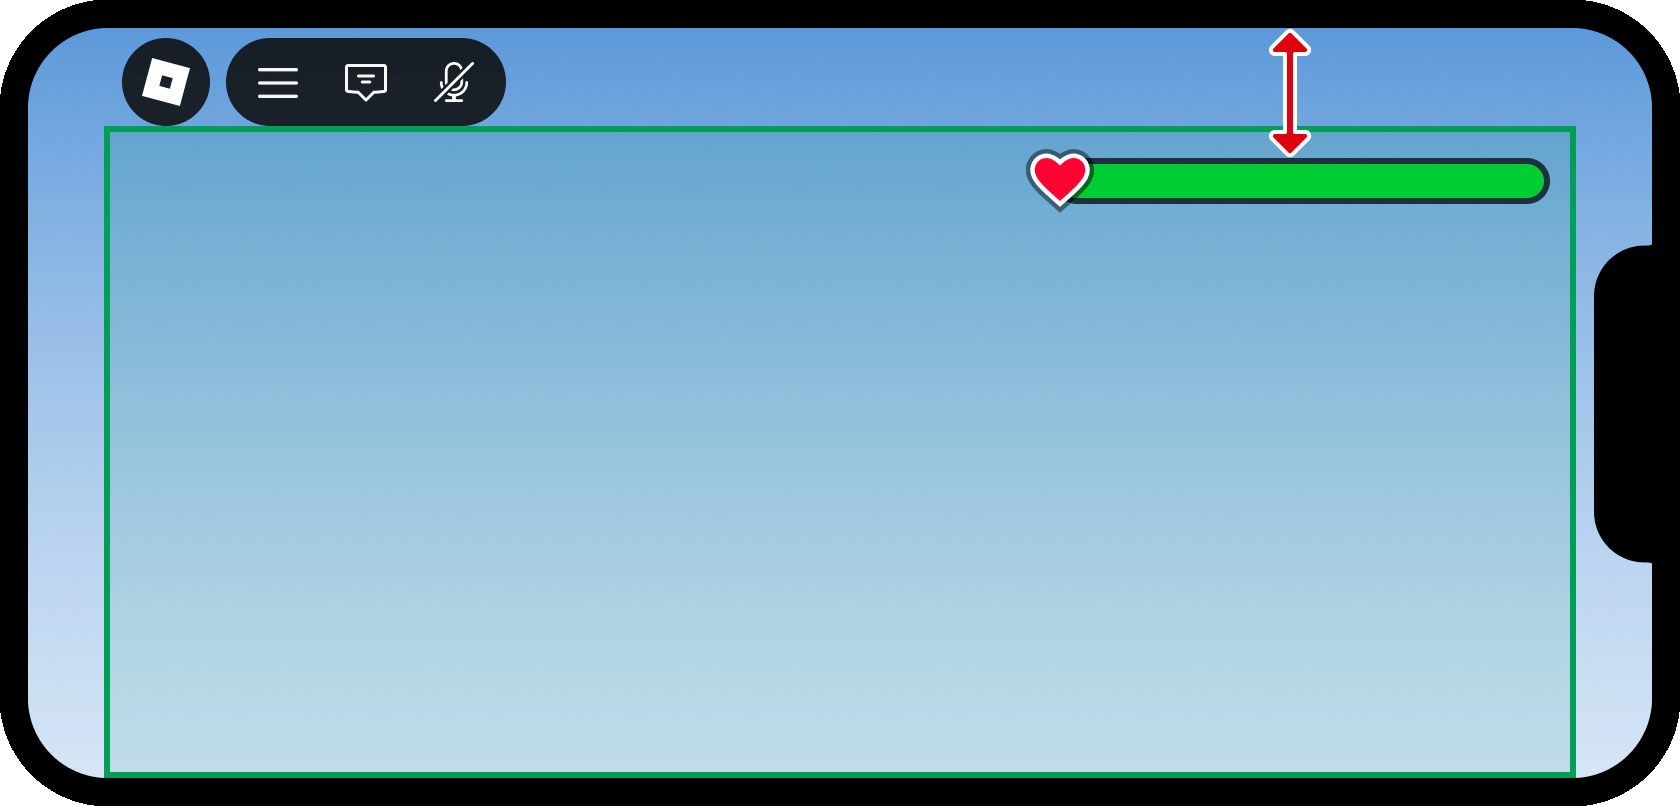
雖然預設值 CoreUISafeInsets 確保所有使用者介面對象免受 Roblox 使用者介面和裝置切割的干擾,但 DeviceSafeInsets 可能是更好的選擇來利用有限的螢幕空間,如下圖所示。
在 導航器 窗口中,選擇 HUDContainer 。

在 屬性 窗口中,將 ScreenInsets 設為 DeviceSafeInsets。

設置邊緣墊片
當 ScreenInsets 設為 DeviceSafeInsets 時,內容現在可以直接延伸到屏幕的物理上限。然而,少量的 填充 可以幫助推動健康計數器 (和容器內的其他對象)稍微離開屏幕邊緣,以獲得更清潔的外觀,並防止它們被剪輯。
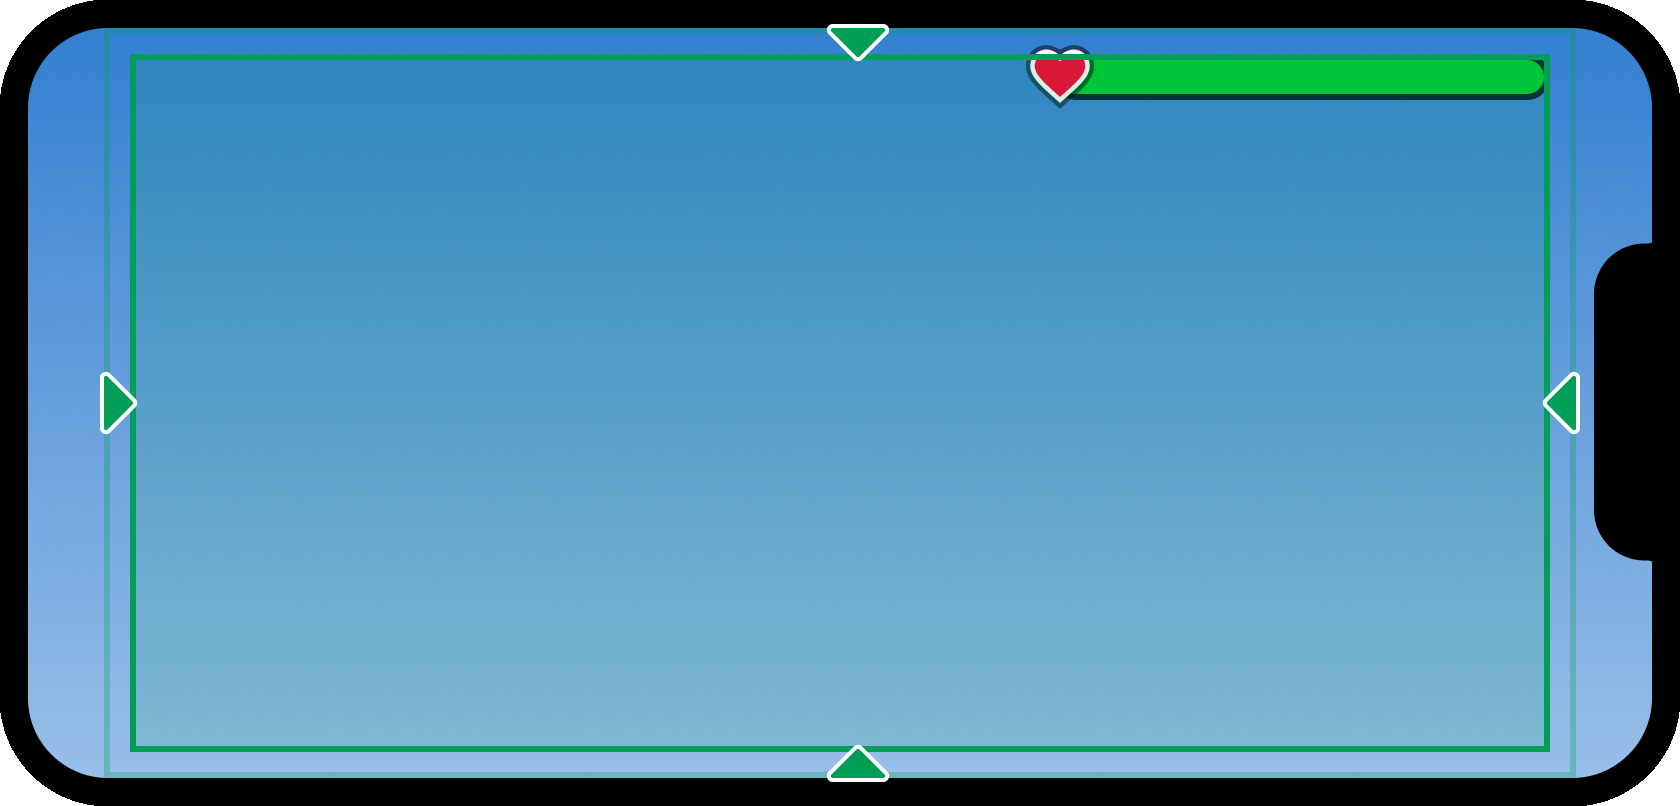
將墊子應用到 UI 容器的一種方法是通過插入 UIPadding 修改器:
在 UIPadding 中插入 修改器 。

選擇新的 UIPadding 對象後,輸入容器所有邊緣的值 0, 16 (PaddingBottom、PaddingLeft、PaddingRight、PaddingTop)。這適用於容器周圍的 16 像素填充,無論是監視器的解析度如何。

建立健康計量器
配置螢幕容器後,您可以使用Roblox介面對象,例如框架和圖像標籤來構建健康計量器。

創建父框
與像 Figma 和 Photoshop 等設計應用程式類似,在 Roblox 中的 Frame 用作其他介面對象的容器。在本教學中,整個生命值計量盤將包含在單一父框中,使其易於在各種HUD布局中重新定位。
將新框架實例重命名為 儀表板 。

位置框架
在 Roblox 中,UI 對象的位置由包含 UDim2 和 Scale 值的 Offset 坐標集來表示,其中包含 X 和 Y 軸:
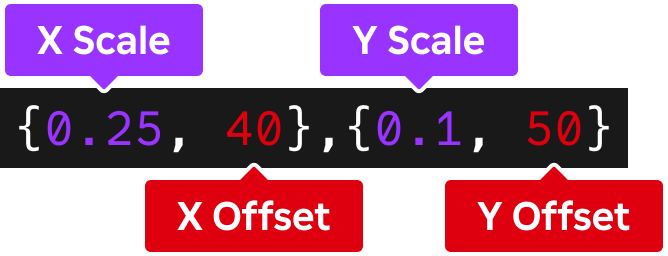
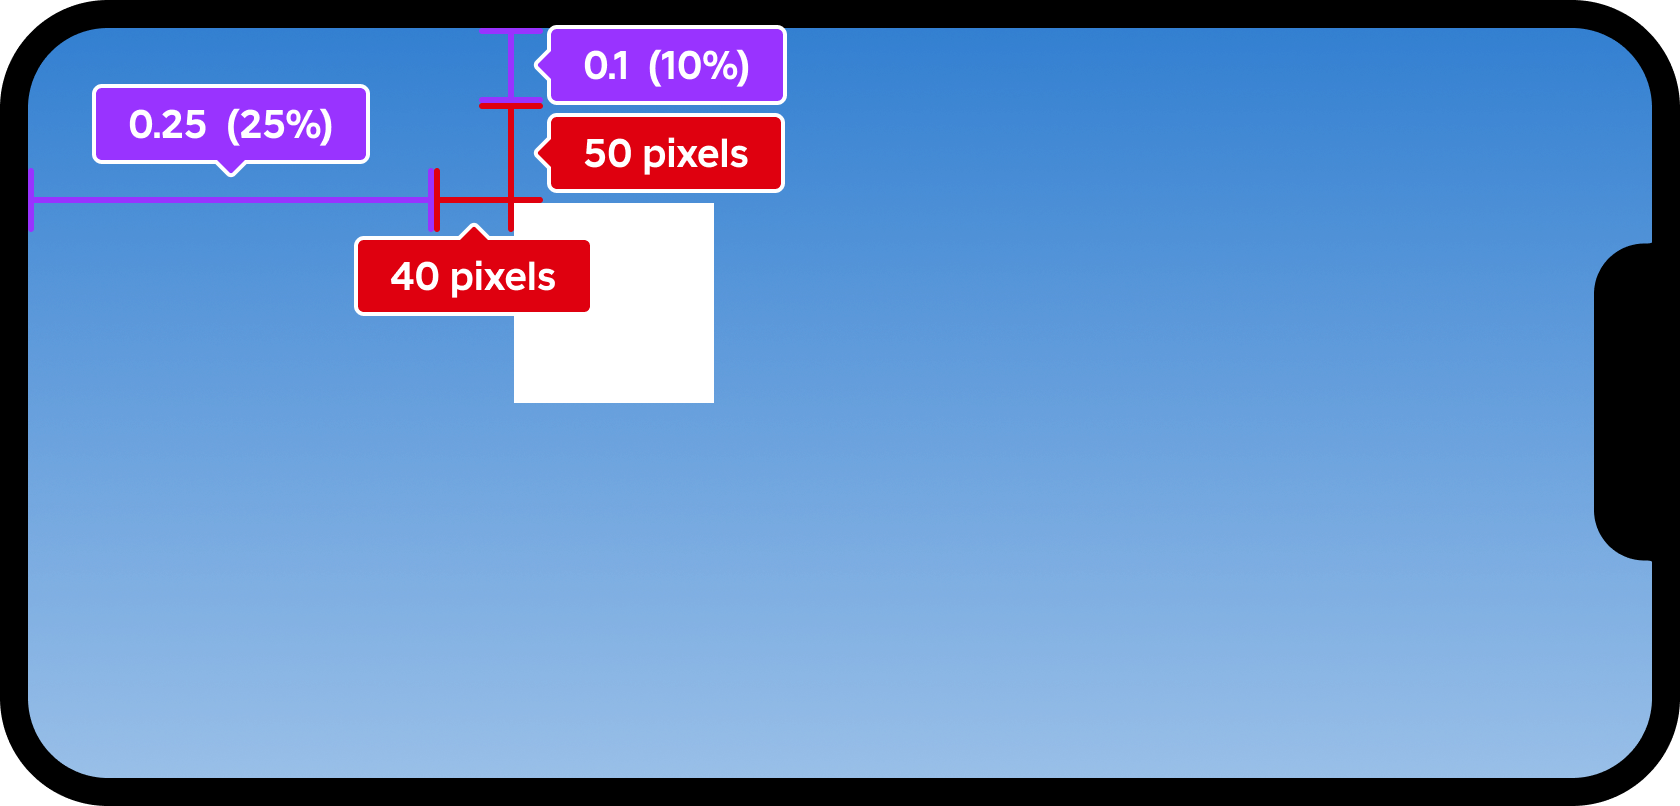
若要將介面對象放置在屏幕容器的右上角,Scale 是最好的方法,因為 X 值的 1 (100%) 代表容器的右邊,無論屏幕的物理像素尺寸如何。相同地,一個 Y 比例值 (0%)代表容器的頂端。
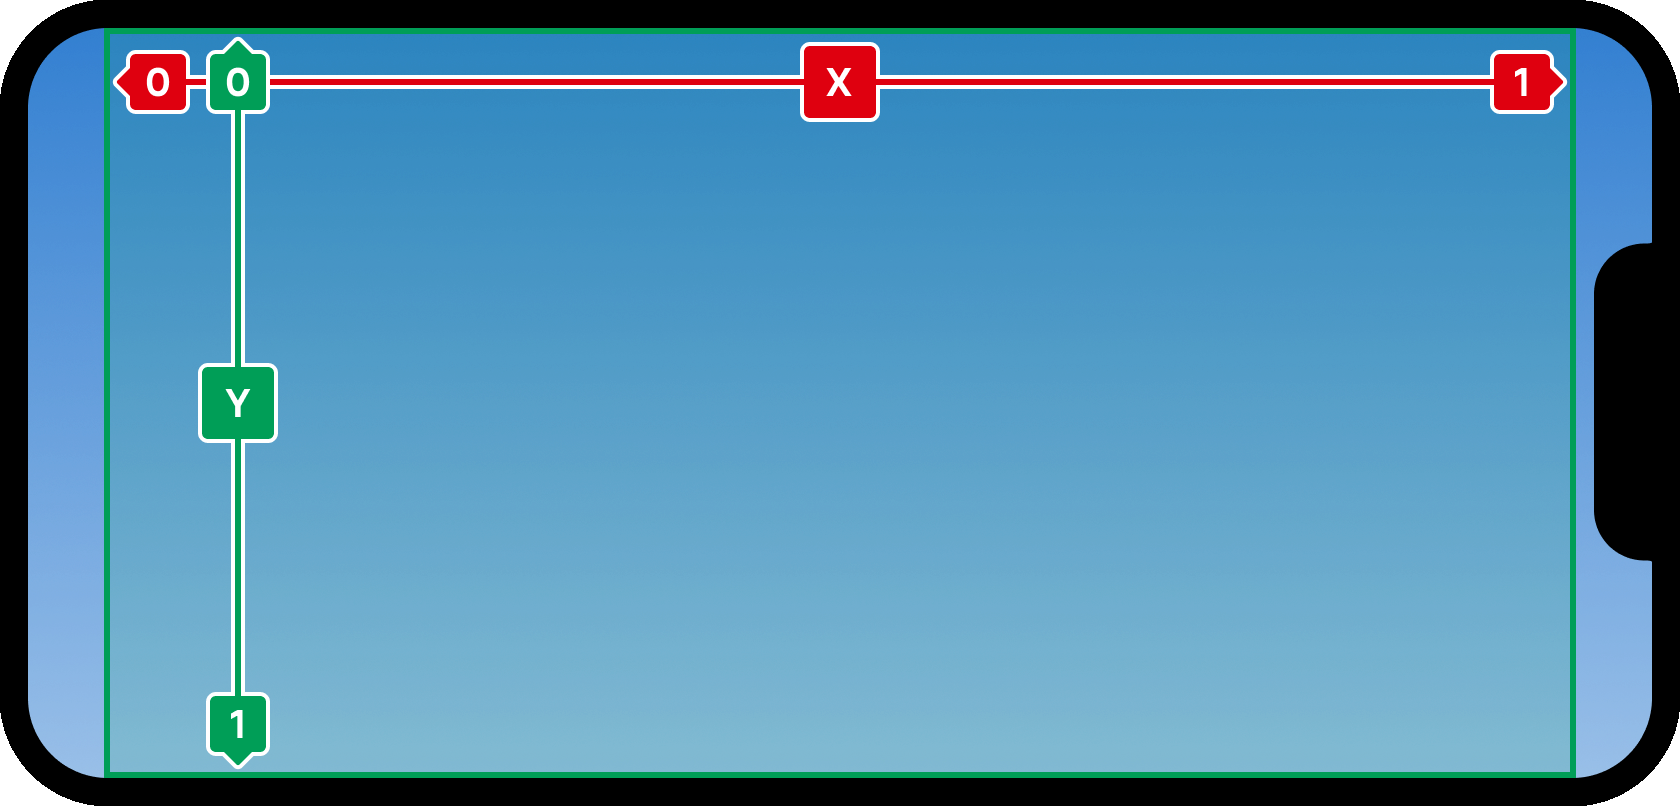
此外,您還需要為父框設置右上角的 錨點,以定義其起點。接受的值在 和 之間,相對於對物件的尺寸,因此 的錨值將框架的錨點放在右上角。

在 導航器 窗口中,選擇您先前插入的 儀表板 框架。

輸入 1, 0 對於 AnchorPoint 屬性。框架現在應該位於 裝置安全區域 的右上角,由於 padding 的結果而略微凹陷到邊緣。

調整框架大小
像位置一樣,UI對象的 代表了包含 和 值的 坐標集,用於代表X和Y軸。
預設情況下,新框的尺寸是 , 即寬度 ( X ) 和高度 ( Y ) 各為 100 個像素。雖然嚴格的像素值在某些情況下有用,但許多用戶介面元素在設為整個畫面容器尺寸的 百分比 時,會在多個畫面上更靈活地縮放。
選擇 儀表板 框,存取 屬性 窗口,並導航到 Size 屬性。
輸入值 0.35, 0, 0.05, 0 來設置 35% 寬、5% 高的百分比尺寸,並無額外的像素偏移。

格式化框架
預設情況下,Frames 會用純白色填滿。最終的健康計數器應該有更暗、稍微不透明的填充,以及黑暗的外部線條,這樣才能在光明和黑暗背景上更好地突出。

選擇 儀表板 框架後,輸入0 對於BackgroundColor3 屬性。工作室會自動將它轉換為RGB值的值。
輸入 0.75 對於 BackgroundTransparency 屬性。在 Roblox 中,透明度從 0 完全不透明到 1 完全透明,因此 0.75 在其他應用程式,例如 Figma 或 Photoshop,的透明度為 25%。

要完成計量框的外觀設計,您可以將角落輪到形成"pill"形狀而不是鋒利的長方形。
將 UICorner 實例插入 儀表板 框架。

選擇新的 UICorner 後,將 CornerRadius 設為 0.5, 0 。使用 比例尺 值 (50%) 而不是像素值,特別適合用於計量條,因為它確保容器無論多高或多寬,都能保持完全圓潤的曲線。

創建內部填充
現在健康計量表的框架已完成,您可以添加 內部填充 部分來代表角色的變量健康。因為只需要是填充實體區域,所以父框內的子兒區 Frame 很適合。
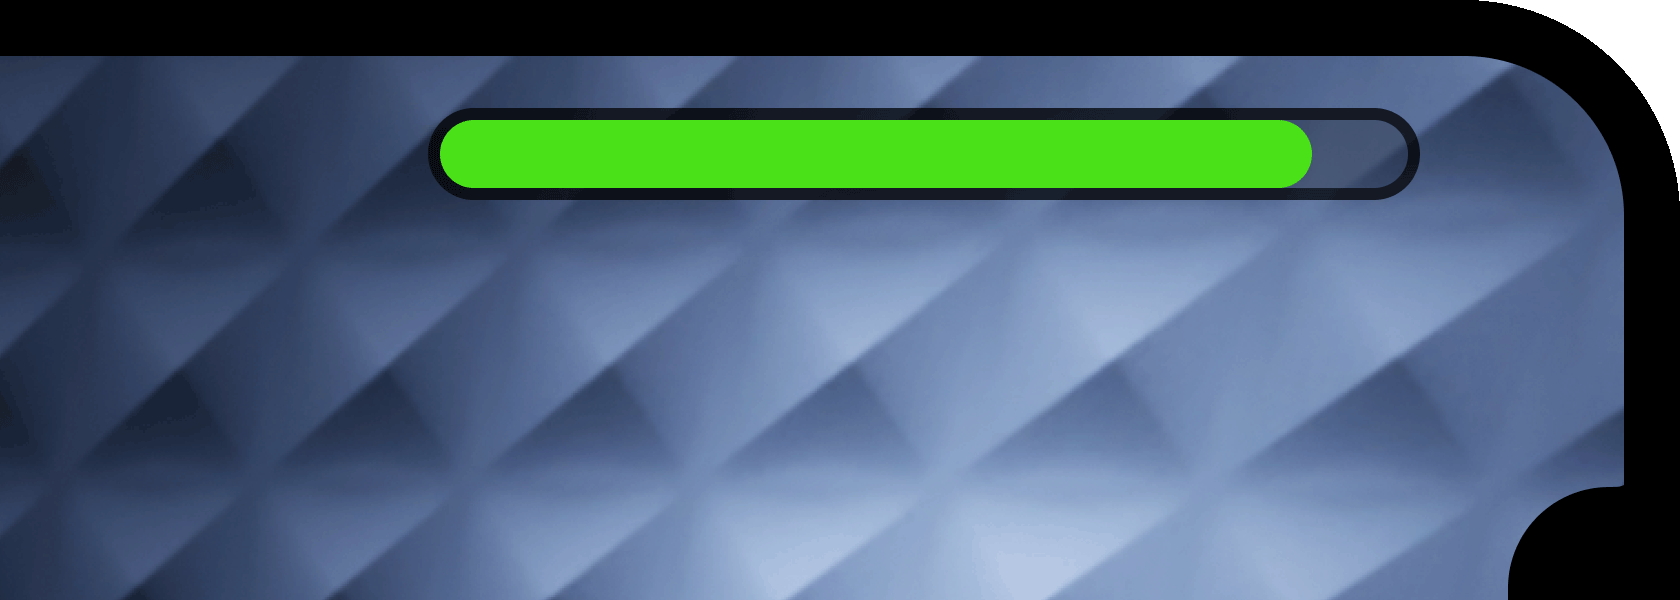
插入兒子 Frame 到 儀表板 框架中。
將新框架實例重命名為 內部填充 。

選擇 內部填充 ,設定以下屬性:
- AnchorPoint = 0, 0.5 (左邊和垂直中心)
- Position = 0, 0, 0.5, 0
- Size = 1, 0, 1, 0
因為框架的子框定位和尺寸與其父元素框相關,因此使用比例將內框填滿父父元素的全寬和高度,從父父元素的左邊開始。

要匹配父框的「片狀」形狀,請在 內填充 中插入額外的 UICorner 。

選擇了新的 修改器,將其 屬性設為 匹配父 儀表板 框的 "pill" 形狀。

為了更好地代表完整的計量表表示良好的健康狀況,請選擇 內部填充 並將其 屬性設為 (在稍後的任務中,您將 腳本 這種顏色以根據實際健康狀況進行更改)。

添加圖示
為了更清楚地指示計量表的目的,您可以在左側添加 圖像標籤,在這個例子中是一個常用來象徵生命或健康的紅色心。
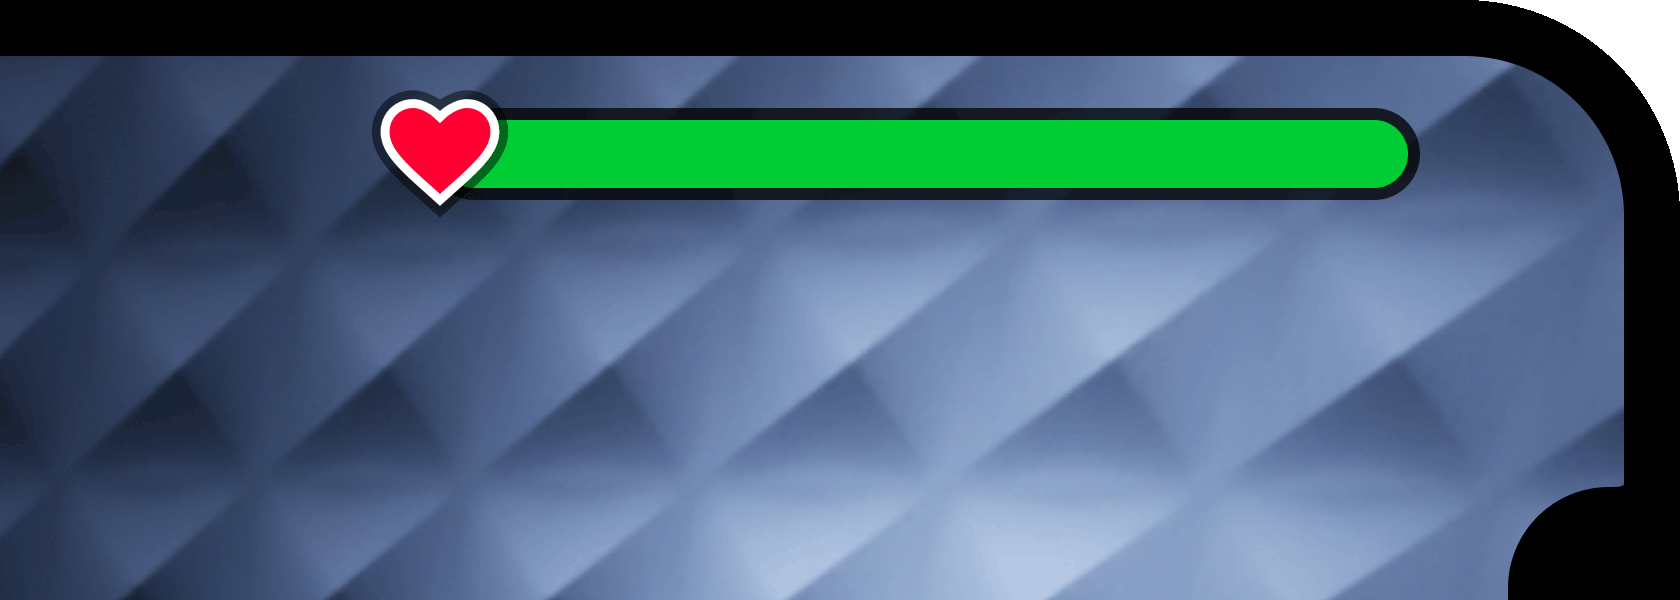
將 ImageLabel 插入到 儀表板 框中。這個對象讓你能夠應用已上傳到 Roblox 的 2D 圖像資產作為貼花。
將新標籤實例重命名為 圖示 。

選擇 圖示 後,將其 ZIndex 屬性設為 2。雖然新插入的使用者介面對象總是排在之前插入的對象之前,但這項變更確保圖示總是顯示在儀表框元素之前。

為了確保圖示 ImageLabel 始終保持 1:1 長寬比,請插入 UIAspectRatioConstraint 。雖然這個 限制 有可自訂的屬性來控制長寬比,但您可以保留其預設值完整。

選擇 圖示 後,通過變更下列屬性來完成外觀和位置:
- AnchorPoint = 0.5, 0.5 (中心固定)
- BackgroundTransparency = 1 (100% 透明)
- Position = 0, 0, 0.5, 0 (計量表的左側和垂直中心)

限制尺寸
雖然一個 比例高度 的 0.05 (5%) 在現代手機螢幕和遊戲監視器上看起來很不錯,但表盤在平板電腦螢幕和較舊的手機上看起來可能稍微太高了。您可以透過模擬平板電腦,例如 iPad 第七代 從 裝置模擬器 來檢查這一點。

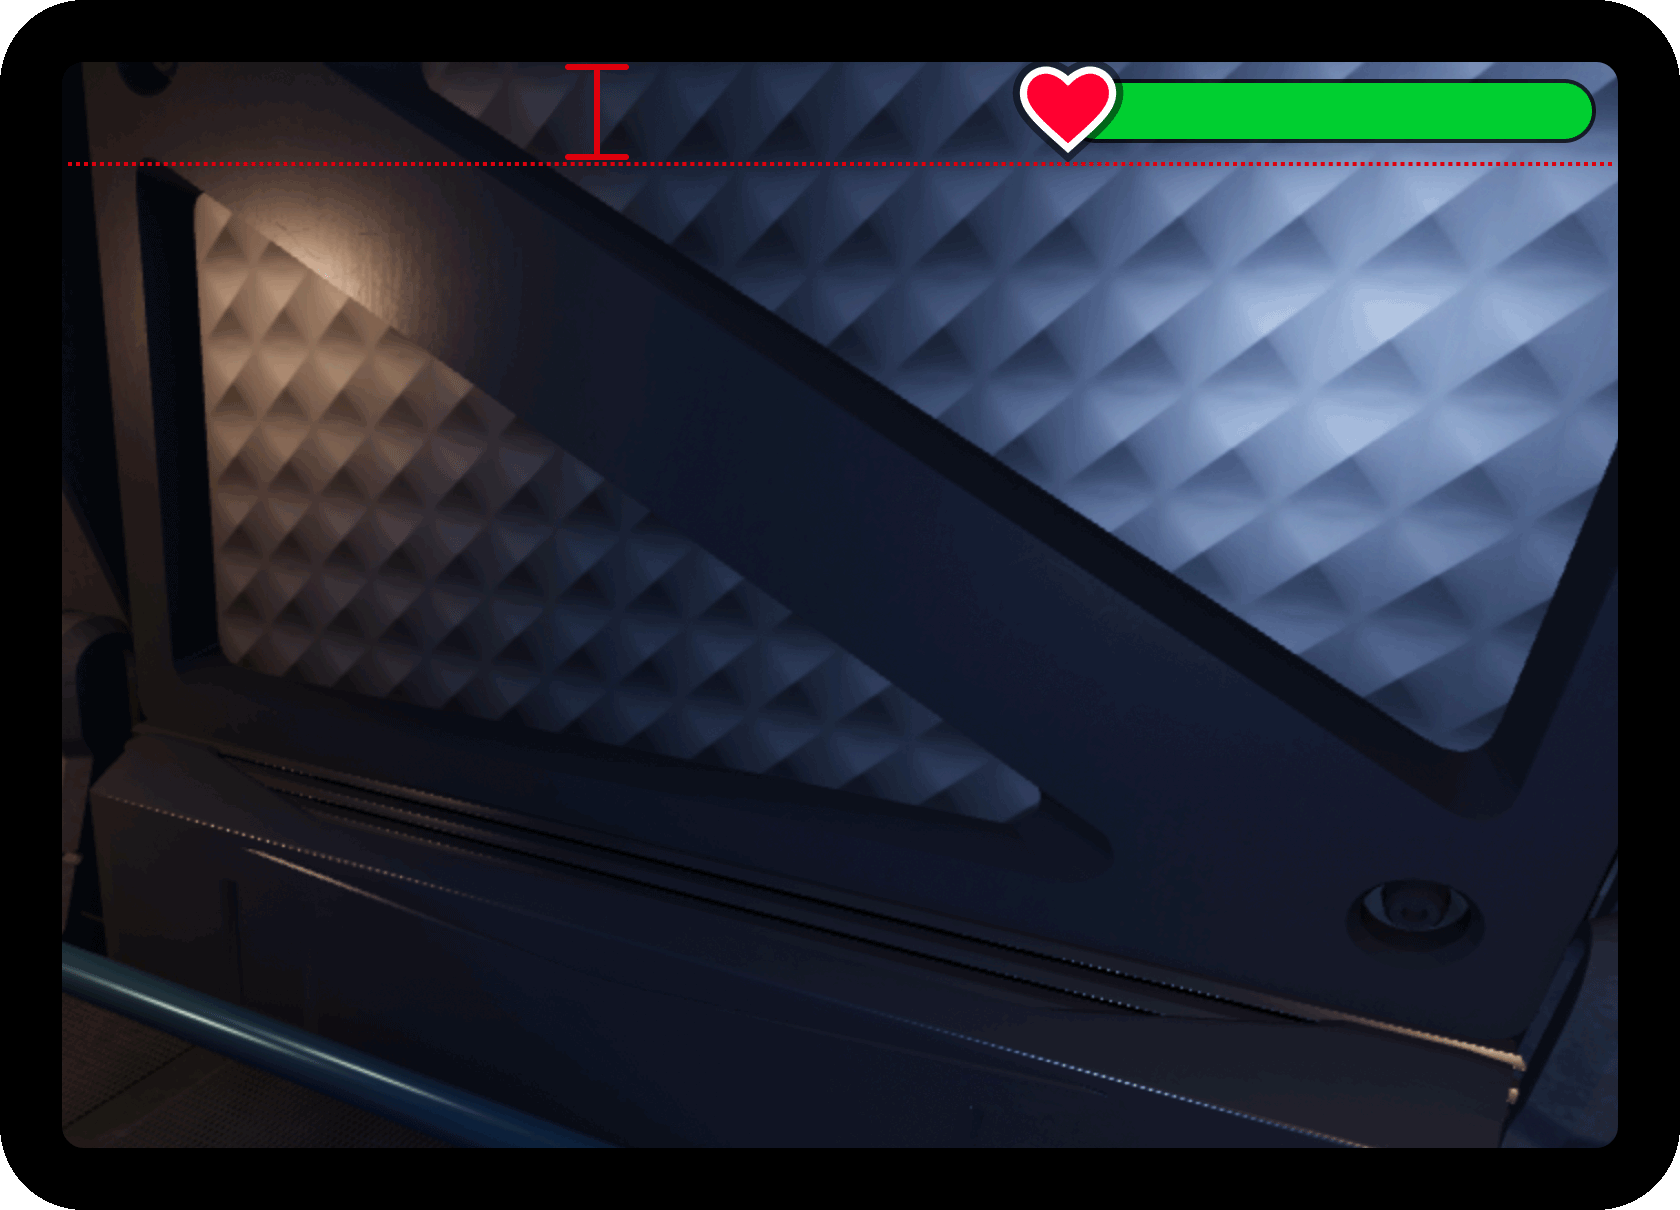
為了使計量棒的高度更一致地與更寬的螢幕,您可以應用 UISizeConstraint 來限制最大像素高度。
插入 UISizeConstraint 到 儀表板 框架中。

選擇新限制後,將其 屬性設為 來限制高度為 20 像素,同時不限制寬度。

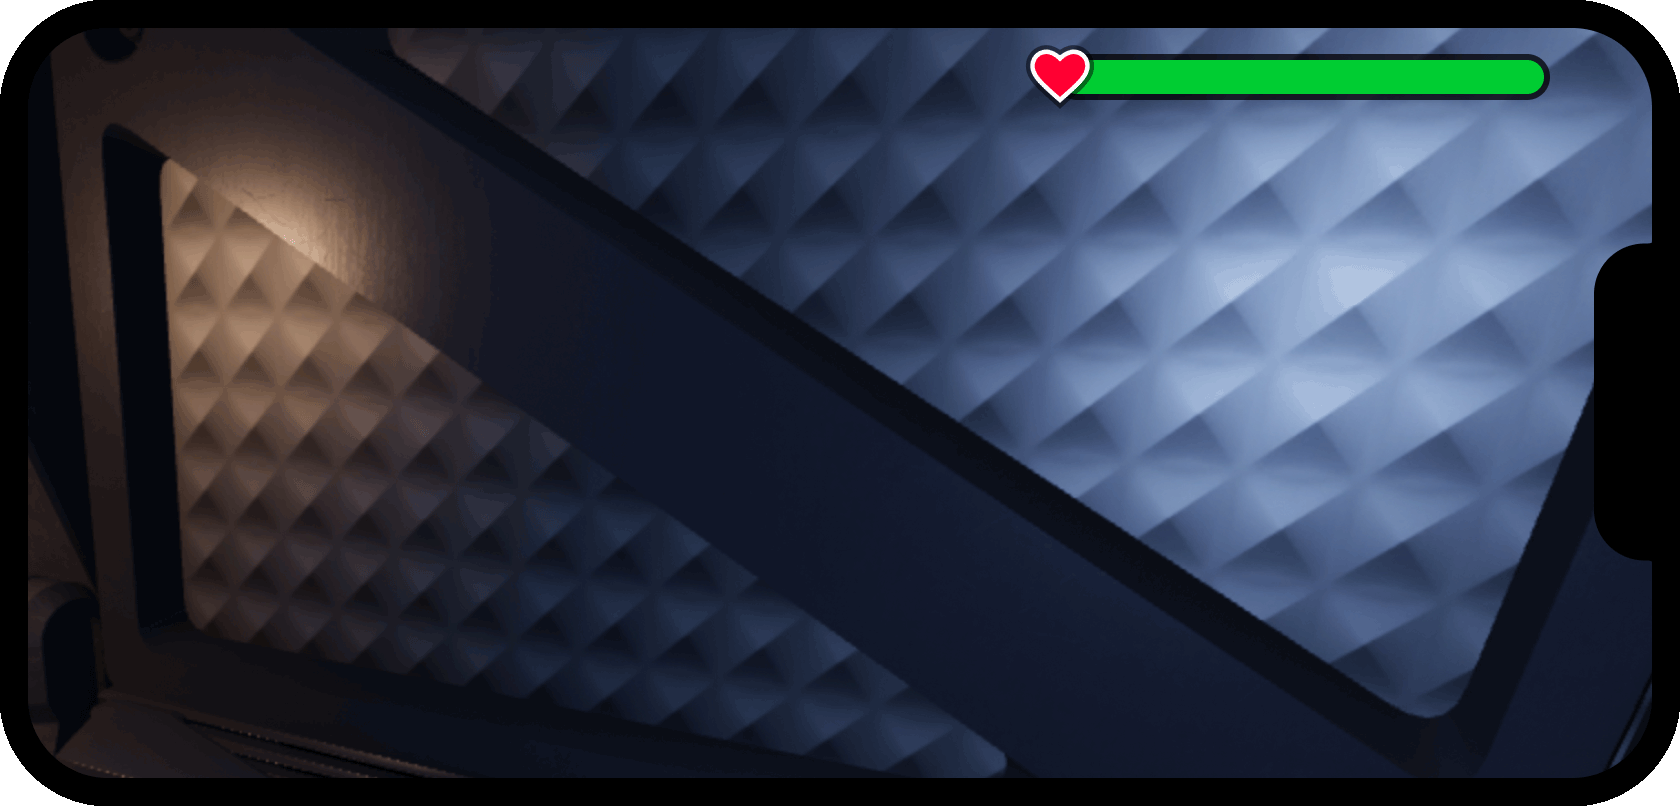
現在,儀表條維持更一致的高度,在更寬和更高的螢幕之間。
取代預設健康計量器
Roblox 體驗包括一個預設生命值計量單位,當角色受到傷害時會顯示。如果您保留預設計量表可見,它將重複並可能覆蓋自訂計量表。
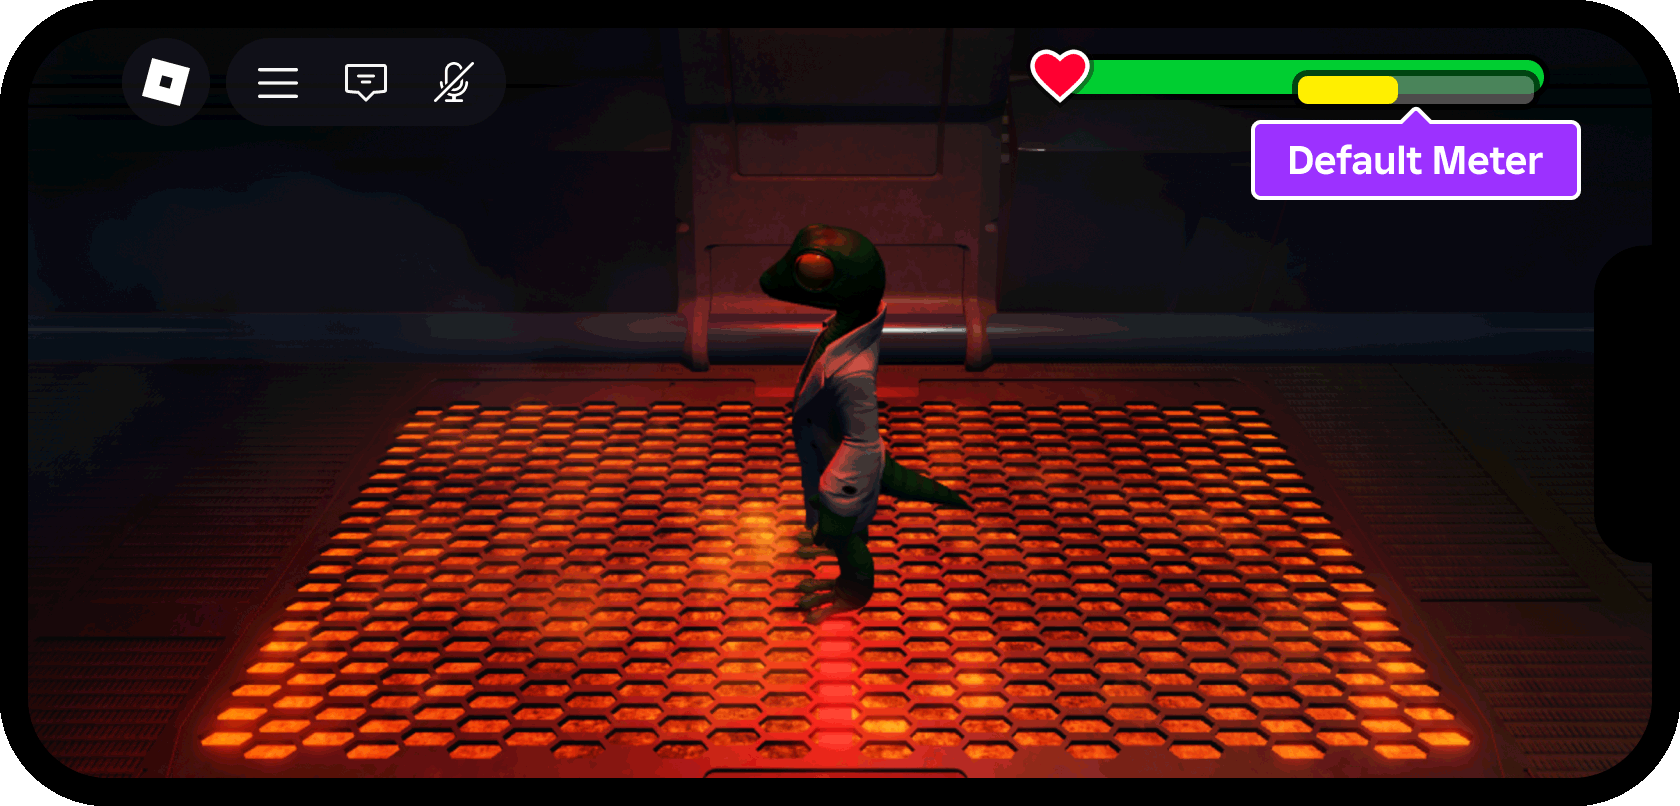
停用預設計量表
若要停用預設狀態計量器,您將使用 客戶端腳本 ( LocalScript ) 內的 StarterPlayerScripts 來呼叫 StarterGui:SetCoreGuiEnabled() 。
在 勘探者 視窗中,擴展 StarterPlayer 容器,並在其中找到 StarterPlayerScripts 容器。

插入新的 LocalScript 到容器中,並將名稱重新命名為 隱藏預設健康計量器 來描述其用途。當地玩家加入體驗時,StarterPlayerScripts腳本會自動運行,使其成為永久隱藏默認計量器的理想容器。

當您插入新的腳指令碼時,它會自動在新的腳本編輯器標籤中打開(如果沒有,請在 檢索器 視窗中雙擊腳本)。
在 隱藏預設健康監視器 指令碼本內貼上以下代碼:
隱藏預設健康監視器local StarterGui = game:GetService("StarterGui")-- 隱藏預設健康計量器StarterGui:SetCoreGuiEnabled(Enum.CoreGuiType.Health, false)代碼說明線 目的 1 獲得核心服務的參考,StarterGui,代表你創建了自定義健康計量器的同一容器,其內容複製到每個加入體驗的玩家的PlayerGui中。 4 呼叫服務的 SetCoreGuiEnabled() 方法並指示默認健康計數器被禁用(false)。
如果你現在玩測體驗並受到傷害,你會注意到默認計量器已停用且隱藏(你將腦力寫入自訂計量器來在下一個部分反映健康變化 )。

聆聽健康變更
所有預設 Roblox 角色模型都包含 Humanoid 類別,提供給角色特殊的行為和功能,例如設置其步行/跑步速度和管理其健康狀況。Health 變更在伺服器上 複製 給每個玩家的客戶端,您可以偵測這些變更來更新兩者的尺寸和顏色自訂健康計量器。
在 勘探者 視窗中,在 StarterCharacterScripts 內找到容器 StarterPlayer 。

插入新的 LocalScript 到容器中,並將名稱重新命名為 更新客戶端測量器 來描述其用途。在 StarterCharacterScripts 內的腳本每次玩家角色生成時自動運行,使其成為理想的容器,可以執行完全重置每次重生的生命計量的腳本。

在 UpdateCustomMeter 指令碼本的編輯器窗口中,貼上以下代碼:
更新自訂計量器local Players = game:GetService("Players")-- 參考本地玩家、角色和人形local player = Players.LocalPlayerlocal character = player.Characterlocal humanoid = character:WaitForChild("Humanoid")-- 參考計量棒內部框架local playerGui = player:WaitForChild("PlayerGui")local meterBarInner = playerGui.HUDContainer.MeterBar.InnerFill-- 傾斜順序顏色(紅、橙、黃、藍綠、綠)local gradient = {Color3.fromRGB(225, 50, 0),Color3.fromRGB(255, 100, 0),Color3.fromRGB(255, 200, 0),Color3.fromRGB(150, 225, 0),Color3.fromRGB(0, 225, 50)}-- 從小數點取得渐變順序中的顏色的功能local function getColorFromSequence(fraction: number): Color3-- 每種顏色在傾斜中定義了區段的開始和/或結束local numSections = #gradient - 1-- 每個部分代表 1 的一部分local sectionSize = 1 / numSections-- 確定要求的分數屬於哪個部分local sectionStartIndex = 1 + math.clamp(fraction, 0, 1) // sectionSize-- 在區段的開始和結束獲得顏色local sectionColorStart = gradient[sectionStartIndex]local sectionColorEnd = gradient[sectionStartIndex + 1] or sectionColorStart-- 將小數正常化為區段內的 0 到 1 數字local fractionOfSection = math.clamp(fraction, 0, 1) % sectionSize / sectionSize-- 基於正常化百分比的開始和結束之間的 Lerpreturn sectionColorStart:Lerp(sectionColorEnd, fractionOfSection)endlocal function onHealthChanged()-- 計算新的生命值為最大值的百分比local healthFraction = math.max(0, humanoid.Health / humanoid.MaxHealth)-- 將條設為新的尺寸/顏色目標meterBarInner.Size = UDim2.new(healthFraction, 0, 1, 0)meterBarInner.BackgroundColor3 = getColorFromSequence(healthFraction)end-- 聆聽關於人形健康的變化humanoid.HealthChanged:Connect(onHealthChanged)-- 初始設定 (或重置) 條形圖尺寸/顏色到當前健康狀況onHealthChanged()代碼說明線 目的 4 ‑ 6 獲得本地 Player 的參考、其 Character 模型和其中的 Humanoid 類。 9 ‑ 10 獲得計量器的 內部填充 對象的參考,該對象必須縮放並重新上色,以適應角色的生命狀況變化。 13 ‑ 19 宣言一個由五個顏色組成的陣列(紅色、橙色、黃色、藍綠色、綠色)來重新上色計量器在各個點;例如,綠色為 100% 生命值、黃色為 50%、紅色為 0% 或在鑰匙點之間的任何比例的混合。 22 ‑ 41 返回任何傾向顏色關鍵點之間的顏色混合功能的助手。 43 ‑ 50 處理任何健康變更的功能。在這裡,它會計算新的生命值為字元的 MaxHealth 百分比,將 內部填充 縮放到該百分比比例,並將其重新上色為從 getColorFromSequence() 函數返回的顏色。 53 主要事件連線,可偵測從伺服器複製的Health,並呼叫onHealthChanged()。 56 最初(在角色生成或重生時)會呼叫 onHealthChanged() 函數將 內部填充 縮放到正確百分比。通常這會是全寬度和綠色。
如果你現在玩測體驗,你會注意到當角色受到傷害時,自訂計量器正確地更新尺寸和顏色:
動畫計量棒
若要為自訂計量器新增一個額外的波蘭語水平,您可以透過 減緩 動畫,逐漸變更計量器條的尺寸和顏色超過 ½ 秒。
存取以前編輯的 UpdateCustomMeter 腳本的腳本編輯器標籤。
選擇所有線 ( Ctrl A 或 ⌘ A ) 然後貼上它們 ( Ctrl V 或 ⌘ V ) 以下代碼:
更新自訂計量器local Players = game:GetService("Players")local TweenService = game:GetService("TweenService")-- 參考本地玩家、角色和人形local player = Players.LocalPlayerlocal character = player.Characterlocal humanoid = character:WaitForChild("Humanoid")-- 過渡屬性local tweenInfo = TweenInfo.new(0.5, Enum.EasingStyle.Exponential, Enum.EasingDirection.Out)-- 參考計量棒內部框架local playerGui = player:WaitForChild("PlayerGui")local meterBarInner = playerGui.HUDContainer.MeterBar.InnerFill-- 傾斜順序顏色(紅、橙、黃、藍綠、綠)local gradient = {Color3.fromRGB(225, 50, 0),Color3.fromRGB(255, 100, 0),Color3.fromRGB(255, 200, 0),Color3.fromRGB(150, 225, 0),Color3.fromRGB(0, 225, 50)}-- 從小數點取得渐變順序中的顏色的功能local function getColorFromSequence(fraction: number): Color3-- 每種顏色在傾斜中定義了區段的開始和/或結束local numSections = #gradient - 1-- 每個部分代表 1 的一部分local sectionSize = 1 / numSections-- 確定要求的分數屬於哪個部分local sectionStartIndex = 1 + math.clamp(fraction, 0, 1) // sectionSize-- 在區段的開始和結束獲得顏色local sectionColorStart = gradient[sectionStartIndex]local sectionColorEnd = gradient[sectionStartIndex + 1] or sectionColorStart-- 將小數正常化為區段內的 0 到 1 數字local fractionOfSection = math.clamp(fraction, 0, 1) % sectionSize / sectionSize-- 基於正常化百分比的開始和結束之間的 Lerpreturn sectionColorStart:Lerp(sectionColorEnd, fractionOfSection)endlocal function onHealthChanged()-- 計算新的生命值為最大值的百分比local healthFraction = math.max(0, humanoid.Health / humanoid.MaxHealth)-- 將條移至新的尺寸/顏色目標local tweenGoal = {Size = UDim2.new(healthFraction, 0, 1, 0),BackgroundColor3 = getColorFromSequence(healthFraction)}local meterBarTween = TweenService:Create(meterBarInner, tweenInfo, tweenGoal)meterBarTween:Play()end-- 聆聽關於人形健康的變化humanoid.HealthChanged:Connect(onHealthChanged)-- 初始設定 (或重置) 條形圖尺寸/顏色到當前健康狀況onHealthChanged()鑰匙添加/變更線 目的 2 獲得 TweenService 的參考以在腳指令碼中實現減少功能。 10 創建一個 TweenInfo 建造者,定義預期的青少年持續時間、放鬆風格 和放鬆方向。 52 ‑ 57 而不是單純設置條的尺寸和顏色如在 以前版本 中,宣言一個具有目標尺寸/顏色的 tweenGoal 表,使用 tweenInfo 和 tweenGoal 參數創建一個新的漸變,並播放新的補間動畫。
如果您現在玩測體驗,您會注意到每次變更生命值之間的自訂計量槽:
添加傷害效果
預設健康計量系統包括當字元受損時,在屏幕邊緣出現淺紅色濾鏡。通過 停用預設計量表,此效果將被移除,但您可以用自己的實現來替換它。
存取以前編輯的 UpdateCustomMeter 腳本的腳本編輯器標籤。
選擇所有行並使用以下代碼貼上它們:
更新自訂計量器local Workspace = game:GetService("Workspace")local Players = game:GetService("Players")local TweenService = game:GetService("TweenService")-- 參考本地玩家、角色和人形local player = Players.LocalPlayerlocal character = player.Characterlocal humanoid = character:WaitForChild("Humanoid")-- 過渡屬性local tweenInfo = TweenInfo.new(0.5, Enum.EasingStyle.Exponential, Enum.EasingDirection.Out)-- 變量以儲存/緩存角色健康狀況local cachedHealth = humanoid.Health / humanoid.MaxHealth-- 在玩家攝影機內獲得(或創建新)顏色修正效果local colorCorrection = Workspace.CurrentCamera:FindFirstChildWhichIsA("ColorCorrectionEffect") or Instance.new("ColorCorrectionEffect", Workspace.CurrentCamera)colorCorrection.Name = "DamageColorEffect"-- 參考計量棒內部框架local playerGui = player:WaitForChild("PlayerGui")local meterBarInner = playerGui.HUDContainer.MeterBar.InnerFill-- 傾斜順序顏色(紅、橙、黃、藍綠、綠)local gradient = {Color3.fromRGB(225, 50, 0),Color3.fromRGB(255, 100, 0),Color3.fromRGB(255, 200, 0),Color3.fromRGB(150, 225, 0),Color3.fromRGB(0, 225, 50)}-- 從小數點取得渐變順序中的顏色的功能local function getColorFromSequence(fraction: number): Color3-- 每種顏色在傾斜中定義了區段的開始和/或結束local numSections = #gradient - 1-- 每個部分代表 1 的一部分local sectionSize = 1 / numSections-- 確定要求的分數屬於哪個部分local sectionStartIndex = 1 + math.clamp(fraction, 0, 1) // sectionSize-- 在區段的開始和結束獲得顏色local sectionColorStart = gradient[sectionStartIndex]local sectionColorEnd = gradient[sectionStartIndex + 1] or sectionColorStart-- 將小數正常化為區段內的 0 到 1 數字local fractionOfSection = math.clamp(fraction, 0, 1) % sectionSize / sectionSize-- 基於正常化百分比的開始和結束之間的 Lerpreturn sectionColorStart:Lerp(sectionColorEnd, fractionOfSection)endlocal function onHealthChanged()-- 計算新的生命值為最大值的百分比local healthFraction = math.max(0, humanoid.Health / humanoid.MaxHealth)-- 將條移至新的尺寸/顏色目標local tweenGoal = {Size = UDim2.new(healthFraction, 0, 1, 0),BackgroundColor3 = getColorFromSequence(healthFraction)}local meterBarTween = TweenService:Create(meterBarInner, tweenInfo, tweenGoal)meterBarTween:Play()-- 如果新生命值低於緩存生命值,顯示傷害效果if healthFraction < cachedHealth then-- 儲存新的生命值cachedHealth = healthFraction-- 將顏色修正設為紅色,作為減緩過程之前的初始色調colorCorrection.TintColor = Color3.fromRGB(255, 25, 25)colorCorrection.Saturation = 2.5-- 將染色返回白色(中立且沒有染色變化從普通)local colorCorrectionTweenGoal = {TintColor = Color3.fromRGB(255, 255, 255),Saturation = 0}local colorCorrectionTween = TweenService:Create(colorCorrection, tweenInfo, colorCorrectionTweenGoal)colorCorrectionTween:Play()endend-- 聆聽關於人形健康的變化humanoid.HealthChanged:Connect(onHealthChanged)-- 初始設定 (或重置) 條形圖尺寸/顏色到當前健康狀況onHealthChanged()鑰匙添加/變更線 目的 14 設置一個暫時參考(cachedHealth)來跟蹤變更之間的角色生命值數量,以便您可以比較是否有變更(傷害)較低。 17 ‑ 18 在初始角色生成時,創建一個新的 ColorCorrectionEffect 在玩家的當前 Camera 內,或在稍後重生時獲得同一實例的參考。將此 後製效果 傳送到玩家的相機,只適用於他們的本地螢攝影機,不適用於伺服器務器上每個玩家的螢幕。 68 ‑ 83 首先進行條件檢查,確認健康狀況低於 cachedHealth 值,表示損壞;如果是如此,它將 cachedHealth 設置為新值。接下來,它將 染色設為 (紅色)的飽和度更高,然後將染色返回到中立白色的預設值( > )沒有飽和度。
如果你現在玩測體驗,你會注意到每當角色受到傷害時,螢幕會暫時閃爍紅色:


