Trong hoạt hình, tweening là quá trình tạo ra các khung hình trung gian giữa hai điểm chính trong một chuỗi. Khi thiết kế giao diện người dùng, bạn có thể sử dụng tweening để chuyển đổi một GuiObject một cách mượt mà từ trạng thái này sang trạng thái khác, chẳng hạn như:
- Tăng dần kích thước của một nút bấm khi người dùng chọn nó.
- Trượt các menu UI vào và ra từ mép màn hình.
- Hoạt hình dần dần một thanh sức khỏe giữa hai chiều rộng khi người dùng nhận được một sự tăng cường sức khỏe.
Tweens thuộc tính đơn
Vị trí
Để tween vị trí của một GuiObject:
- Đặt AnchorPoint cho đối tượng.
- Chuyển một TweenInfo và vị trí mục tiêu vào TweenService:Create().
- Chơi tween với Tween:Play().
Đoạn mã sau di chuyển một ImageLabel bên trong một ScreenGui đến chính giữa màn hình:
UI Tween - Vị trí
Kích thước
Để tween kích thước của một GuiObject:
- Gắn một UIAspectRatioConstraint vào đối tượng để duy trì tỷ lệ khung hình thiết kế của nó khi tweening.
- Chuyển một TweenInfo và kích thước mục tiêu vào TweenService:Create().
- Chơi tween với Tween:Play().
Đoạn mã sau thay đổi tỉ lệ của một ImageLabel bên trong một ScreenGui thành 40% chiều rộng hoặc chiều cao màn hình (tùy thuộc vào cái nào nhỏ hơn) từ điểm neo trung tâm của đối tượng:
UI Tween - Kích thước
Góc quay
Để tween góc quay của một GuiObject:
- Đặt AnchorPoint cho đối tượng để quay xung quanh.
- Xác định Rotation mục tiêu cho đối tượng.
- Chuyển một TweenInfo và góc quay mục tiêu vào TweenService:Create().
- Chơi tween với Tween:Play().
UI Tween - Kích thước
Độ trong suốt
Nhiều thuộc tính điều khiển độ trong suốt của UI, tùy thuộc vào loại đối tượng. Bạn có thể tween từng thuộc tính này riêng lẻ hoặc kết hợp thông qua một multi-property tween. Ngoài ra, bạn có thể tween độ trong suốt tổng thể của một đối tượng bằng cách đặt nó vào trong một CanvasGroup và tween độ trong suốt của nhóm GroupTransparency.
UI Tween - Độ trong suốt của hình ảnh
UI Tween - Độ trong suốt của Canvas Group
Màu sắc
Nhiều thuộc tính điều khiển màu sắc của UI, tùy thuộc vào loại đối tượng. Bạn có thể tween từng thuộc tính này riêng lẻ hoặc kết hợp thông qua một multi-property tween. Ngoài ra, bạn có thể tween màu sắc tổng thể của một đối tượng bằng cách đặt nó vào trong một CanvasGroup và tween màu sắc của nhóm GroupColor3.
UI Tween - Màu sắc hình ảnh
UI Tween - Màu sắc Canvas Group
Stroke
Nhiều thuộc tính điều khiển viền UI, tùy thuộc vào loại đối tượng.
Ngoài ra, bạn có thể áp dụng một đối tượng con UIStroke và tween độ dày, màu sắc, và/hoặc độ trong suốt của nó.
| Đối tượng UI | Thuộc tính |
|---|---|
| UIStroke | Color, Thickness, Transparency |
UI Tween - Màu sắc & Độ dày UIStroke
Multi-property tweens
Bạn có thể kết hợp bất kỳ tweens thuộc tính đơn nào thành các tweens phức tạp hơn bằng cách chuyển nhiều thuộc tính mục tiêu vào TweenService:Create(), chẳng hạn như vị trí + góc quay hoặc kích thước + độ trong suốt.
UI Tween - Vị trí & Góc quay
UI Tween - Kích thước & Độ trong suốt
Chuỗi Tween
Bạn có thể nối các hoạt hình UI để xảy ra lần lượt bằng cách chơi các tween tiếp theo sau khi sự kiện Completed của tween trước đó. Ví dụ, đoạn mã sau di chuyển một đối tượng đến chính giữa màn hình, sau đó xoay nó 45°.
UI Tween Sequence
local TweenService = game:GetService("TweenService")
local Players = game:GetService("Players")
local PlayerGui = Players.LocalPlayer:WaitForChild("PlayerGui")
local ScreenGui = PlayerGui:WaitForChild("ScreenGui")
local object = ScreenGui:WaitForChild("ImageLabel")
object.AnchorPoint = Vector2.new(0.5, 0.5)
local targetPosition = UDim2.new(0.5, 0, 0.5, 0)
local targetRotation = 45
local tweenInfo = TweenInfo.new(2)
local positionTween = TweenService:Create(object, tweenInfo, {Position = targetPosition})
local rotationTween = TweenService:Create(object, tweenInfo, {Rotation = targetRotation})
-- Ban đầu chơi tween vị trí
positionTween:Play()
-- Chơi tween góc quay khi hoàn thành tween vị trí
positionTween.Completed:Connect(function()
rotationTween:Play()
end)
Chuyển đổi kiểu dáng
Các đối tượng UI cũng có thể được hoạt hình thông qua chuyển đổi kiểu dáng, tương tự như chuyển tiếp CSS, nơi một hoặc nhiều thuộc tính UI được tween thông qua các định nghĩa StyleRule. Xem hướng dẫn Trình biên tập kiểu dáng để biết thêm chi tiết.

Tùy chọn easing
Sử dụng các tùy chọn easing của TweenInfo, bạn có thể điều khiển kiểu và hướng của các hoạt hình UI.
Kiểu
Enum.EasingStyle xác định tỷ lệ nội suy từ bắt đầu đến kết thúc. Theo mặc định, kiểu easing được đặt thành Enum.EasingStyle.Quad.
| Kiểu | Mô tả |
|---|---|
| Đường thẳng | Di chuyển với tốc độ không đổi. |
| Sine | Tốc độ được xác định bởi sóng sine cho một chuyển động easing nhẹ nhàng. |
| Quad | Tương tự như Sine nhưng với một đường cong hơi sắc nét hơn dựa trên nội suy bậc hai. |
| Cubic | Tương tự như Quad nhưng với một đường cong hơi sắc nét hơn dựa trên nội suy bậc ba. |
| Quart | Tương tự như Cubic nhưng với một đường cong sắc nét hơn dựa trên nội suy bậc bốn. |
| Quint | Tương tự như Quart nhưng với một đường cong sắc nét hơn dựa trên nội suy bậc năm. |
| Exponential | Đường cong sắc nét nhất dựa trên nội suy số mũ. |
| Hình tròn | Theo một cung tròn, như vậy mà sự tăng tốc là đột ngột hơn và sự giảm tốc là dần dần hơn so với Quint hoặc Exponential. |
| Quay lại | Đôi khi vượt quá mục tiêu, sau đó trở lại vị trí. |
| Nảy | Nảy ngược nhiều lần sau khi đạt mục tiêu, trước khi cuối cùng ổn định. |
| Đàn hồi | Di chuyển như thể gắn với một sợi dây cao su, vượt quá mục tiêu nhiều lần. |

Kiểu Easing - Bậc ba
Hướng
Enum.EasingDirection xác định cách mà nội suy kiểu easing áp dụng cho một đối tượng, với mặc định là Ra. Lưu ý rằng một tween với kiểu easing Đường thẳng không bị ảnh hưởng, vì nội suy đường thẳng là không đổi từ bắt đầu đến kết thúc.
| Hướng | Mô tả |
|---|---|
| Vào | Kiểu easing áp dụng theo hướng tiến lên. |
| Ra | Kiểu easing áp dụng theo hướng ngược lại. |
| VàoRa | Kiểu easing áp dụng tiến lên trong nửa đầu và ngược lại trong nửa sau. |
Hướng easing - VàoRa
Hiệu ứng nhập văn bản kiểu máy đánh chữ
Bạn có thể dễ dàng nâng cao giao diện UI dựa trên văn bản, chẳng hạn như băng rôn cắt cảnh, hướng dẫn người chơi, và nhắc nhở, với các hiệu ứng hoạt hình. "Hiệu ứng máy đánh chữ" là lý tưởng cho TextLabels kể một câu chuyện, đầu ra các cuộc hội thoại NPC, v.v.
Tạo một ModuleScript mới trong ReplicatedStorage.
Đổi tên script mới thành AnimateUI.
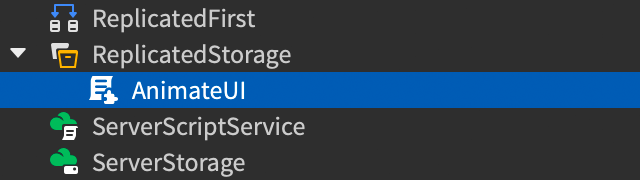
Dán mã sau vào script:
ModuleScript - AnimateUIlocal LocalizationService = game:GetService("LocalizationService")local Players = game:GetService("Players")local SOURCE_LOCALE = "en"local translator = nillocal AnimateUI = {}function AnimateUI.loadTranslator()pcall(function()translator = LocalizationService:GetTranslatorForPlayerAsync(Players.LocalPlayer)end)if not translator thenpcall(function()translator = LocalizationService:GetTranslatorForLocaleAsync(SOURCE_LOCALE)end)endendfunction AnimateUI.typeWrite(guiObject, text, delayBetweenChars)guiObject.Visible = trueguiObject.AutoLocalize = falselocal displayText = text-- Dịch văn bản nếu có thểif translator thendisplayText = translator:Translate(guiObject, text)end-- Thay thế các thẻ ngắt dòng để vòng lặp grapheme không bị mất các ký tự đódisplayText = displayText:gsub("<br%s*/>", "\n")-- Loại bỏ các thẻ RichText vì hoạt hình ký tự theo ký tự sẽ làm hỏng các thẻdisplayText = displayText:gsub("<[^<>]->", "")-- Đặt văn bản đã dịch/sửa đổi vào chaguiObject.Text = displayTextlocal index = 0for first, last in utf8.graphemes(displayText) doindex += 1guiObject.MaxVisibleGraphemes = indextask.wait(delayBetweenChars)endendreturn AnimateUITạo một TextLabel ở một vị trí phù hợp, chẳng hạn như trong một ScreenGui parented đến StarterGui.
Chèn một LocalScript mới làm con trực tiếp của nhãn và dán mã sau. Lưu ý rằng mỗi thông điệp được xuất bằng cách gọi AnimateUI.typeWrite() với các tham số cho đối tượng cha, chuỗi để xuất và độ trễ giữa các ký tự.
LocalScriptlocal ReplicatedStorage = game:GetService("ReplicatedStorage")local AnimateUI = require(ReplicatedStorage:WaitForChild("AnimateUI"))local label = script.Parent-- Tải bộ dịch nếu trải nghiệm được địa phương hóa--AnimateUI.loadTranslator()local message1 = [[Cánh cửa này dẫn đến <br /><font size="46" color="rgb(255,50,25)">Great Zorgoth...</font> <font size="40">🗡</font>]]AnimateUI.typeWrite(label, message1, 0.05)task.wait(1)local message2 = [[...người cai trị ngục này <font color="rgb(255,200,50)">không thể địch!</font> <font size="30">😈</font>]]AnimateUI.typeWrite(label, message2, 0.05)
