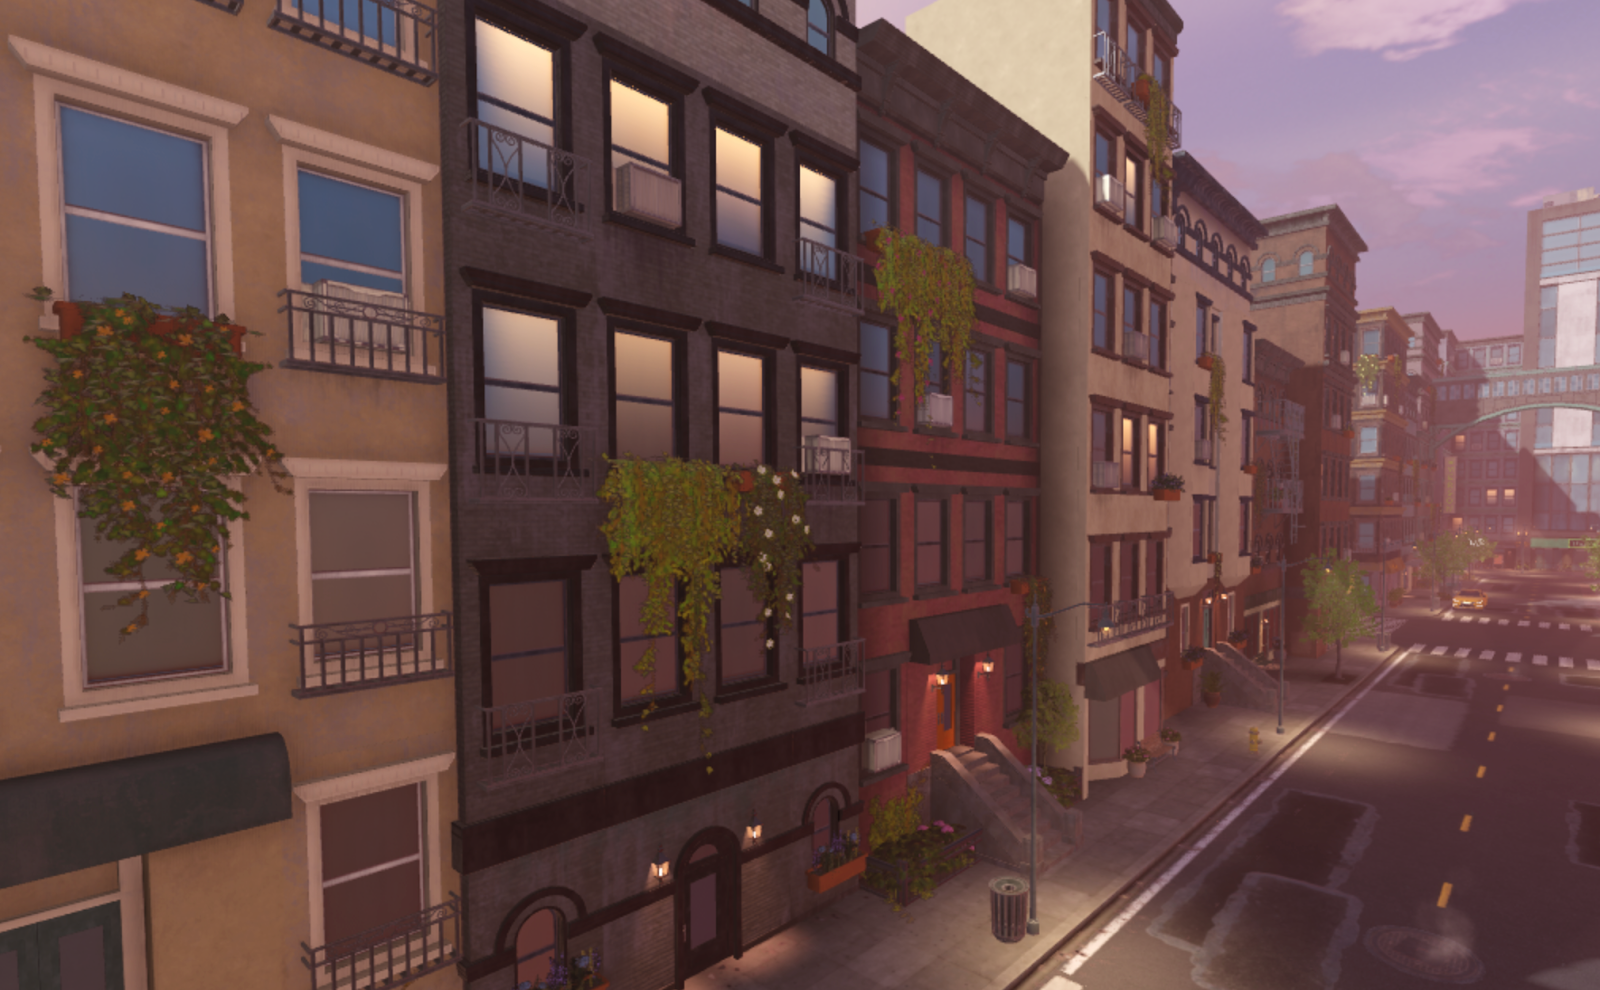
A modular environment is a 3D space made up of reusable assets that seamlessly snap together in numerous configurations to create variations of a larger complex object. For example, Studio's Modern City template is a modular environment that utilizes reusable walls, windows, and doors from both a modular building kit and materials pack to create building variations that comprise an entire downtown area.
Assembling modular environments is useful because it means you don't need to manually create each individual asset in your experience. Instead, you only need to create a few assets that you can reuse and customize to create variety throughout the scene. Not only does this process significantly speed up how quickly you can build large environments, but it can also help each distinct object feel cohesive within your experience.
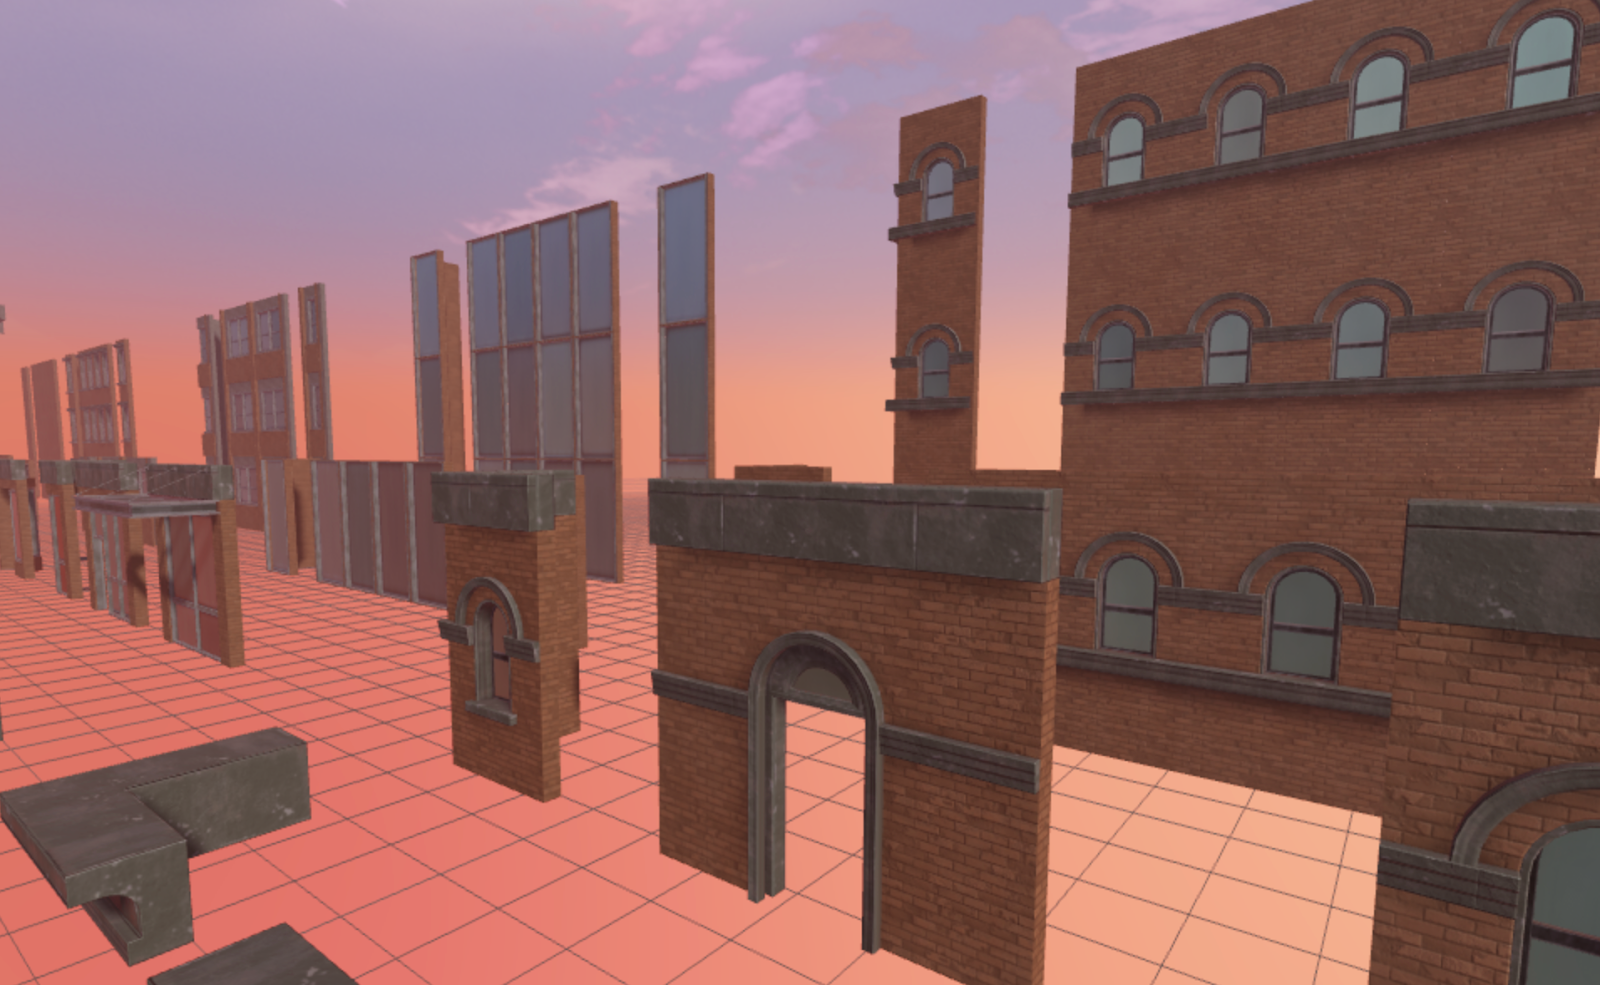
Using the same modular building kit pieces that built Studio's Modern City template, this guide walks you through the importance of consistent pivot point locations in order for modular assets to align and snap together, shows you how to combine modular assets to create a realistic building, and demonstrates how to customize modular assets to create variety within your environment.
The importance of consistent pivot point locations
Every object in Studio moves and rotates according to the location of its pivot point. By default, parts and meshes start with a pivot point location in the center of the object, so when you move them, they move from the center of the object outwards. The default pivot point location is useful for having symmetrical scaling and rotation, but it becomes problematic when you want to snap together objects of varying shapes in a predictable and uniform way.
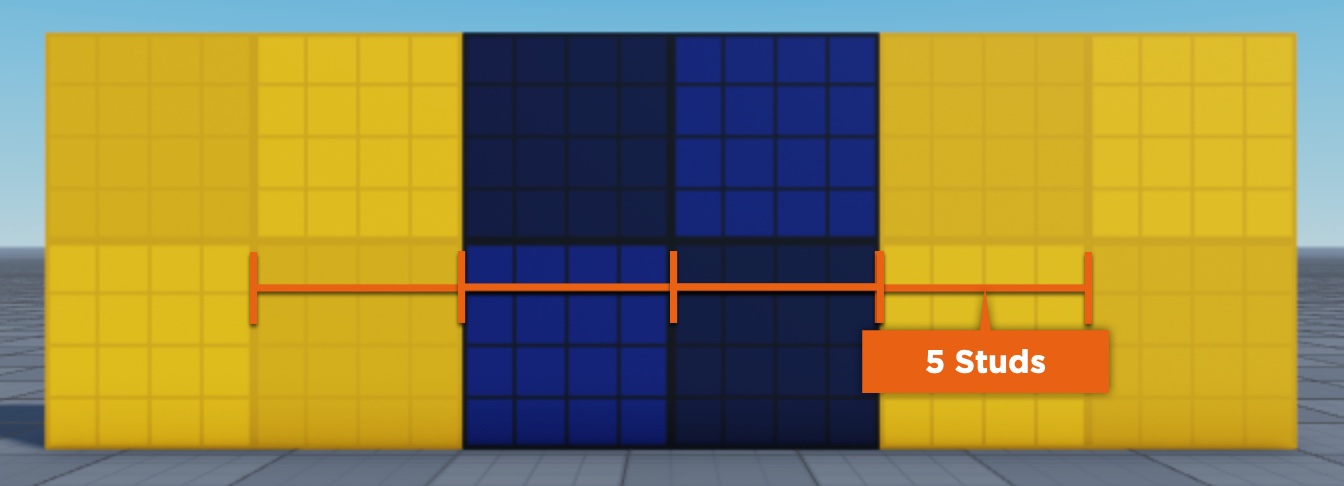
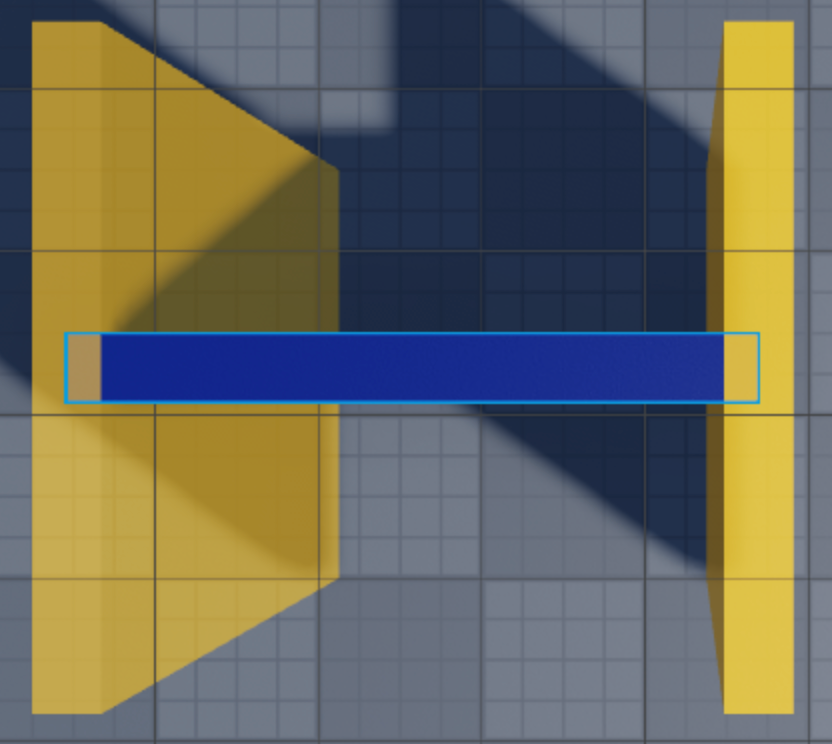
For example, the following two parts both have a size value of [10, 10, 1] and keep their default pivot point locations. If you move the yellow part in increments of 5 studs on the X axis, it moves from its center to its edge, and is easily able to align and snap to either side of the blue part.
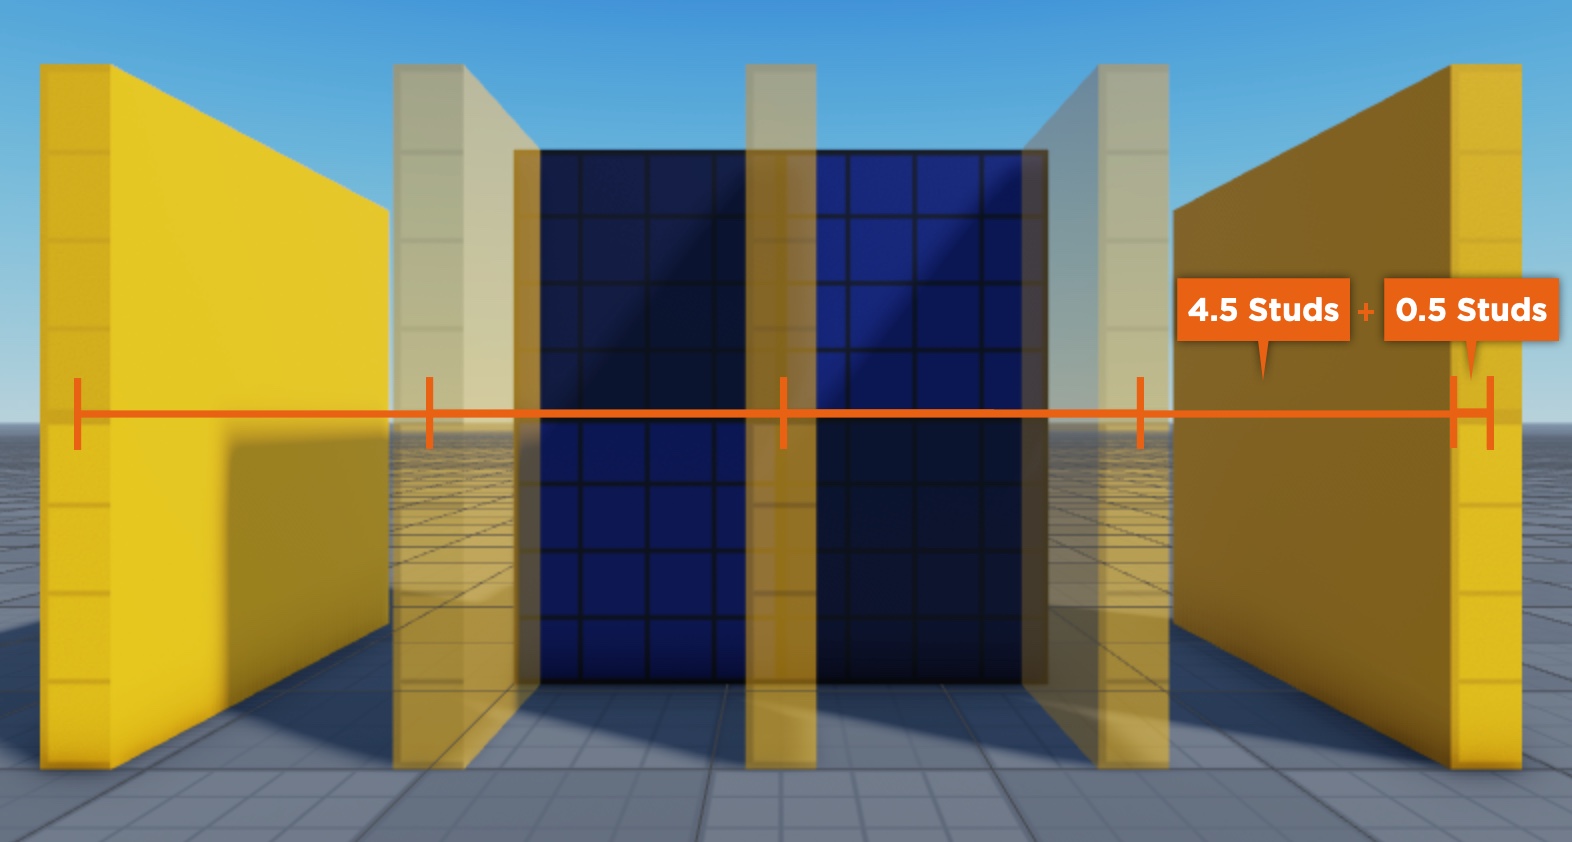
However, if you rotate the yellow part and continue to move it in increments of 5 studs on the X axis, it cannot align and snap to either side of the blue part. This is because the width of the yellow part is now one stud, so when it moves 5 studs from its center, it moves 0.5 studs from the center + 4.5 studs on the world grid, resulting in 0.5 studs of overlap on either side of the blue part.
If you want to align them again, you could change the stud increment movement value or manually adjust the position until they're aligned, but this process quickly becomes tedious and unsustainable, especially when you need to apply it for many objects of differing sizes, unique pivot point locations, or complex geometry, such as meshes you create in third-party modeling tools.
This is why having a consistent pivot location for modular assets is of vital importance so they can connect together at predetermined, incremental distances relative to one another when you enable grid snapping. For example, each mesh in the Modern City sample modular building kit has a minimum length of 7.5 studs and a maximum length that's divisible by 7.5 studs so every mesh can seamlessly align and connect without overlap even when you rotate them.
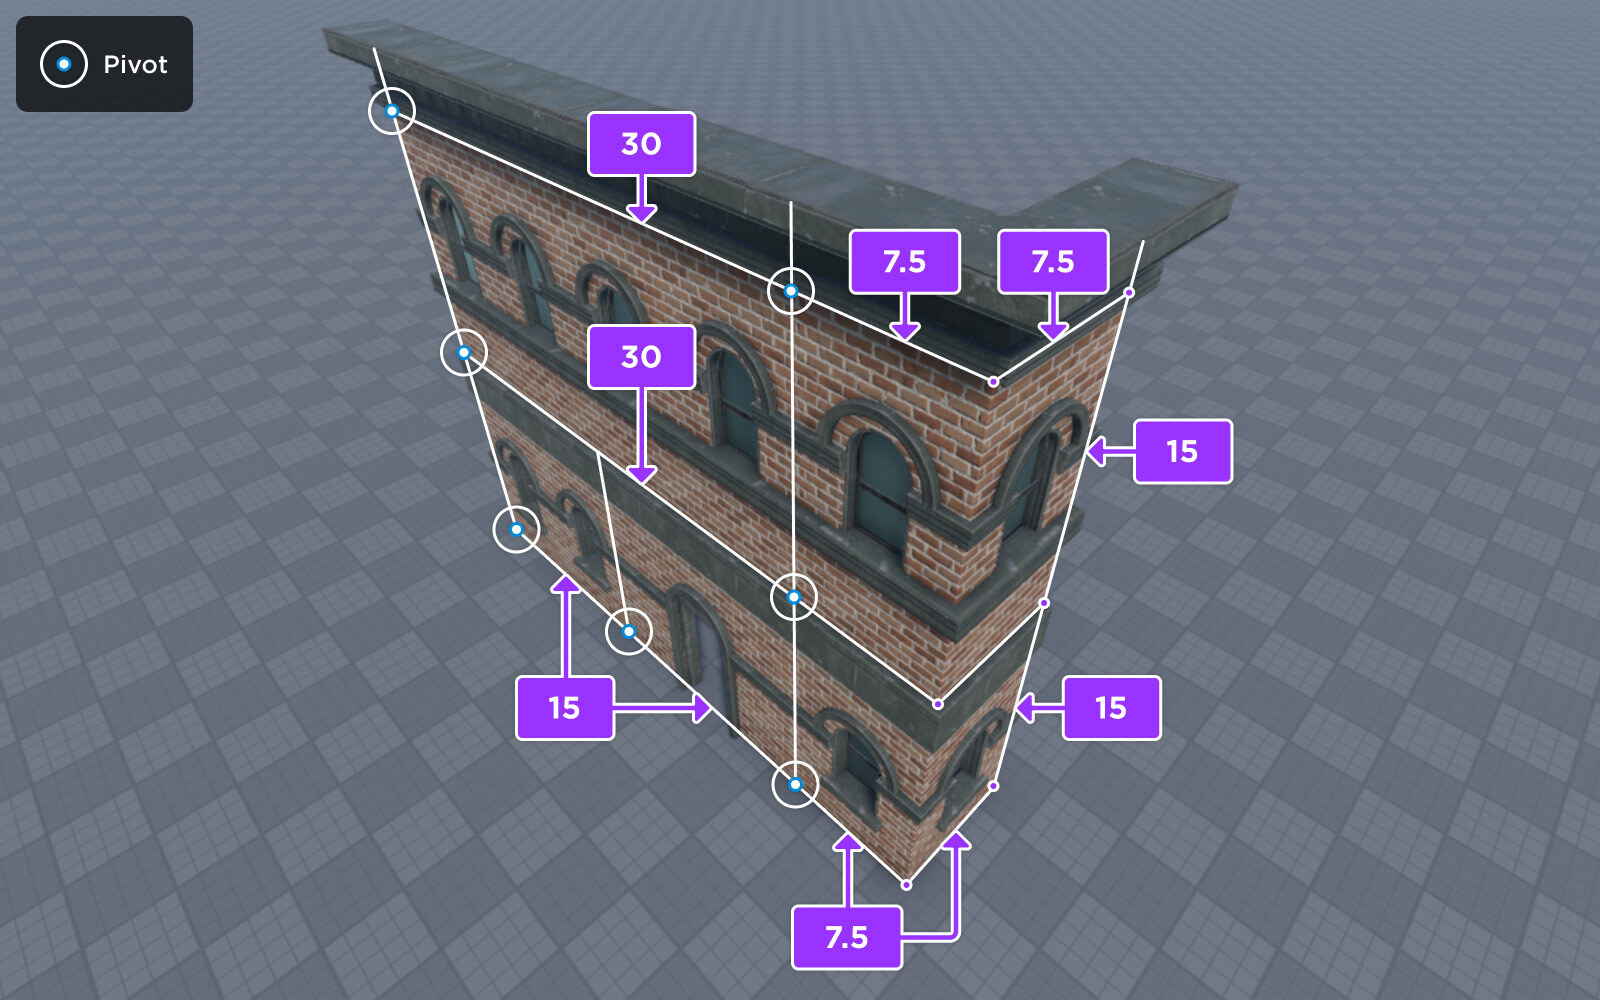
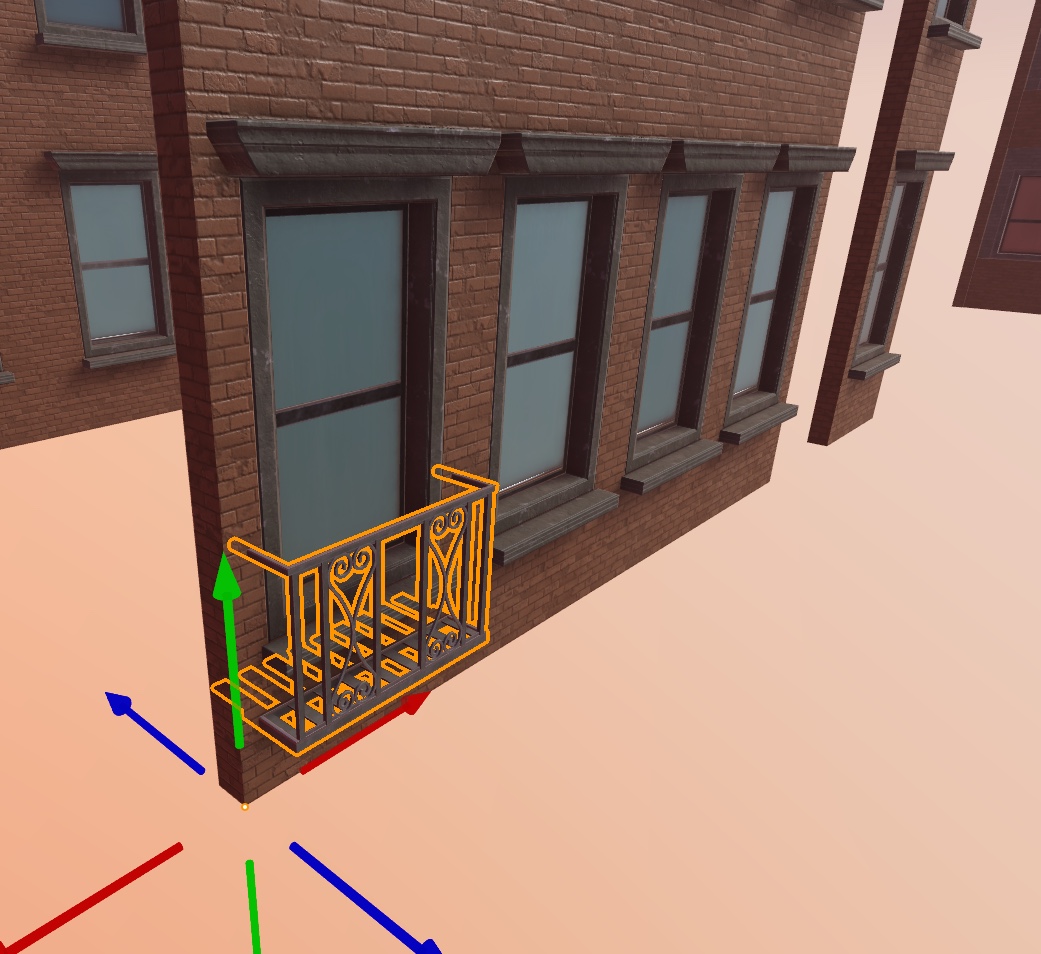
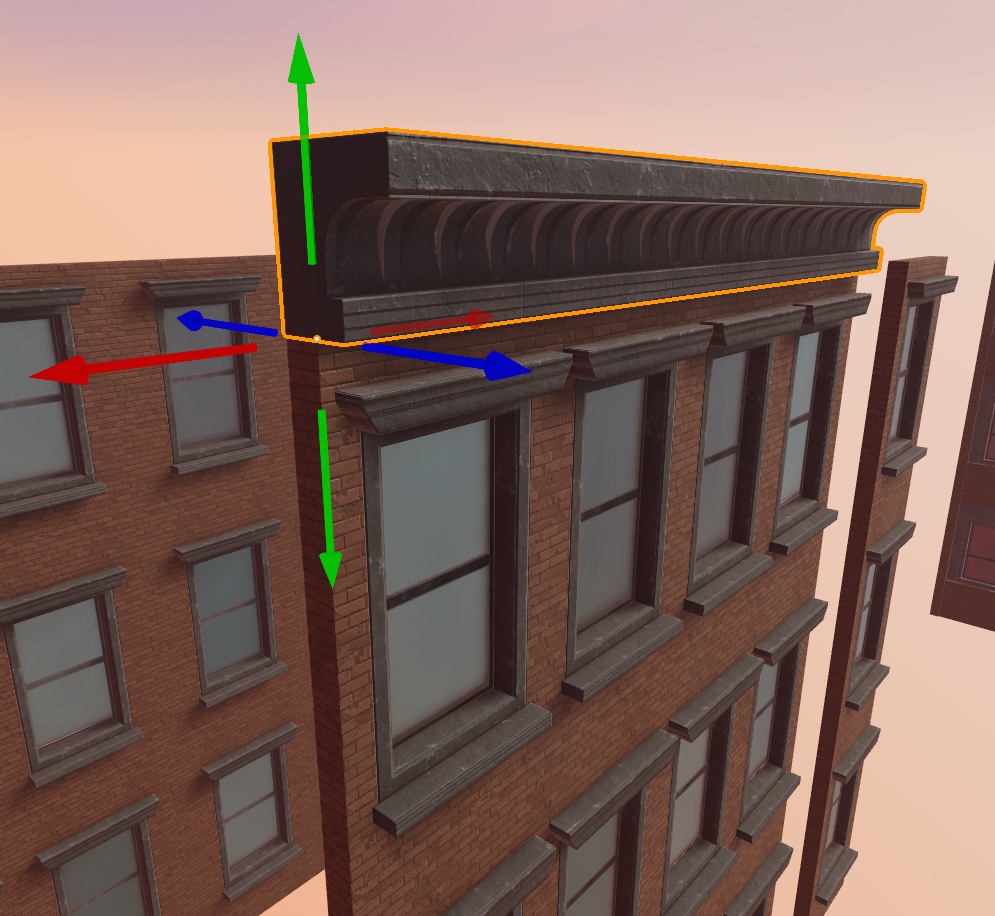
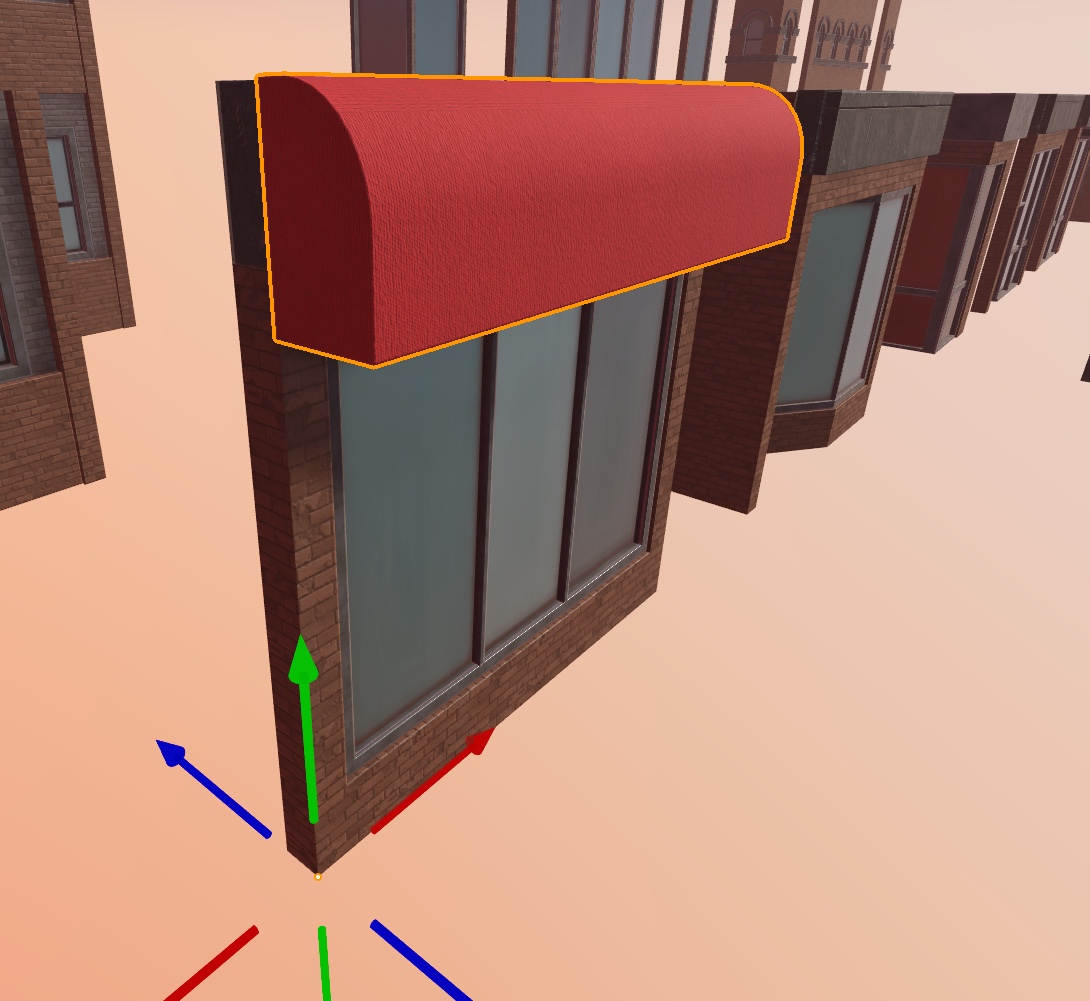
Modular assets can consist of a nearly infinite variety of different shapes, sizes, and silhouettes and embody various purposes such as walls, corners, or decorative additions, so where that consistent pivot should be is different for each modular building kit. For the Modern City sample modular building kit, every mesh has a consistent pivot location either at the forward-most, lower corner, or in a location that allows them to snap to a logical position on the building, such as balconies, cornices, and awnings.
For information on how to configure pivot locations for parts and models you create within Studio, see Pivot Tools. For information on how to configure pivot locations for meshes you create in third-party modeling tools, see the pivot point documentation for Blender or Maya.
Configure snapping behavior
Studio's default settings allow you to freely move and rotate objects to any fraction of a stud or degree, respectively. However, because modular building kits rely on assets snapping together at exact increments, you must change these default settings according to the requirements of each modular building kit. For example, the Modern City sample modular building kit requires each mesh to rotate in 7.5 stud and 45 degree increments with collisions off. This ensures that as you move and rotate meshes around the 3D environment, they can connect and maintain clear alignment to one another as the building grows.
To configure Studio settings for ideal snapping behavior for the sample modular building kit, look in the toolbar and:
- Disable Collisions.
- Enable Rotate snapping and set it to 45.
- Enable Move snapping and set it to 7.5.
Combine modular assets
When you start to assemble modular assets into a larger complex object, it's helpful to choose one core object whose position coordinates you can reference throughout the entire process. This ensures that each additional object quickly aligns to the right pivot location before moving them to a different position.
To snap modular assets together to create a building using the sample modular building kit:
Select one of the bottom modular meshes. This example uses a door.
In the viewport, position this mesh in a location within your experience where you want to create a building.

In the Properties window, copy the Position coordinates.
In the viewport, select a single mesh you want to connect to your first mesh.
In the Properties window, paste the Position coordinates from the first mesh. The second mesh displays on top of the first mesh.

In the toolbar, select the Move tool, then move the second mesh to a new location on either side of the first mesh. It snaps in 7.5 increments along the same axis.

Repeat this process for every mesh you want to comprise your building, continuously pasting the first mesh's position coordinates for each additional mesh to ensure the starting pivot location remains the same for each mesh of the building.

Customize modular assets
To ensure every object looks and feels unique from one another, it's important to customize your modular assets to create visual variety. While the following sections explore customization strategies for the sample modular building kit, such as using alternate materials for the walls and trims, experimenting with different hues for these adornments, removing repetition for materials that tile on large surfaces, and dressing objects with decorative props, you can utilize similar methods for any modular building kit you use to create modular environments.
Use custom materials
Every mesh within the sample modular building kit uses a custom material from the sample materials pack that you can use to alter the appearance and physical qualities of your buildings' walls. For example, by default, all walls start with a PaintedBrick custom material, but you can change it to various forms of alternative brick, concrete, and plaster, then set a distinct tint color to the material in order to give each building a unique appearance.
To use alternative custom materials for wall meshes:
In the viewport, hold down AltShift (⌥Shift) then click on any mesh of your building with a brick material.

In the Properties window, click the MaterialVariant dropdown menu. All alternative custom materials display.

Select an alternative material variant. All active wall meshes update their material in the viewport.

(Optional) To further customize the new custom material, select a new tint color.
In the Properties window, click either BrickColor or Color. The hexagon map or colors popup display, respectively.
Select a new color. All active wall meshes update their tint color in the viewport.


Use SurfaceAppearance objects
Every mesh with a trim in the sample modular building kit includes a SurfaceAppearance object that utilizes custom textures to make each building's adornments feel more realistic. To make each building in your experience feel unique, you can swap any SurfaceAppearance object for another in the SurfaceAppearance folder in the workspace, including materials like concrete, plaster, and wood, then set a distinct tint color to the trim for additional variety.
To swap SurfaceAppearance objects for trim meshes:
In the viewport, select a mesh with a trim.

In the Explorer window, expand the parent model, then the child mesh until the SurfaceAppearance object is visible.

Delete the SurfaceAppearance object. The mesh's visual appearance updates in the viewport.

In the SurfaceAppearance folder, copy an alternative SurfaceAppearance object you want to use for the trim.

Navigate back to the trim model, then paste the new SurfaceAppearance object into the child mesh. The mesh's visual appearance updates in the viewport.


Repeat this process for each trim mesh on your building.

(Optional) To further customize the new SurfaceAppearance object, select a new tint color.
In the viewport, hold down AltShift (⌥Shift) then click on any mesh of your building with a trim.
In the Properties window, click either BrickColor or Color. The hexagon map or colors popup display, respectively.
Select a new color. All active trim meshes update their tint color in the viewport.


Reduce visible repetition
When you're building large objects that utilize tiling materials like bricks and concrete, the tiling pattern can rapidly reveal visible repetition. To help reduce the visible tiling of these materials, you can create a grunge decal or texture, then add it as a child of your wall meshes to overlay on top of the wall's active materials. This customization strategy has the benefit of adding additional realism to your building, quickly improving the quality of your 3D environment. For information on how to apply and customize textures, see Textures and decals.


Add decorative props
As a final step in making objects feel distinct in their larger modular environment, you can add a significant amount of character to each object by dressing them with decorative props. For example, the sample modular building kit includes assets like fire escapes, window balconies, air conditioner units, and foliage that you can experiment with to flourish each building and make it feel lived in. Even just including a few decorative props can add a vast amount of storytelling to your scene.
