The in-experience text chat system, powered by TextChatService, allows players to easily communicate and socialize with each other in live experiences. In addition to supporting the default text chat, you can customize the front‑end user interface.
Chat window configuration
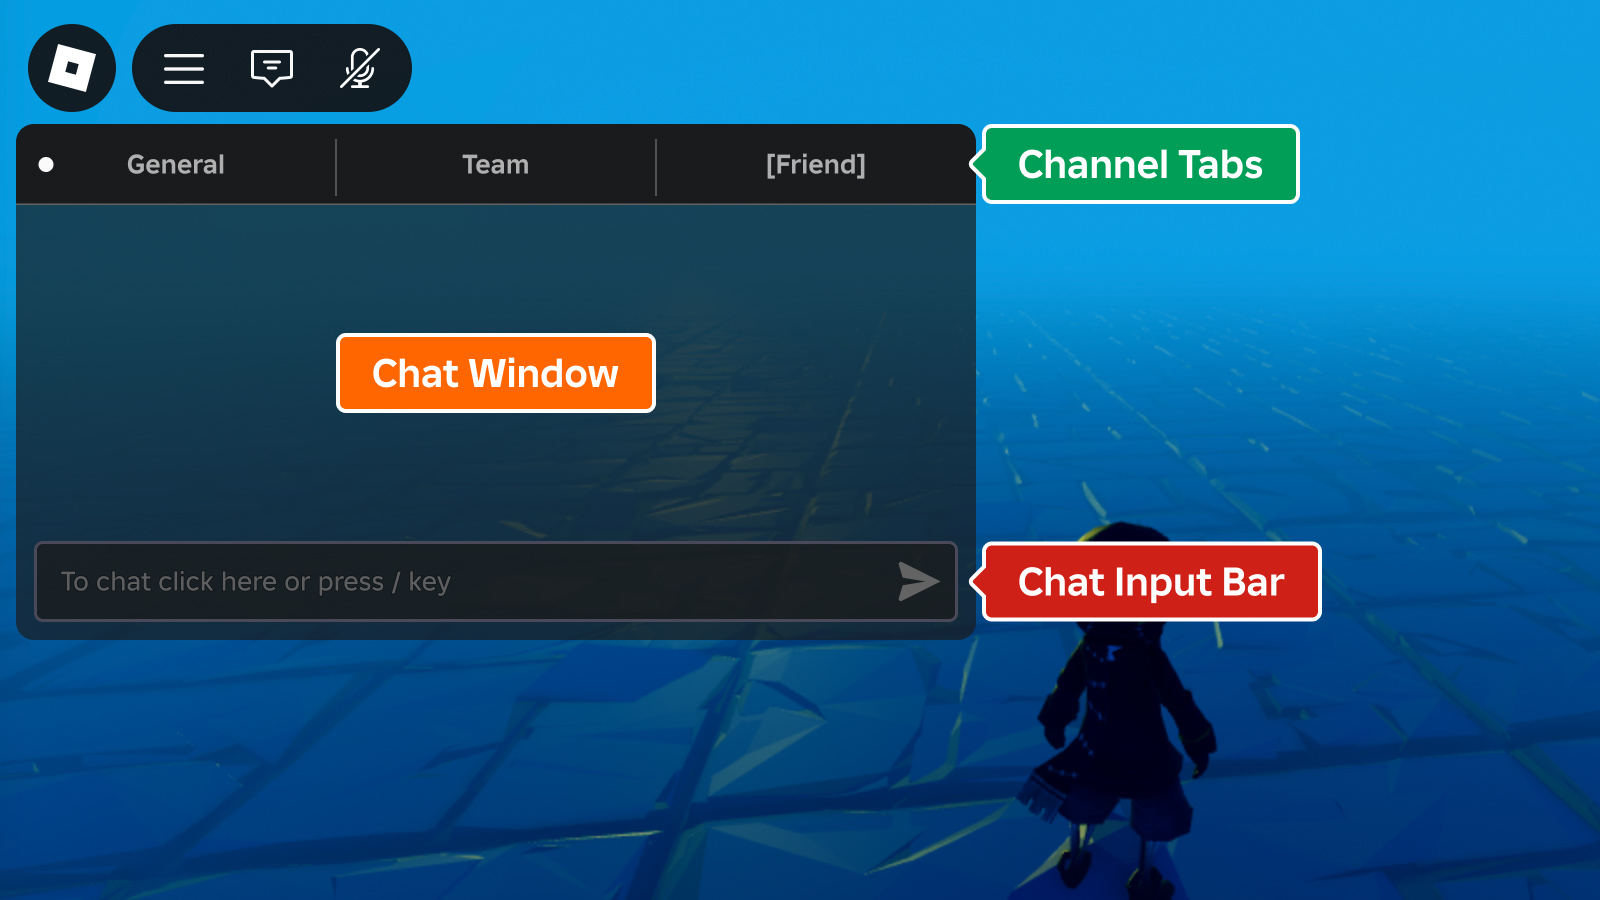
The overall chat window consists of:
- Chat window
- Input bar
- Channel tabs (optional)

The channel tabs are disabled by default and each component can be toggled on and off in Studio or through scripting:
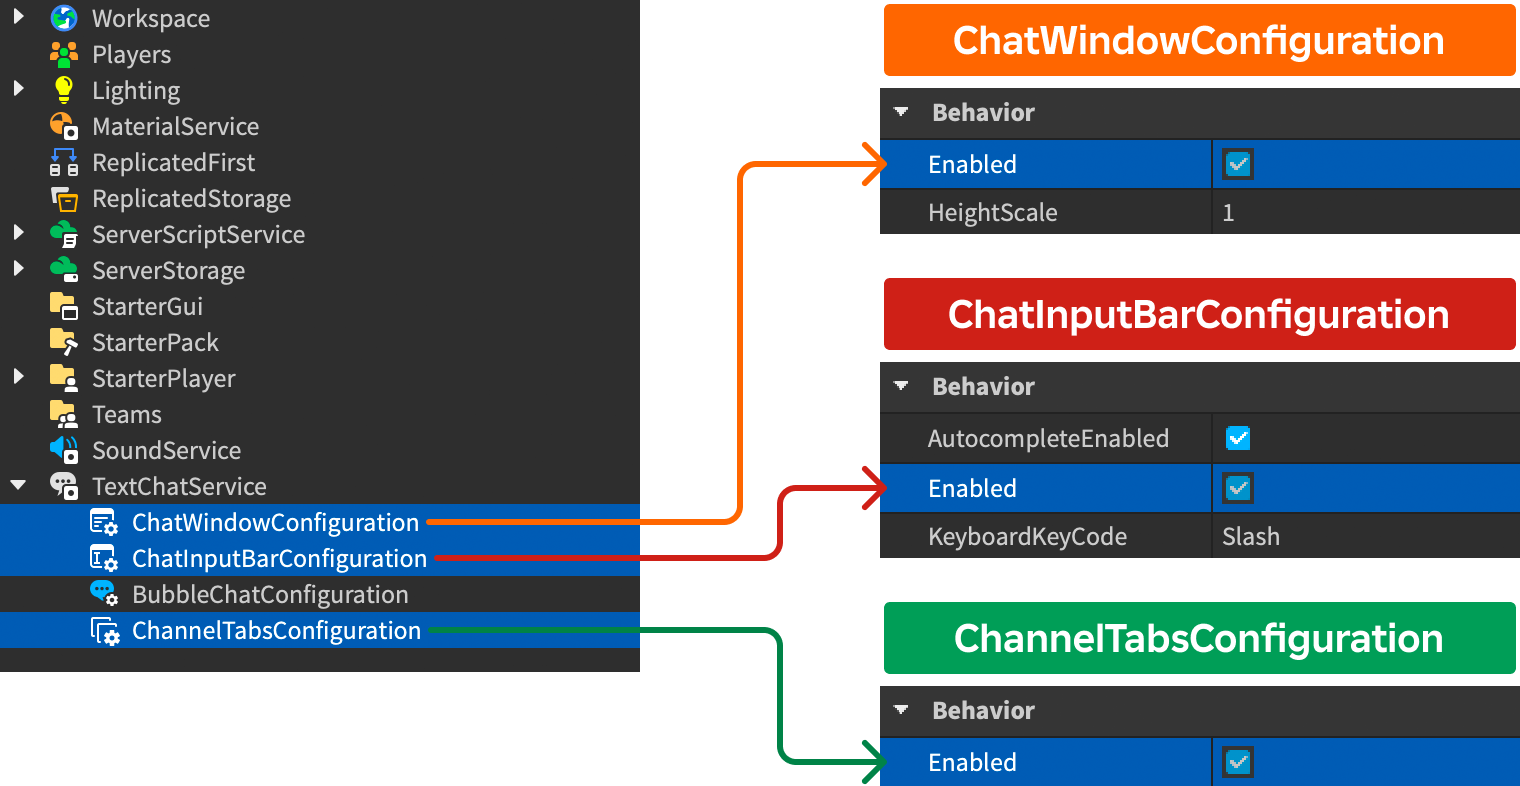
In the Explorer window, expand the TextChatService branch and select ChatWindowConfiguration, ChatInputBarConfiguration, or ChannelTabsConfiguration. Then enable or disable the component in the Properties window.

When ChannelTabsConfiguration is enabled, each default TextChannel appears in a tab as outlined in the following table. In addition, each custom TextChannel creates a tab corresponding to the channel's Name property.
| Default channel | Tab name |
|---|---|
| RBXGeneral | General |
| RBXSystem | General (combined into a single tab with RBXGeneral) |
| RBXTeam | Team |
| RBXWhisper | User name of the other player |
Window appearance
Appearance of the overall chat window is customizable through ChatWindowConfiguration.

| Property | Description | Default |
|---|---|---|
| BackgroundColor3 | Color3 background color of the chat window. | [25, 27, 29] |
| BackgroundTransparency | Transparency of the chat window's background. | 0.3 |
| FontFace | Font of chat window text. | BuilderSansMedium |
| TextColor3 | Color3 of chat window text. | [255, 255, 255] |
| TextSize | Size of chat window text. | 14 |
| TextStrokeColor3 | Color3 of the stroke for chat window text. | [0, 0, 0] |
| TextStrokeTransparency | Transparency of the stroke for chat window text. | 0.5 |
| HorizontalAlignment | Horizontal alignment of the chat window. | Left |
| VerticalAlignment | Vertical alignment of the chat window. | Top |
| HeightScale | Height scale of the chat window relative to the screen size. | 1 |
| WidthScale | Width scale of the chat window relative to the screen size. | 1 |
Input bar appearance
Appearance of the chat input bar is customizable through ChatInputBarConfiguration.

| Property | Description | Default |
|---|---|---|
| BackgroundColor3 | Color3 background color of the chat input bar. | [25, 27, 29] |
| BackgroundTransparency | Transparency of the chat input bar's background. | 0.2 |
| FontFace | Font of chat input text. | BuilderSansMedium |
| PlaceholderColor3 | Color3 of placeholder chat input text. | [178, 178, 178] |
| TextColor3 | Color3 of player-entered chat input text. | [255, 255, 255] |
| TextSize | Size of chat input text. | 14 |
| TextStrokeColor3 | Color3 stroke color of chat input text. | [0, 0, 0] |
| TextStrokeTransparency | Transparency of the stroke for chat input text. | 0.5 |
| AutocompleteEnabled | Whether the text chat system shows autocomplete options for emojis and commands. Emojis are autocompleted by typing : followed by non-whitespace characters, while commands are autocompleted by typing /. | true |
| KeyboardKeyCode | Additional key players can press to trigger focusing on the default chat input bar. | Slash |
Channel tabs appearance
Appearance of the channel tabs is customizable through ChannelTabsConfiguration.

| Property | Description | Default |
|---|---|---|
| BackgroundColor3 | Color3 background color of the channel tabs. | [25, 27, 29] |
| BackgroundTransparency | Transparency of the channel tabs' background. | 0 |
| HoverBackgroundColor3 | Color3 background color of tabs when hovering over them. | [125, 125, 125] |
| FontFace | Font for the text in channel tabs. | BuilderSansBold |
| TextColor3 | Color3 of text in an unselected tab. | [175, 175, 175] |
| SelectedTabTextColor3 | Color3 of text in a selected tab. | [255, 255, 255] |
| TextSize | Size of the text in channel tabs. | 18 |
| TextStrokeColor3 | Color3 stroke color of the text in channel tabs. | [0, 0, 0] |
| TextStrokeTransparency | Transparency of the stroke for text in channel tabs. | 1 |
Customize messages
You can customize the appearance of chat message bodies and prefixes using ChatWindowMessageProperties and TextChatService.OnChatWindowAdded callbacks without overriding the existing UI. The customization options let you modify the appearance of chat messages to match your experience's theme, and you can also sort or highlight messages from different user groups by coloring prefixes or adding chat tags.
Color user names
When a user sends a chat message, their DisplayName displays as the prefix portion of the message. By default, each user's name is colored according to their Player.TeamColor but you can change the colors of chat names using ChatWindowMessageProperties and OnChatWindowAdded. The following LocalScript in StarterPlayerScripts assigns a predetermined color to each user, picking randomly from a table of RGB colors.

LocalScript - Random User Name Colors
local TextChatService = game:GetService("TextChatService")
local chatWindowConfiguration = TextChatService.ChatWindowConfiguration
local nameColors = {
Color3.fromRGB(255, 0, 0),
Color3.fromRGB(0, 255, 0),
Color3.fromRGB(0, 0, 255),
Color3.fromRGB(255, 255, 0),
}
TextChatService.OnChatWindowAdded = function(message: TextChatMessage)
local properties = chatWindowConfiguration:DeriveNewMessageProperties()
local textSource = message.TextSource
if textSource then
local index: number = (textSource.UserId % #nameColors) + 1
local randomColor: Color3 = nameColors[index]
properties.PrefixTextProperties = chatWindowConfiguration:DeriveNewMessageProperties()
properties.PrefixTextProperties.TextColor3 = randomColor
end
return properties
end
You can also apply color and transparency gradients to color message prefixes using UIGradient.

Gradient User Name Colors
local TextChatService = game:GetService("TextChatService")
local chatWindowConfiguration = TextChatService.ChatWindowConfiguration
local gradient = Instance.new("UIGradient")
gradient.Color = ColorSequence.new{
ColorSequenceKeypoint.new(0, Color3.fromRGB(255, 0, 0)),
ColorSequenceKeypoint.new(0.5, Color3.fromRGB(255, 255, 0)),
ColorSequenceKeypoint.new(1, Color3.fromRGB(255, 0, 255))
}
TextChatService.OnChatWindowAdded = function(message: TextChatMessage)
local properties = chatWindowConfiguration:DeriveNewMessageProperties()
local textSource = message.TextSource
if textSource then
properties.PrefixTextProperties = chatWindowConfiguration:DeriveNewMessageProperties()
gradient:Clone().Parent = properties.PrefixTextProperties
end
return properties
end
Rich text customization
Rich text font color tags can be used to format chat messages, helpful if you want to apply formatting to very specific parts of the message. Note that rich text does not support gradients, but the following code sample shows how you can move the user name (stored in TextChatMessage.PrefixText) into the message body and then apply rich text tagging to only the name portion.

Rich Text Customization
local TextChatService = game:GetService("TextChatService")
local Players = game:GetService("Players")
local chatWindowConfiguration = TextChatService.ChatWindowConfiguration
local gradient = Instance.new("UIGradient")
gradient.Color = ColorSequence.new{
ColorSequenceKeypoint.new(0, Color3.fromRGB(255, 0, 0)),
ColorSequenceKeypoint.new(0.5, Color3.fromRGB(255, 255, 0)),
ColorSequenceKeypoint.new(1, Color3.fromRGB(255, 0, 255))
}
TextChatService.OnChatWindowAdded = function(message: TextChatMessage)
local properties = chatWindowConfiguration:DeriveNewMessageProperties()
if message.TextSource then
properties.PrefixText = "[VIP]"
properties.Text = string.format("<font color='#00ffff'>%s</font>", message.PrefixText) .. " " .. message.Text
properties.PrefixTextProperties = chatWindowConfiguration:DeriveNewMessageProperties()
gradient:Clone().Parent = properties.PrefixTextProperties
end
return properties
end
Messages from non‑player sources
When TextChatService.CreateDefaultTextChannels is true, one of the default text channels is the RBXSystem channel. The default chat scripts automatically display system messages in this channel. You can customize the appearance of these messages using the TextChannel.OnIncomingMessage callback.
You might want to customize or alter the system messages that are automatically emitted by the chat system. Since the default system messages are localized for users, you should reference them by TextChatMessage.Metadata in your text chat callbacks if you wish to customize their appearance. For example, you could use Metadata to identify system messages, error messages, or messages from specific systems in your experience.
System
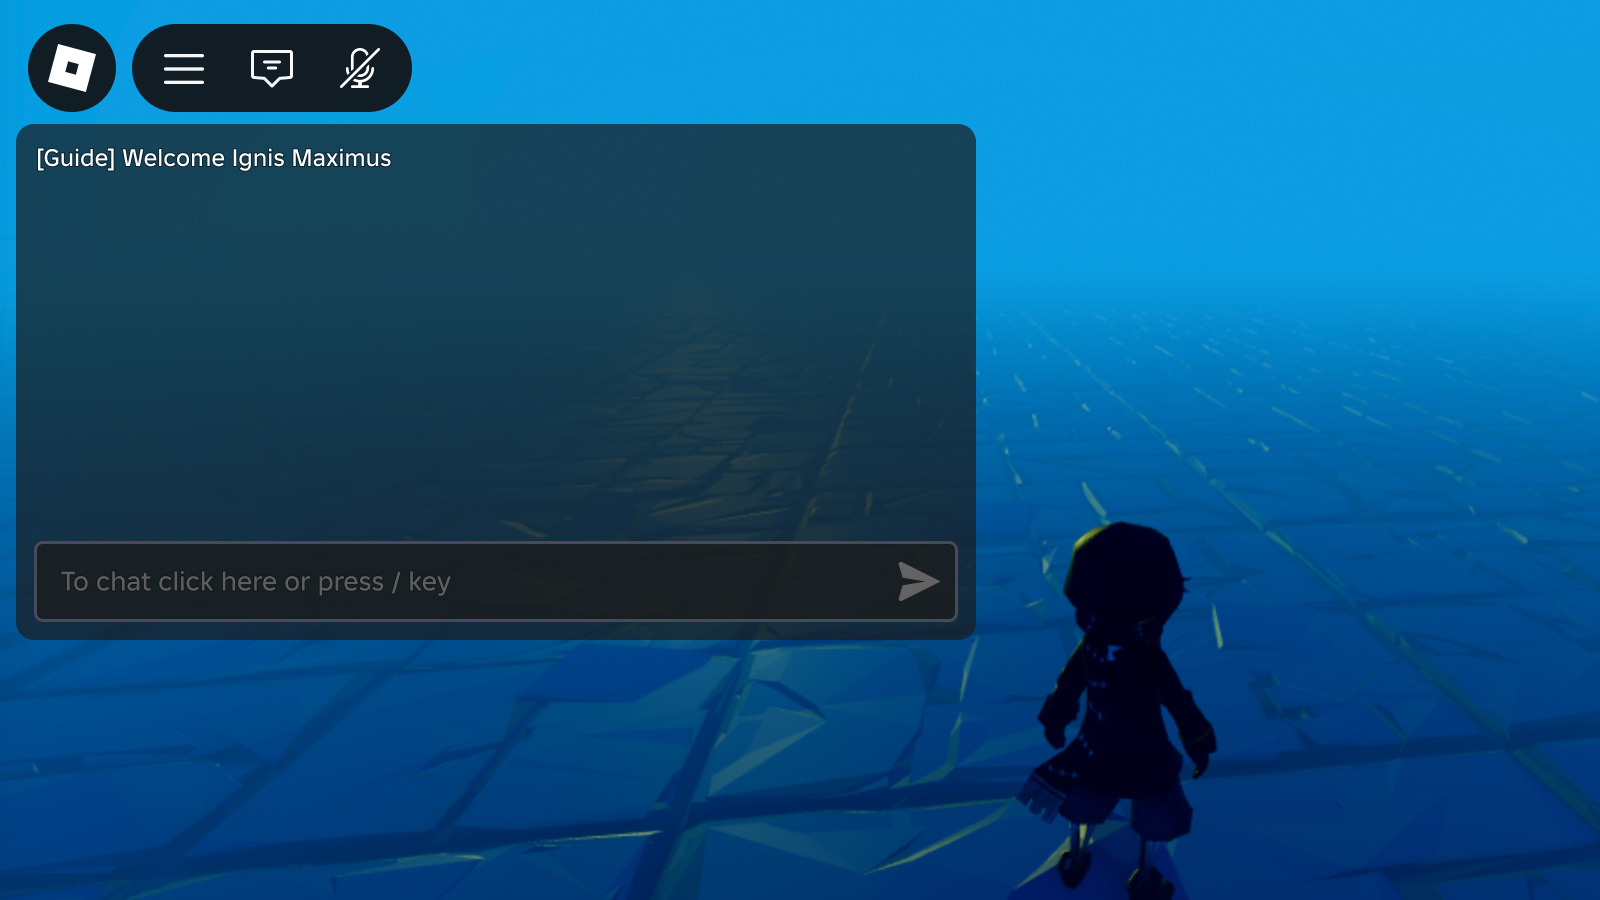
To deliver a system message to the local player, such as "speech" from a public address system, call DisplaySystemMessage() from the default RBXGeneral channel with a prefix before the player's display name.
Client Script

NPC/object
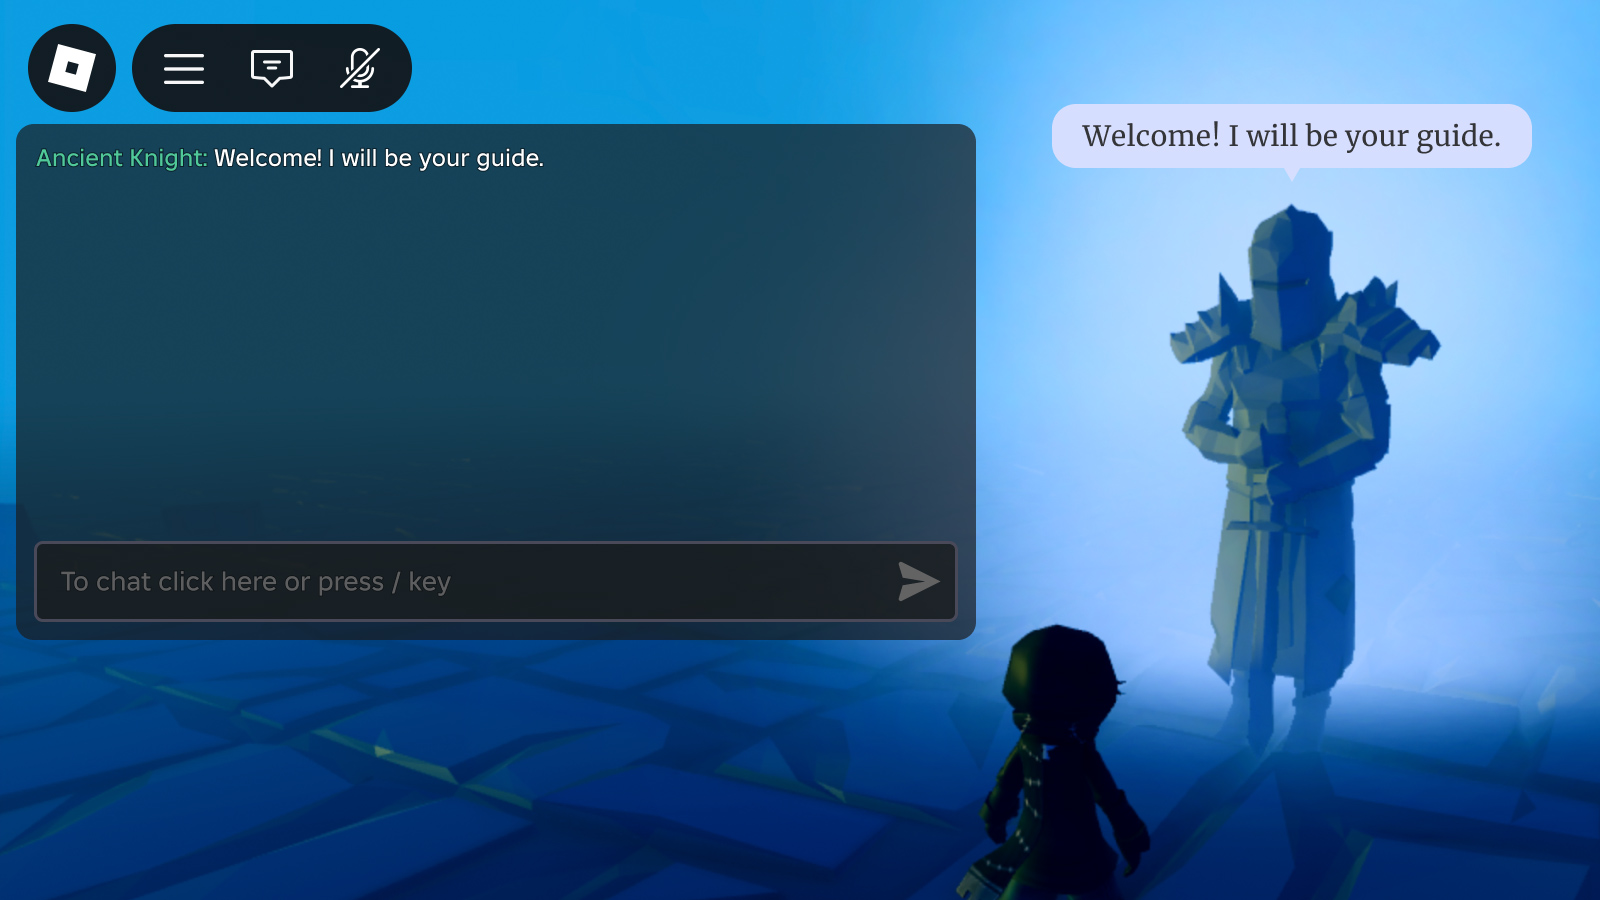
You can also stylize non-player dialogue and add chat bubbles to make it appear like messages are coming from an NPC or object within the 3D world.
Client Script
local TextChatService = game:GetService("TextChatService")
local Workspace = game:GetService("Workspace")
local generalChannel: TextChannel = TextChatService:WaitForChild("TextChannels").RBXGeneral
TextChatService.OnIncomingMessage = function(textChatMessage: TextChatMessage)
local properties = Instance.new("TextChatMessageProperties")
-- Check for system messages that contain metadata
if not textChatMessage.TextSource and textChatMessage.Metadata ~= "" then
-- Add prefix to make message look like it was sent by a player
properties.PrefixText = string.format("<font color='#%s'>%s: </font>", "#50C999", textChatMessage.Metadata)
-- Add bubble chat
TextChatService:DisplayBubble(Workspace.Statue, textChatMessage.Text)
end
return properties
end
local message = "Welcome! I will be your guide."
local speakerName = "Ancient Knight"
generalChannel:DisplaySystemMessage(message, speakerName)
