A humanoid skinned mesh is a character model that, when posed or animated, bends and stretches naturally at its joints. You can create a skinned mesh using a third party modeling tool such as Blender or Maya.
This is an advanced guide on skinning a humanoid model into an R15 model in Blender using the humanoid model completed in Rig a humanoid model. Before skinning a humanoid model, you should also familiarize yourself with the basic concepts in Skin a simple mesh.
To skin a humanoid model in Blender, you need to:
- Set up Blender with a rigged model to optimize the weight painting process with bone visualization settings and Auto Normalize.
- Weight paint vertices of your mesh objects by balancing influence of your vertices between two or more bones of a humanoid rig architecture.
Set up Blender
This guide uses the rigged model completed in Rig a humanoid model. You can also download the rigged model Blender project to follow along with this guide.
To optimize the process of skinning a rigid character, first set up the following in your Blender project:
- Open the Blender project and configure the bone visualization settings.
- Enable Auto Normalize to help optimize the weight-painting process.
Bone visualization
By default, Blender displays bone objects as octahedral shapes. This original shape is useful when positioning bones but can get in the way while weight painting. To help visualization during the weight painting process, change your bone visualization to sticks.
To update the visualization of your bones:
In Object Mode, click the armature.
In the Object Data Properties, change the Display As value to Sticks.
Auto normalize
The Auto Normalize setting forces the influence on your vertices to equal one. This makes weight painting multiple meshes and bones more efficient by ensuring that each vertex in your character is fully influenced by at least one bone. See Blender's documentation on the Auto Normalize for more information.
Auto Normalize also prevents cases where a vertex is fully influenced by multiple bones and can prevent common weight painting mistakes.
To enable Auto Normalize:
- In Object Mode, select the armature.
- Hold Shift and select any mesh object on your model.
- At the top of the 3D viewport, click on the Mode dropdown and switch to Weight Paint mode.
- On the right side of the viewport, expand the Tool tab.
- Under Options, enable Auto Normalize.
Weight painting
Weight painting applies specific weights, or influences, that bones will have over parts of a mesh using a painting workflow. There are also additional ways to apply influences through weight painting or other tools, some which are covered in Skin a simple mesh. See additional online resources such as Blender's Character Rigging and Vertex Groups fundamental guides for more information on skinning and applying weights.
This guide will cover one process of weight painting the head and arm meshes of a humanoid model. These weight painting techniques can be used to weight paint the rest of the model.
Paint the head mesh
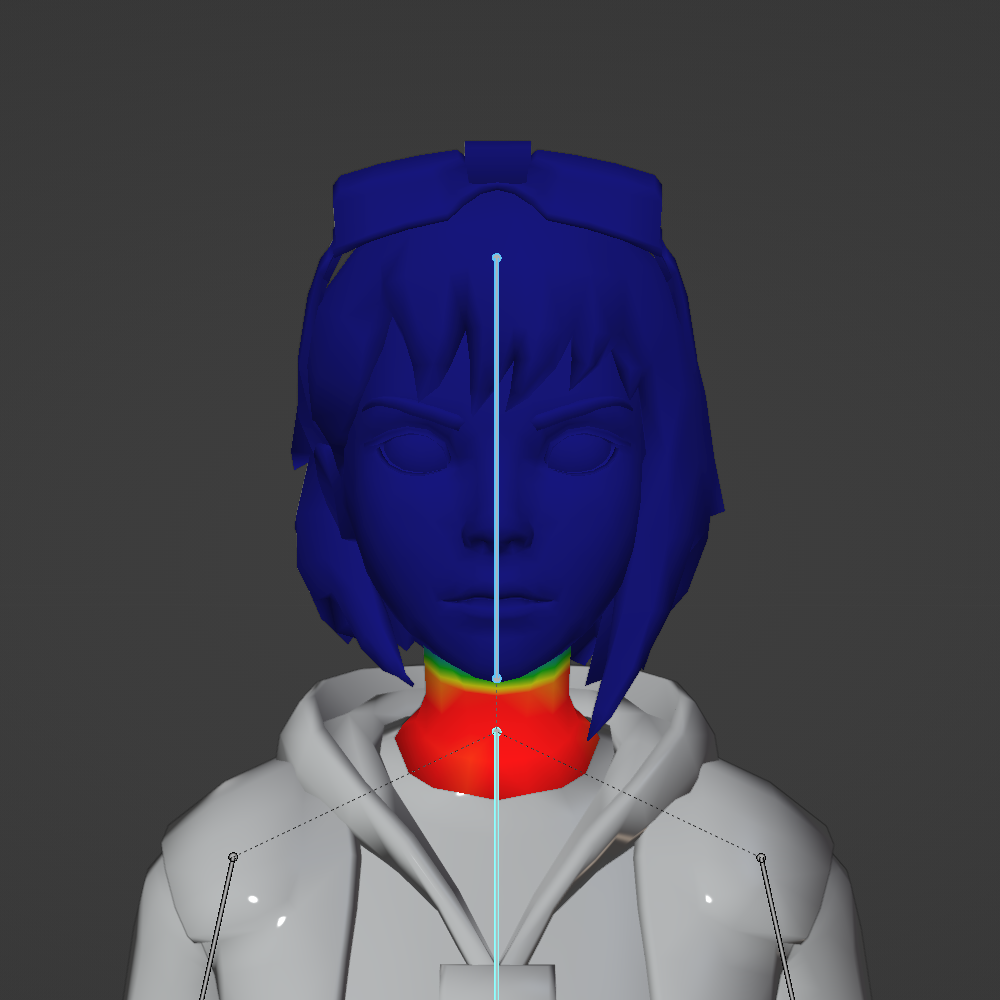
The head mesh connects to the upper torso at the bottom vertices of the neck. To create a realistic bend in the model, the head mesh needs to share influence with the Head bone and the Upper Torso bone near the neckline.
To begin weight painting the Head mesh object:
In Object Mode, click the armature then hold Shift and click the Head mesh object.
In the Mode dropdown, switch to Weight Paint mode.
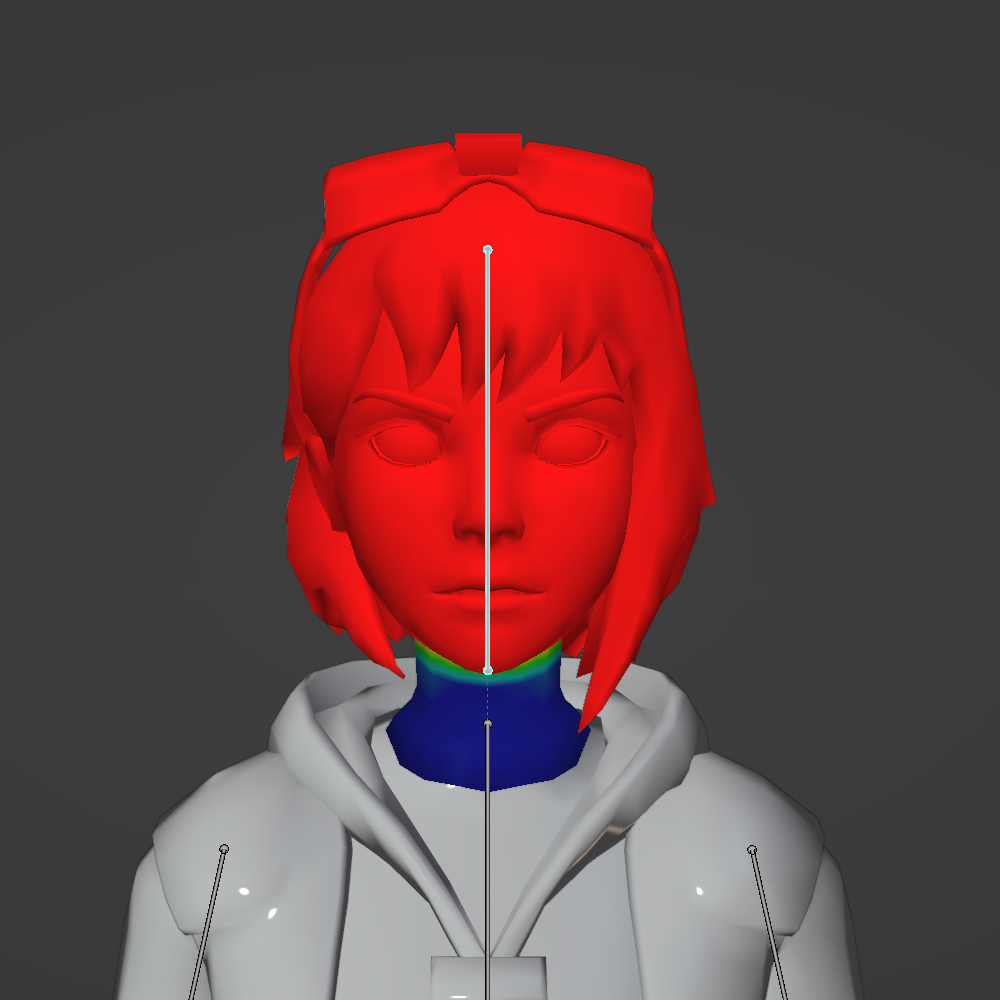
Hold Shift and click the Upper Torso bone. The head should be completely blue as the Upper Torso doesn't yet influence any head vertices.
In the top right of the Viewport, open the Tool menu and set the brush strength to 1.
With the Upper Torso bone selected, paint the Head of your model at the neckline. You can temporarily Hide the Upper Torso mesh in the Outliner to have direct access to the bottom of the neck.
At any point, check the applied influences by holding Shift and deselecting the Upper Torso bone and selecting the Head bone. Press R to rotate the Head bone with your mouse and test how the mesh object shares influences between the Head and Upper Torso bone.
If additional painting is required, hold Shift and select the bone you want to add or remove influence from, and use the Brush tool to apply.
The final result of weight painting the head of the model should balance the head mesh influences with the Head bone and the Upper Torso bone:


Paint the arm meshes
Similar to the process for balancing influences between the Head bone and Upper Torso bone, arms and legs require a similar weight painting process.
The right arm includes the Right Hand, Right Lower Arm, and Right Upper Arm, each with their corresponding bones. The following instructions provide guidance on painting influences to all of the arm mesh objects. You can then apply these techniques to the rest of the meshes in your model.
Hand
Starting with the Right Hand, you can balance the influences of the mesh between the Hand bone and the Lower Arm bone to create a natural bend at the wrist.
To weight paint influences to the right hand:
From Object Mode, click the armature, hold Shift, and click the right hand geometry.
In the mode dropdown, switch to Weight Paint mode. With the hand bone selected in this mode, you can press R and test the current rotation of the hand mesh object.
In the top right of the Viewport, open the Tool menu and set the brush strength to 1.
With the Lower Arm bone selected, paint the hand of your model at the wrist. You can temporarily Hide the Lower Arm mesh in the Outliner to get better access to the wrist.
During and after weight painting the hand, press R with the bone selected to test the rotation and flexibility.
Lower arm
After the wrist of the right hand is weight painted, you can proceed to balance the influences of the Lower Arm mesh between the Lower Arm bone and the Upper Arm bone to create a natural bend at the elbow.
To weight paint influences to the lower arm:
Switch back to Object Mode.
Click the armature and hold Shift and click the right lower arm geometry.
In the mode dropdown, switch to Weight Paint mode.
Hold Shift and deselect other bones besides the Lower Arm bone. You can test the current rotation of the highlighted Lower Arm bone by pressing R.
Hold Shift and select the Upper Arm bone.
With the Upper Arm bone selected, paint the lower arm of your model at the elbow. You can temporarily Hide the Upper Arm mesh in the Outliner to get better access to the elbow.
During and after weight painting the lower arm, press R with the lower arm bone selected to test the rotation and flexibility.
Upper arm
After the elbow of the right lower arm is weight painted, you can proceed to balance the influences of the Upper Arm mesh between the Upper Arm bone and the Upper Torso bone to create a natural bend at the underarm.
To weight paint influences to the upper arm:
Switch back to Object Mode.
Click the armature and hold Shift and click the right upper arm geometry.
In the mode dropdown, switch to Weight Paint mode.
Hold Shift and deselect other bones besides the Upper Arm bone. You can test the current rotation of the highlighted Upper Arm bone by pressing R.
Press R and drag your mouse to rotate the Upper Arm so that the arm is horizontal. This makes it easier to access the vertices of the underarm.
Hold Shift and select the Upper Torso bone.
With the Upper Torso bone selected, paint the upper arm of your model at the underarm. You can temporarily Hide the Upper Torso mesh in the Outliner to get better access to the elbow.
During and after weight painting the lower arm, press R with the upper arm bone selected to test the rotation and flexibility.
Shoulder
After the underarm is weight painted, you can proceed to balance the influences of the Upper Torso mesh between the Upper Torso bone and the Upper Arm bone to create a natural bend at the shoulder when the arm is moved. Since this movement is subtle, you only need to apply a partial strength influence to these vertices.
To weight paint a partial strength influence to the upper torso:
Switch back to Object Mode.
Click the armature and hold Shift and click the upper torso geometry.
In the mode dropdown, switch to Weight Paint mode.
Hold Shift and deselect other bones besides the Upper Arm bone. You can test the current rotation of the highlighted Upper Arm bone by pressing R.
In the top right of the Viewport, open the Tool menu and set the brush strength to .25. You may want to adjust this based on the results when testing.
With the Upper Torso bone selected, paint the upper torso of your model at the shoulder.
During and after weight painting the lower arm, press R with the upper arm bone selected to test the rotation and flexibility of your influences to the upper torso.
You can continue to weight paint the rest of the limbs of your model using these processes. When completed, you can export your skinned model as a .fbx using the Blender export settings for use in Studio. For reference, you can download a Blender project with the model fully skinned.
