이 모든 작업을 함께 가져올 시간입니다! 이제 광선과 입자 구성 요소를 만들었으므로 3개의 미리 만든 스크립트를 추가할 것입니다.이 스크립트는 구성 요소에게 언제 무엇을 수행할지 알려 튜토리얼을 관리합니다.예를 들어, 스크립트는 새 플레이어를 위한 빔을 생성하고 목표와 상호작용할 때마다 입자를 방출합니다.
빔과 입자 저장
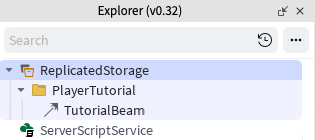
스크립트를 추가하기 전에 빔과 입자는 스크립트가 필요한 만큼 복사할 수 있는 위치로 이동해야 합니다.
In ReplicatedStorage , 새로운 폴더 PlayerTutorial 을 만듭니다. 테스트플레이어에서 TutorialBeam을 이동하고 새 폴더로 이동합니다.
In ServerStorage 에서 폴더 TutorialParticles 라는 이름을 만듭니다. 폭발 입자를 테스트플레이어에서 해당 폴더로 이동합니다.

빔과 입자 방출기가 이동되면 더 이상 테스트 플레이어가 필요하지 않습니다. 삭제 스크립트가 완료되면 실제 플레이어와 작동하므로 테스트플레이어를 삭제합니다.
이벤트 생성
플레이어가 목표와 상호작용할 때마다 튜토리얼 스크립트는 그 플레이어의 진행률을 업데이트하고 입자 효과를 방출할 수 있도록 알아야 합니다.스크립트를 알리기 위해, 신호는 이벤트 를 사용하여 전송할 수 있습니다.
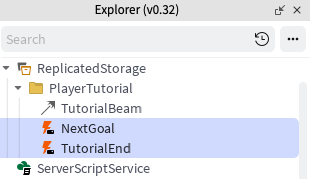
ReplicatedStorage > PlayerTutorial에서 두 개의 원격 이벤트 개체를 만들고 이름을 다음 목표 및 튜토리얼 종료 로 지정하십시오.
스크립트 추가
아래의 세 스크립트는 이전에 생성된 입자 방출기 및 빔 개체를 찾아 튜토리얼 시스템을 관리합니다.
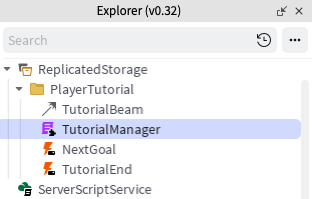
ReplicatedStorage > PlayerTutorial > 에서 새로운 모듈 스크립트 이름으로 명명된 튜토리얼 매니저 를 생성합니다.
아래의 전체 코드를 복사하고 붙여 넣어 기본 코드를 대체합니다.
local TutorialManager = {}local ReplicatedStorage = game:GetService("ReplicatedStorage")local tutorialFolder = ReplicatedStorage:WaitForChild("PlayerTutorial")local TutorialEndEvent = tutorialFolder:WaitForChild("TutorialEnd")local NextGoalEvent = tutorialFolder:WaitForChild("NextGoal")-- 목표 부품은 테이블에 주문해야 하며, 그렇지 않으면 게임 내 목표 순서가 다를 수 있습니다local goalParts = {workspace.TutorialGoals.GoalPart1,workspace.TutorialGoals.GoalPart2}local function checkTutorialEnd(player, goalParts)local currentIndex = player:WaitForChild("GoalProgress")return currentIndex.Value >= #goalPartsendlocal function finishTutorial(player)local playerBeam = player.Character.HumanoidRootPart:FindFirstChildOfClass("Beam")playerBeam:Destroy()print(player.Name .. " finished the tutorial")-- 추가 코드용 자리 표시자. 예를 들어, 다른 작업을 수행하기 위해 서버에 메시지를 보내려는 경우endfunction TutorialManager.interactGoal(player)NextGoalEvent:FireServer()endfunction TutorialManager.getTutorialGoals()return goalPartsendfunction TutorialManager.nextGoal(player, goalParts)if checkTutorialEnd(player, goalParts) thenfinishTutorial(player)else-- 플레이어의 목표 추적기 증가local currentGoalIndex = player:WaitForChild("GoalProgress")currentGoalIndex.Value += 1endend-- 튜토리얼 목표를 통해 플레이어의 진행률을 로컬로 추적하기 위한 int 값을 생성합니다function TutorialManager.setupPlayerProgress(player)local currentGoalProgress = Instance.new("IntValue")currentGoalProgress.Name = "GoalProgress"currentGoalProgress.Value = 1currentGoalProgress.Parent = playerendreturn TutorialManager이 스크립트는 튜토리얼에서 플레이어의 진행률을 관리하는 코드를 실행합니다.여기에는 목표와 상호작용하기 위해 코드를 실행하거나 튜토리얼이 끝났을 때 일어나는 일과 같은 작업이 포함됩니다.
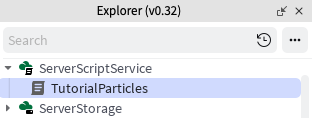
In ServerScriptService 에서 새로운 스크립트 TutorialParticles 라는 이름의 스크립트를 생성합니다.
아래 코드를 붙여넣습니다.
local Players = game:GetService("Players")local ReplicatedStorage = game:GetService("ReplicatedStorage")local ServerStorage = game:GetService("ServerStorage")local tutorialFolder = ReplicatedStorage:WaitForChild("PlayerTutorial")local NextGoalEvent = tutorialFolder:WaitForChild("NextGoal")local EMIT_RATE = 50local function playParticleBurst(player)local character = player.Character or player.CharacterAdded:Wait()local humanoidRootPart = character:WaitForChild("HumanoidRootPart")local particleAttachment = humanoidRootPart:WaitForChild("ParticleAttachment")-- 첨부 파일의 입자를 통과하고 입자 유형에 따라 재생하십시오for _, particle in particleAttachment:GetChildren() doif particle:IsA("ParticleEmitter") thenparticle:Emit(EMIT_RATE)endendendlocal function setupPlayerParticles(player)player.CharacterAdded:Connect(function(character)local humanoidRootPart = character:WaitForChild("HumanoidRootPart")local playerParticleAttachment = Instance.new("Attachment")playerParticleAttachment.Name = "ParticleAttachment"playerParticleAttachment.Parent = humanoidRootPart-- 폴더에 있는 복제 입자를 클론하고 플레이어에 연결하더라도 하나 이상 있는 경우for _, emitter in ServerStorage.TutorialParticles:GetChildren() doemitter:Clone().Parent = playerParticleAttachmentendend)endPlayers.PlayerAdded:Connect(setupPlayerParticles)NextGoalEvent.OnServerEvent:Connect(playParticleBurst)이 스크립트는 플레이어가 목표와 상호작용할 때마다 폭발 입자를 재생합니다.상호 작용 중에 생성되는 입자 수를 결정하는 변수 EMIT_RATE 가 있습니다.
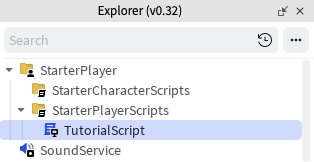
스타터플레이어 > 스타터플레이어 스크립트에서 로컬스크립트 라는 이름의 새로운 튜토리얼 스크립트 를 생성합니다.
그런 다음 아래의 스크립트를 붙여넣으십시오. 이 스크립트는 플레이어를 안내하는 데 사용되는 빔을 생성하고 관리합니다.
local Players = game:GetService("Players")local ReplicatedStorage = game:GetService("ReplicatedStorage")local tutorialFolder = ReplicatedStorage:WaitForChild("PlayerTutorial")local TutorialManager = require(tutorialFolder:WaitForChild("TutorialManager"))local TutorialEndEvent = tutorialFolder:WaitForChild("TutorialEnd")local player = Players.LocalPlayerlocal goalParts = TutorialManager.getTutorialGoals()local playerBeam = nillocal goalIndex = nillocal function getTargetAttachment()local currentTarget = goalParts[goalIndex.Value]local interactionPart = currentTarget:FindFirstChild("InteractionPart")local attachment = interactionPart and interactionPart:FindFirstChildOfClass("Attachment")if not attachment thenattachment = Instance.new("Attachment")attachment.Name = "BeamAttachment"attachment.Parent = currentTargetendreturn attachmentendlocal function updateBeamTarget()playerBeam = player.Character.HumanoidRootPart:FindFirstChildOfClass("Beam")local targetBeamAttachment = getTargetAttachment()if targetBeamAttachment thenplayerBeam.Attachment1 = targetBeamAttachmentelsewarn("Attachment not found in a goal. Check that goals have attachments or they're included under the InteractionPart")endendlocal function setupGoals()for _, part in goalParts dolocal interactionPart = part:FindFirstChild("InteractionPart")local proximityPrompt = interactionPart and interactionPart:FindFirstChild("ProximityPrompt")if proximityPrompt thenproximityPrompt.Triggered:Connect(function(player)proximityPrompt.Enabled = falseTutorialManager.nextGoal(player, goalParts)TutorialManager.interactGoal(player)end)elsewarn("Proximity prompt not included in goal. Add one to each goal part under the InteractionPart")endendendlocal function createBeamForCharacter(character)local humanoidRootPart = character:WaitForChild("HumanoidRootPart")local playerBeamAttachment = Instance.new("Attachment")local beamTemplate = tutorialFolder:WaitForChild("TutorialBeam")if not beamTemplate thenwarn("Tutorial Beam not found in ReplicatedStorage")endplayerBeamAttachment.Name = "BeamAttachment"playerBeamAttachment.Parent = humanoidRootPartlocal targetBeamAttachment = getTargetAttachment()playerBeam = beamTemplate:Clone()playerBeam.Attachment0 = playerBeamAttachmentplayerBeam.Attachment1 = targetBeamAttachmentplayerBeam.Enabled = trueplayerBeam.Parent = humanoidRootPartendlocal function setupPlayer()setupGoals()TutorialManager.setupPlayerProgress(player)goalIndex = player:WaitForChild("GoalProgress")player.CharacterAdded:Connect(createBeamForCharacter)if player.Character thencreateBeamForCharacter(player.Character)endendsetupPlayer()goalIndex.Changed:Connect(updateBeamTarget)스크립트를 테스트하기 위해 프로젝트를 플레이합니다. 부스에서 부스로 이동하여 코드가 작동하는지 확인하세요. 상호 작용 기능을 사용하여 코드가 작동하는지 확인합니다.
문제 해결 팁
문제 : 게임이 시작되면 입자가 재생됩니다.
서버스토리지 > 튜토리얼 파티클 > 버스트로 이동합니다. 비활성화가 끄기있는지 확인하십시오. 문제 : 무한 생성과 같은 컴파일러의 경고.
스크립트가 특정 위치에서 특정 개체를 찾고 있기 때문에 부품의 이름이 잘못 지정되는 경우가 있습니다.게임의 각 부분의 이름과 위치가 튜토리얼과 일치하는지 두 번 확인합니다.
스크립트 혜택 및 제한
경험에서 이 튜토리얼 시스템을 사용하는 경우 팔로잉사항을 염두에 두십시오: 이점
- 튜토리얼 종료와 같은 이벤트는 다른 스크립트를 트리거하는 데 사용할 수 있습니다. 예를 인스턴스, 이 이벤트가 발생하면 플레이어에게 특별 아이템을 수여할 수 있습니다.
- 튜토리얼 파트너스 스크립트는 한 번에 여러 입자를 재생할 수 있습니다.더 복잡한 효과를 위해 ServerStorage/TutorialParticles에 더 많은 입자를 추가할 수 있습니다. 제한
- 튜토리얼에서 플레이어의 진행 상황은 영구적이지 않으므로 그 진행 상황을 저장하는 방법을 코드해야 합니다.가이드를 보려면 문서: 데이터 저장을 참조하십시오.