Audio playback occurs through Sound objects which emit audio within a game. Roblox assigns each audio asset a unique ID that you can assign to Sound objects to play a specific sound effect or music track. You can either set this audio to play automatically at runtime, or trigger it to play from scripts.
To modify playback of multiple Sound objects, you can assign them to a sound group and control the entire group's volume, as well as apply dynamic effects.
Create sound objects
There are three locations you can create a Sound object, and each location determines how audio emits and volume changes in relation to the user's position within the game.
| Location | How audio emits | How volume changes |
|---|---|---|
| Child of a block, sphere, or cylinder BasePart. | Audio emits outward from the entire surface of the part. | Volume changes depending on the distance between the user's sound listener and the position of the part, as well as its size. |
| Child of an Attachment, MeshPart, TrussPart, WedgePart, or CornerWedgePart. | Audio emits outward from the single attachment point or part center. | Volume changes depending on the distance between the user's sound listener and the attachment/part position. |
| Within SoundService or Workspace. | Audio emits throughout the game. | Volume and pan position remain the same regardless of the user's sound listener position or rotation. |
Positional audio
Positional audio is audio that users can only hear near a specific position within the game. There are two types of positional audio you can utilize: volumetric and point source.
Volumetric
Volumetric audio is the most realistic audio option, as it dynamically changes depending on the user's position to the audio source. For example, if the user is within a BasePart with a child Sound object, audio plays all around the user, similar to music in headphones playing at the same volume in each speaker. When the user exits the part, audio gradually decreases in volume and becomes more directional per speaker, moving around the user's head when their listener rotates. For information on the properties that control how loud your audio is at different distances from the part, see RollOffMinDistance and RollOffMaxDistance.
The size of the BasePart also affects the audio's volume, as larger BaseParts produce a wider area in which users can hear the audio and when a user navigates away from a large BasePart, volume decreases slower. The following example displays a BasePart that is the size of a city with a Sound object playing ambient audio. Users A and B experience the audio differently: user B is closer to the large BasePart, and they mostly hear the audio around the same loudness in both speakers. Conversely, user A is further away from the city, so the audio they hear is quieter and more directional than user B, playing at differing loudness in each of their speakers.

Volumetric audio is useful for any audio that needs to be immersive around a user and change dynamically depending on the user's position, such as a concert stage or ambience zones like rainfall. When you experiment with placing a Sound object on BaseParts of different sizes and positions from users, you can hear how immersive volumetric audio can be.
To create a Sound object for volumetric audio:
In the Explorer window, select SoundService.
In the Properties window, navigate to the VolumetricAudio property, then set it to Enabled.
In the Explorer window, hover over a BasePart, then click the ⊕ button. A contextual menu displays.
From the menu, insert a Sound.
In the Properties window, navigate to the SoundId property and input a valid audio asset ID.

(Optional) If you want the audio to start playing when the game begins, enable the Playing property.

Point source
Contrary to volumetric audio, point source audio only emits from a single point source. This type of audio is useful for explosions, impact noises, electronic devices, and dialogue.
To create a Sound object for point source audio:
- In the Explorer window, hover over an attachment, truss, wedge, or corner wedge, then click the ⊕ button. A contextual menu displays.
- From the menu, insert a Sound.
- (Optional) If you want the audio to start playing when the game begins, enable the Playing property.
Background audio
Background audio plays at the same volume no matter where the user travels within your game. This type of audio is useful for music that you want to play for users, especially when you want to create a soundtrack of multiple audio files.
It's best to keep all Sound objects for background audio in a single location of the Workspace for organization purposes as you continue to add and edit audio within your game. The following example stores the new Sound object under the SoundService container, as this service determines how Sound objects play in games.
To create a Sound object for background audio:
- In the Explorer window, hover over SoundService, then click the ⊕ button. A contextual menu displays.
- From the menu, insert a Sound.
- (Optional) If you want the audio to start playing when the game begins, enable the Playing property.
- (Optional) If this Sound object is the only track you want to play in the place, enable its Looped property.
Customize sound objects
Sound object properties work together to influence how users experience your audio, such as:
- How loud they hear specific audio individually and in relation to one another (Volume).
- How they perceive volume when they move away from the audio source (RollOffMinDistance, RollOffMaxDistance, and RollOffMode)
- What part of the audio they can listen to (TimePosition).
- How fast and at what pitch they hear it (PlaybackSpeed).
- If the audio automatically replays upon completion (Looped).
Volume
The Volume property allows you to set the volume of your audio anywhere from 0 (silence) to 10 (booming). If you want to change the volume of multiple Sound objects at once, parent them under a sound group.
RollOffMinDistance and RollOffMaxDistance
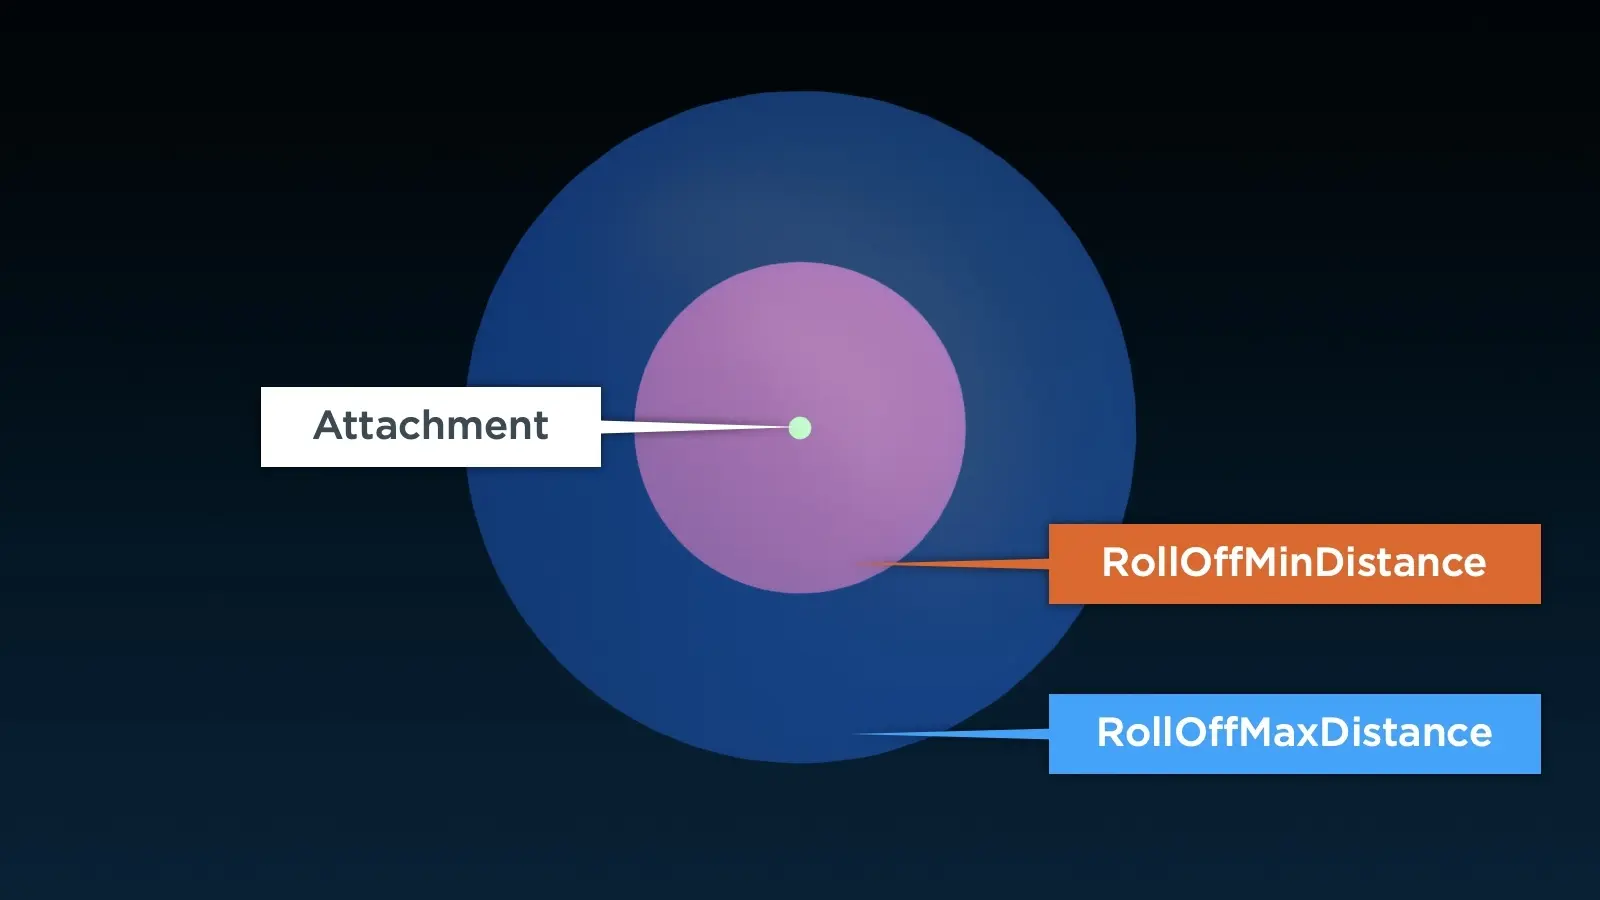
RollOffMinDistance and RollOffMaxDistance determine the range of how a user perceives volume from positional audio. For volumetric audio, RollOffMinDistance is the minimum distance in studs that audio begins to decrease in volume when the client's listener moves away from the parent BasePart, and RollOffMaxDistance property is the maximum distance in studs that a client's listener can hear audio from the surface of the object.

For point source audio, RollOffMinDistance and RollOffMaxDistance work similarly to volumetric audio, but the roll off distance these properties control doesn't surround the object, it only influences the distance outward from the point source.
RollOffMode
The RollOffMode property allows you to decide how audio fades as the distance between the user's listener and the Sound object's parent increases. You can set this property to one of four values of the Enum.RollOffMode enum.
| RollOffMode | Description |
|---|---|
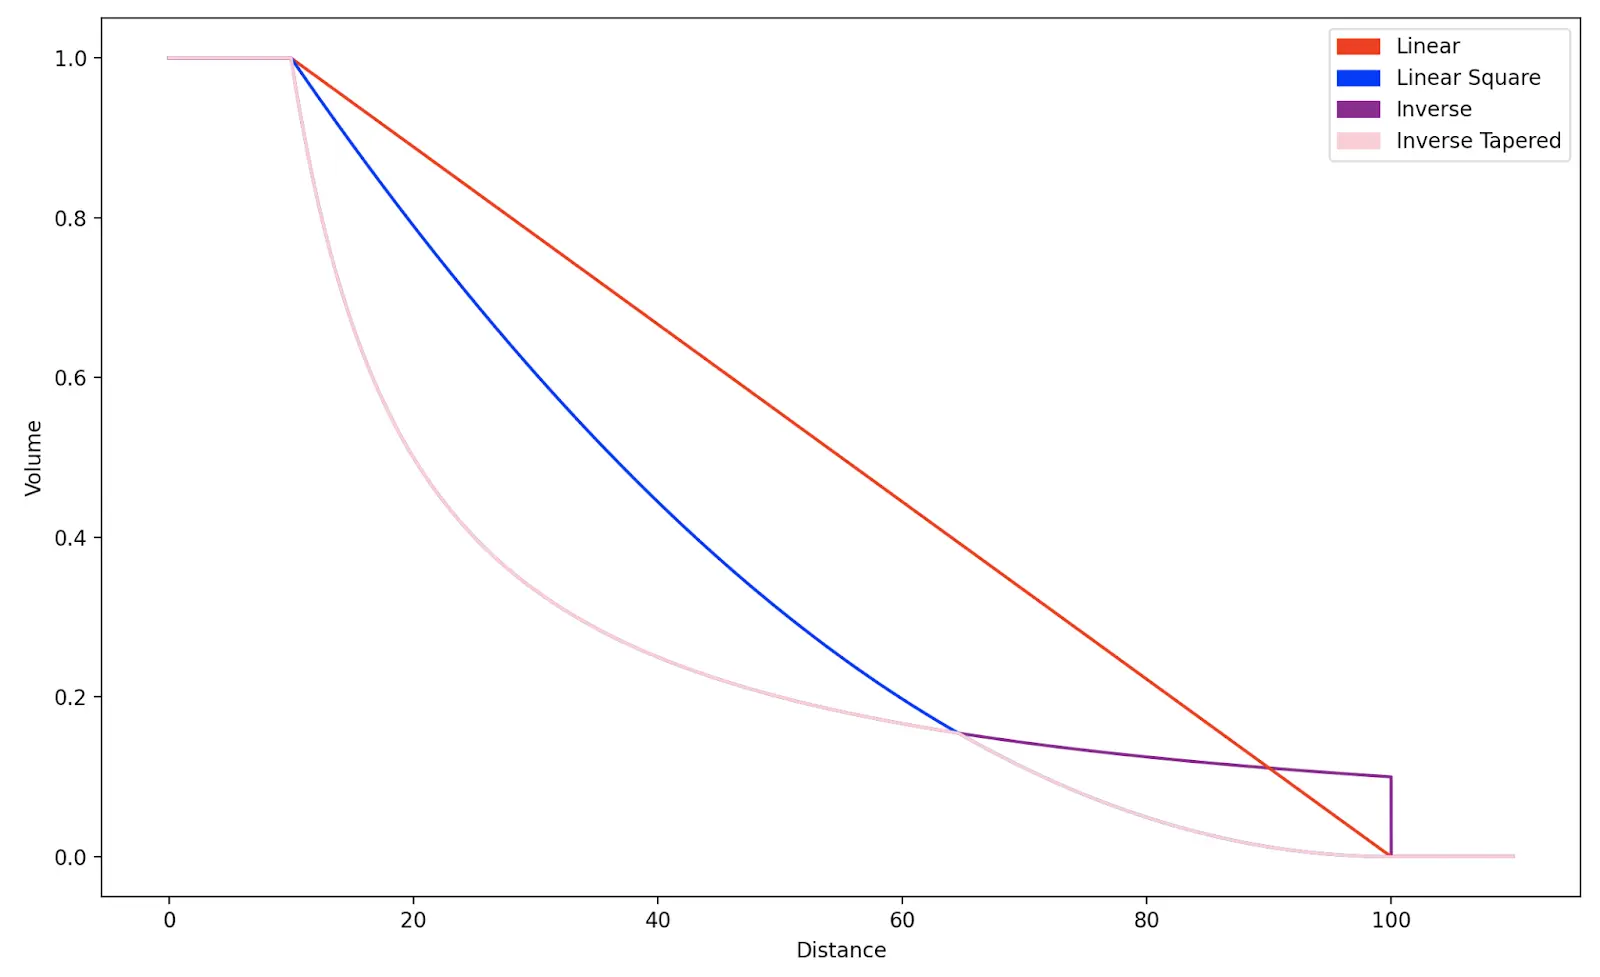
| Inverse (default) | Volume initially fades abruptly from RollOffMinDistance, but volume fading becomes more gradual the closer a user is to reaching the RollOffMaxDistance. Once they reach the RollOffMaxDistance, the audio falls silent. |
| Linear | Volume fades linearly between RollOffMinDistance and RollOffMaxDistance. Once a user reaches the RollOffMaxDistance, the audio falls silent. |
| InverseTapered | Volume follows the inverse model when close to RollOffMinDistance and the linear square model when a user is close to RollOffMaxDistance. Audio approaches silence at the maximum distance point. |
| LinearSquare | Volume fades between RollOffMinDistance and RollOffMaxDistance with a linear squared relationship. Audio approaches silence at the maximum distance point. |
PlaybackSpeed
The PlaybackSpeed property allows you to determine the speed your audio plays. For example, if you set the PlaybackSpeed to a value of 2, your audio plays twice as fast and one octave higher in pitch. Similarly, if you set it to a value of 0.5, your audio plays twice as slow and one octave lower in pitch.
| PlaybackSpeed = 0.5 | PlaybackSpeed = 1.0 | PlaybackSpeed = 2.0 |
TimePosition
The TimePosition property displays, in seconds, what position within the audio sample a user is currently hearing. This property is useful for either only playing a section of the audio sample, or triggering an event to occur once audio reaches a specific position. For example, the following code sample causes a particle emitter to emit a white ring particle above a part within a limited time range of an audio track.
local RunService = game:GetService("RunService")
local Workspace = game:GetService("Workspace")

-- Create a new part
local part = Instance.new("Part")
part.Anchored = true
part.Color = Color3.new(0.75, 0.2, 0.5)
part.Size = Vector3.new(2, 1, 2)
part.Material = Enum.Material.Neon
part.Position = Vector3.new(0, 4, 0)
part.Parent = Workspace

-- Create an attachment on the part
local attachment = Instance.new("Attachment")
attachment.Position = Vector3.new(0, 0.5, 0)
attachment.Parent = part

-- Create a particle emitter on the attachment
local emitter = Instance.new("ParticleEmitter")
emitter.Rate = 5
emitter.Lifetime = NumberRange.new(1.5, 1.5)
emitter.Texture = "rbxassetid://1266170131"
emitter.Speed = NumberRange.new(1, 1)
emitter.Size = NumberSequence.new{NumberSequenceKeypoint.new(0, 1), NumberSequenceKeypoint.new(1, 6)}
emitter.Transparency = NumberSequence.new{NumberSequenceKeypoint.new(0, 1), NumberSequenceKeypoint.new(0.25, 0), NumberSequenceKeypoint.new(1, 1)}
emitter.Orientation = Enum.ParticleOrientation.VelocityPerpendicular
emitter.Parent = attachment

-- Create a sound on the attachment
local sound = Instance.new("Sound")
sound.SoundId = "rbxassetid://1835405646"
sound.Parent = attachment

-- Play the sound
sound:Play()

-- Start checking if emitter should be enabled
RunService.Heartbeat:Connect(function()
	-- Enable the emitter within a time range of the audio; otherwise disable it
	emitter.Enabled = sound.TimePosition >= 5 and sound.TimePosition < 20
end)
Looped
The Looped property allows you to repeat audio after it has finished playing. When set to true, the Sound object's audio plays again. This is useful to apply to background audio to ensure your game never has abrupt silence.
Script sound objects
Play audio contextually
Aside from auto-playing audio through the Sound object's Playing property, you can play audio contextually from a LocalScript by calling Play() on the corresponding Sound object. For example:
Alternatively, if the place will feature multiple tracks, you can play a specific track from a LocalScript:
Play interface audio
You can play interface audio for GuiObjects such as buttons by hooking up a Sound object to the Activated event listener. This lets you provide auditory feedback to users, such as when they hover over or press it.
To play a Sound object's audio when a user activates a TextButton or ImageButton:
- In the Explorer window, hover over the TextButton or ImageButton, then click the ⊕ button. A contextual menu displays.
- From the menu, insert either a LocalScript or a Script with RunContext set to Enum.RunContext.Client.
- Paste the following code into the script, then replace SOUND_NAME with the name of a Sound object located inside the SoundService container.
local SoundService = game:GetService("SoundService")

local button = script.Parent
local sound = SoundService:FindFirstChild("SOUND_NAME")

if not sound.isLoaded then
	sound.Loaded:Wait()
end

local function onButtonActivated()
	if sound and not sound.IsPlaying then
		sound:Play()
	end
end

button.Activated:Connect(onButtonActivated)