A plugin is an extension that adds additional features or functionality to Studio. You can install community-made plugins from the Creator Store, or you can create and publish your own to the Toolbox to use across your games.
If you choose to also distribute your plugins to the Creator Store, you can either offer them for free or sell them for United States Dollars. Roblox offers a market-leading revenue share for these sales, as only taxes and payment processing fees are deducted. For more information on selling plugins, see Creator Store - Distribute and sell assets.
Create new plugins
You can create your own plugins to improve your workflow in Studio. The following code sample is a plugin called AddEmptyScript that inserts an empty Script as the child of an Instance or in ServerScriptService. The following sections explain the major parts to creating this plugin.
To begin, you should enable Plugin Debugging Enabled in the Studio section of Studio's settings. This will expose the PluginDebugService in Studio which provides real-time debugging for your plugin's code and makes it easier to reload and save your plugin.
local ServerScriptService = game:GetService("ServerScriptService")
local Selection = game:GetService("Selection")

-- Create a new toolbar section and Plugins menu folder titled "Custom"
local toolbar = plugin:CreateToolbar("Custom")

-- Add a toolbar button labeled "Empty Script"
local newScriptButton = toolbar:CreateButton("Empty Script", "Create an empty script", "rbxassetid://14978048121")

-- Make button clickable even if 3D viewport is hidden
newScriptButton.ClickableWhenViewportHidden = true

local function onPluginButtonClicked()
	local selectedObjects = Selection:Get()
	local parent = selectedObjects[1] or ServerScriptService
	local newScript = Instance.new("Script")
	newScript.Source = ""
	newScript.Parent = parent
end

newScriptButton.Click:Connect(onPluginButtonClicked)
Save plugin script
To create a plugin, first create a Script and save it locally.
Insert a new Script inside ServerStorage and rename it to AddEmptyScript.

Copy and paste the AddEmptyScript Plugin code above into the new script.
With the new script selected in the Explorer window, select Save as Local Plugin from Studio's Plugins menu.
In the popup window, click Save to insert the plugin script into your local Plugins folder of the Studio installation.
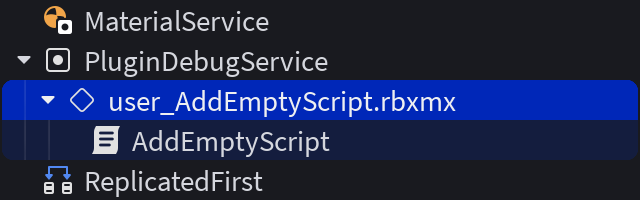
The plugin should appear in PluginDebugService and start running.
- IMPORTANTDelete the original script in ServerStorage and work from the AddEmptyScript plugin inside PluginDebugService, otherwise you may end up applying changes to the wrong script.


Add toolbar button
To add a button for your plugin to the Plugins tab of the Studio toolbar, use the Plugin:CreateToolbar() and PluginToolbar:CreateButton() methods. In the code for AddEmptyScript, line 5 creates a new section in the toolbar and Plugins menu folder titled Custom, while line 8 creates a button labeled Empty Script.

Execute code on click
To make the plugin execute code when a user clicks the toolbar button, connect a function to the button's PluginToolbarButton.Click event. In the code for AddEmptyScript, the connecting function is onPluginButtonClicked().
Check user selection
To modify a plugin's behavior based on what the user has selected, use the Selection service. The onPluginButtonClicked() function checks if the user has anything selected and creates the new script as its child instead of inside ServerScriptService. If the user doesn't have anything selected, it creates the new script in ServerScriptService.

Support undo and redo
Use ChangeHistoryService to allow users to undo and redo changes made by a plugin within a game. In your script, set the plugin to call TryBeginRecording() and store the identifier assigned to the API call before making changes. Then set the plugin to call FinishRecording() after making changes, so it captures any changes made during the recording session for undo and redo.
The following code sample creates an example plugin that can apply the neon material to selected parts. It uses ChangeHistoryService to record and manage the changes made by the plugin:
local ChangeHistoryService = game:GetService("ChangeHistoryService")
local Selection = game:GetService("Selection")

-- Create an example plugin
local toolbar = plugin:CreateToolbar("Example Plugin")
local button = toolbar:CreateButton("Neon it up", "", "")

-- Connect a function to the click event
button.Click:Connect(function()
	-- Try to begin a recording with a specific identifier
	local recording = ChangeHistoryService:TryBeginRecording("Set selection to neon")

	-- Check if recording was successfully initiated
	if not recording then
		-- This indicates that your plugin began a previous recording and never completed it
		-- You may only have one recording per plugin active at a time
		return
	end

	-- Iterate through the selected instances
	for _, instance in Selection:Get() do
		-- Check if the instance is a BasePart
		if instance:IsA("BasePart") then
			instance.Material = Enum.Material.Neon -- Set the material of the part to Neon
		end
	end

	-- Finish the recording, committing the changes to the history
	ChangeHistoryService:FinishRecording(recording, Enum.FinishRecordingOperation.Commit)
end)Upload plugins
After you finish creating a plugin, you can upload it to your inventory so that it is accessible across all of your projects.
To upload a plugin:
In the Explorer window, select a plugin script.
Navigate to Studio's Plugins menu, then select Publish as Plugin.
- OPTIONALIn the upper-left corner of the asset configuration window, click the default puzzle piece image to upload a 512×512 image thumbnail for your plugin.
Fill in the following fields:
- Name — A title for your plugin.
- Description — A description that describes what a potential user can expect the plugin to do.
- Creator — The creator or group that you want to attribute as the creator of the plugin.
Click the Submit button. Your plugin is now available to you in the Toolbox under the Inventory and Creations tabs.
Distribute and sell plugins
You can publicly distribute and sell your own plugins on the Creator Store for others to use within their own game development. This monetization method lets you earn 100% of net proceeds on transactions, bypassing platform fees and DevEx rates. For more information on this process, including how to set up a seller account to set prices and receive payouts, see Creator Store - Distribute and sell assets.