Elevators are platforms users can operate to travel from one part of an experience to another. This device is useful when you want to allow users to reach new areas within the worlds you create. In this guide, you can quickly create your own elevator that elevates users upwards and downwards when they interact with a proximity prompt.
In the following method to create an elevator, follow each section to learn how to:
- Using basic parts, create a platform for users to stand on and a track the platform can follow to move upwards and downwards.
- Configure a PrismaticConstraint to drive the platform's motion.
- Create a ProximityPrompt for users to interact with to start the platform's motion.
- Create a Script to connect all of the elevator's components and enable the platform to move along the track.
Creating the Platform and Track
A Part is Roblox's primary building block that you can move, resize, rotate, and customize to change their appearance, such as their color and material. Using basic parts to create the foundation of the elevator is useful because the elevator's platform and track only require basic shapes.
To create the platform and track of your elevator:
In the menu bar, select the Model tab.
In the Parts section, click the dropdown arrow and select Block. A block part displays in the workspace that's about to become the platform users ride up and down the elevator.

In the Explorer window, select the block, then in the Properties window,
- Set Name to Platform.
- Set Size to [8,1,4].
In the Explorer window, select the platform, then press CtrlD (⌘D) to duplicate the part. This duplicate part is about to become the track the platform uses to move up and down.
In the menu bar, select the Move tool, then use one of the axis arrows to pull the duplicate part away from the original position so there is a small gap between each object.
In the Properties window,
- Set Name to Track.
- In the Size property, set the Y axis to 20 studs tall.
- Enable the Anchored property.
In the Explorer window, select both parts, then press CtrlG (⌘G) to group them.
Rename the model Elevator.


In the viewport, the model appears as two separate objects. In the Explorer window, the model contains the separate Platform and Track objects.
Configuring the PrismaticConstraint
Now that you have two parts that make up the foundation of your elevator, you can create a PrismaticConstraint, align the associated attachments so the platform moves along an ideal path, and set the constraint's values to enable the platform to move up and down the track.
Creating the PrismaticConstraint and Attachments
A PrismaticConstraint creates a rigid joint between two Attachments, allowing the attachments to slide along one axis without rotating. This type of constraint is ideal for elevators because it keeps the platform at a single orientation while still being able to move upwards and downwards.
To create a PrismaticConstraint and its attachments:
In the Explorer window, insert a PrismaticConstraint into Track.
- Hover over Track and click the ⊕ button. A contextual menu displays.
- From the menu, insert a PrismaticConstraint.
Insert an attachment into Track and Platform.
Hover over Track and click the ⊕ button. A contextual menu displays.
From the menu, insert an Attachment.
Repeat this process for Platform.
Rename both attachments TrackAttachment and PlatformAttachment, respectively.

Select the PrismaticConstraint.
In the Properties window, assign the attachments to the PrismaticConstraint.
Select the PrismaticConstraint.Attachment0 property. Your cursor changes.
In the Explorer window, select TrackAttachment.
Select the PrismaticConstraint.Attachment1 property. Your cursor changes.
In the Explorer window, select PlatformAttachment.

Aligning the Attachments
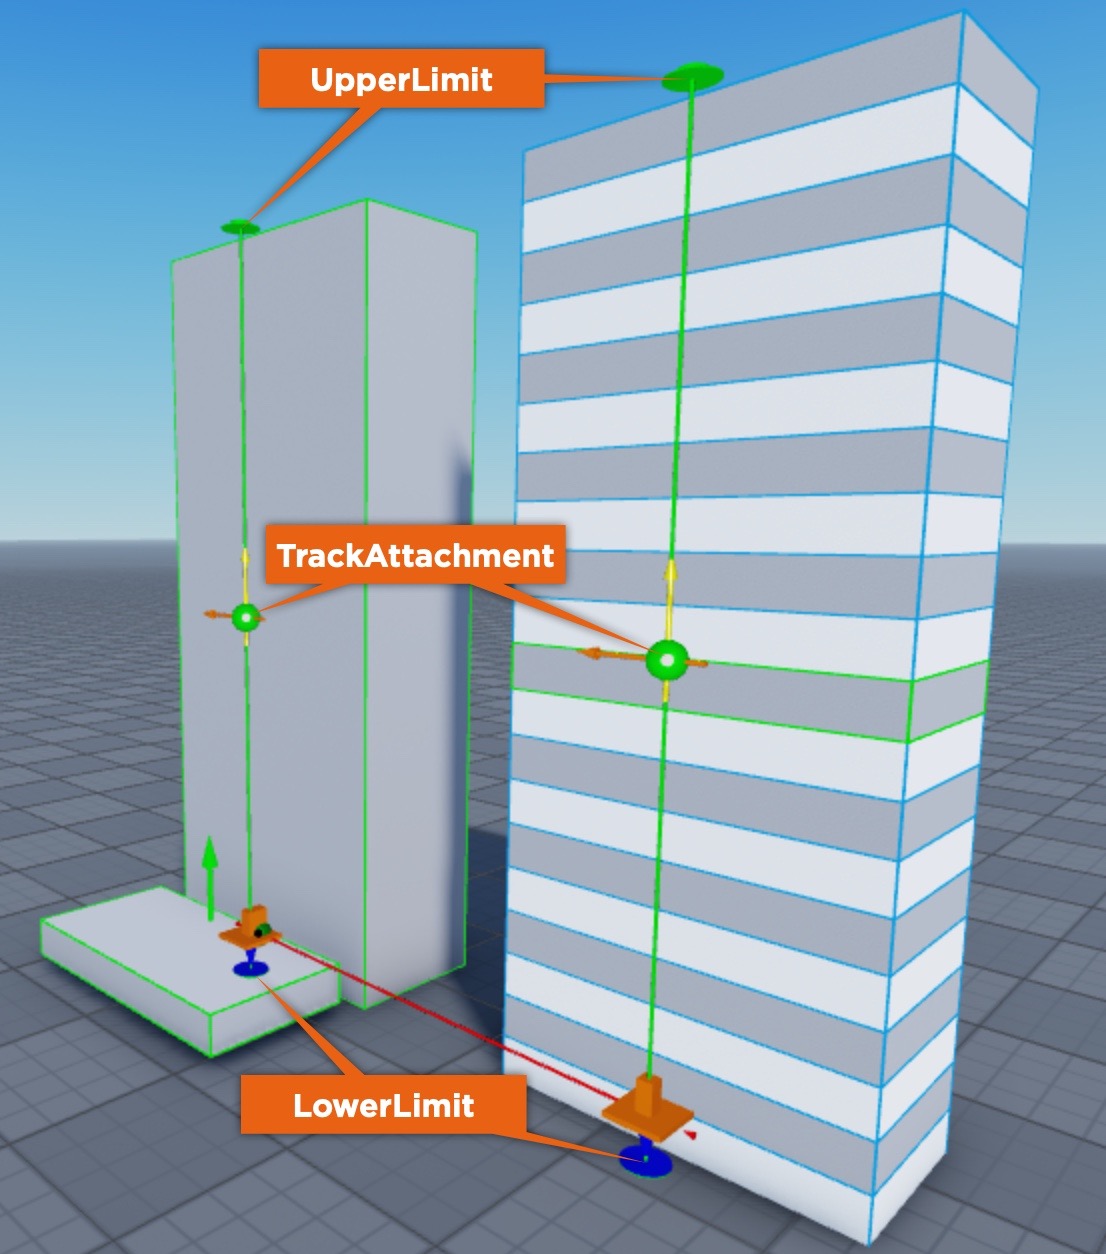
If you keep both attachments at their default positions within the center of their parent parts, the attachments will try to pull each part inside of the other, causing the physics of both parts to collide and render the elevator non-functional. To ensure this doesn't happen, you must move the attachments outside of their parent parts so the platform can freely travel through an unobstructed space along the outside of the track, then align them along their X and Z axes so that the platform only moves up and down the Y axis.
Before you begin to reposition and align your attachments, make sure you are able to view them within the viewport by enabling constraint details:
In the menu bar, navigate to the Model tab, then the Constraints section.
If it's not currently enabled, click Constraint Details and Draw On Top to display constraint and attachment visual aids.

If you want to make the visualization of each attachment larger, increase Scale.

It's important to view attachments so that you can visualize how the constraint is using both attachments to connect and move the platform.
To align the constraint's attachments:
In the menu bar, select the Rotate tool and rotate the TrackAttachment and PlatformAttachment so that the yellow arrow of each attachment points upwards on the Y axis.

Select the Move tool and reposition the attachment points so that they are both outside of their parent parts and aligned on their X and Z axes.

Setting PrismaticConstraint Values
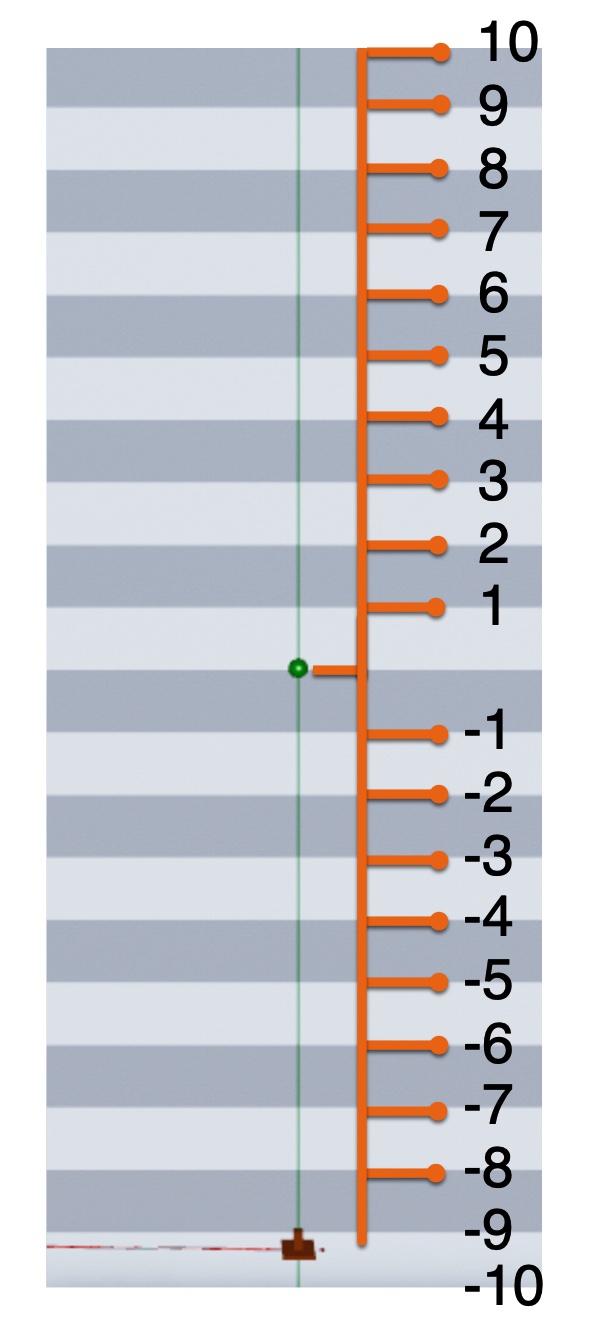
Now that you have a PrismaticConstraint and have aligned its associated Attachments, it's time to set the constraint's values that a Script can use to enable the platform to move up and down the track to a set lower and upper range of motion that correlates to the bottom and top of the track. Because the bottom and top of the track are each 10 studs away from the TrackAttachment that's in the middle of the track that's 20 studs in length, the constraint's lower and upper limits must be -10 and 10, respectively.


To set values for your constraint to enable elevator movement within a set range of motion:
In the Explorer window, select PrismaticConstraint.
In the Properties window, navigate to the Slider section, then enable the ability to set limits on the platform's range of motion with a servo style motor. New property fields display.
- Set Limits Enabled to True.
- Set ActuatorType to Servo.
Navigate to the Limits section, then set the platform's movement range to 10 studs above and below the middle of the track with no elasticity (bounce) as it reaches the upper and lower limits. After you set the following properties, the lower and upper limit visual aids elongate to meet their new values.
- Set LowerLimit to -10.
- Set Restitution to 0.
- Set UpperLimit to 10.
Navigate to the Servo section, then ensure that the platform can hold the weight against physics working against the platform, it moves at a nice pace upwards and downwards, and that its initialization point is at the bottom of the constraint's lower limit.
- Set ServoMaxForce to 10000.
- Set Speed to 10.
- Set TargetPosition to -10.
Creating the Proximity Prompt
A ProximityPrompt is an object that encourages user interaction to trigger an action when they approach in-experience objects such as doors, light switches, and buttons. This process uses a proximity prompt to allow users to press a key when they are near the platform in order to activate the elevator's movement.
To create a proximity prompt:
In the Explorer window, hover over Platform and click the ⊕ button. A contextual menu displays.
From the menu, insert a ProximityPrompt.

Scripting Elevator Movement
Now that you have all of the elements of your elevator ready to go, it's time to create a Script that gets everything to work together and move the platform up and down the track.
To script the elevator's movement:
- In the Explorer window, hover over Elevator and click the ⊕ button. A contextual menu displays.
- From the menu, insert a Script.
- In the new script, enter the following:
local platform = script.Parent.Platform
local prismaticConstraint = script.Parent.Track.PrismaticConstraint

platform.ProximityPrompt.Triggered:Connect(function(player)
	print(prismaticConstraint.CurrentPosition)
	if prismaticConstraint.CurrentPosition <= -9 then
		prismaticConstraint.TargetPosition = 10
	elseif prismaticConstraint.CurrentPosition >= 9 then
		prismaticConstraint.TargetPosition = -10
	end
end)
When you playtest your experience and input the key for the elevator's proximity prompt, the script runs to check if the platform is below or above 9 studs from the constraint. If it's below 9 studs and a user interacts with the proximity prompt, the platform moves upwards until it reaches the constraint's upper limit; conversely, if it's above 9 studs and a user interacts with the proximity prompt, the platform moves downwards until it reaches the constraint's lower limit.