The Season Passes feature package offers out-of-the-box functionality to create limited-time, quest-based progression systems in which players can complete quest objectives to earn rewards that are only available during a pre-defined period of time. Using the package's customization options, you can personalize all season passes to deliver new content to your audience, promote player retention, and generate revenue.

Get package
The Creator Store is a tab of the Toolbox that you can use to find all assets that are made by Roblox and the Roblox community for use within your projects, including model, image, mesh, audio, plugin, video, and font assets. You can use the Creator Store to add one or more assets directly into an open game, including feature packages!
Every feature package requires the Core feature package to function properly, and the Season Passes package requires the Missions feature package to define a season's missions. Once all three package assets are within your inventory, you can reuse them in any project on the platform.
To get the packages from your inventory into your game:
Add the Core, Missions, and Season Passes packages to your inventory within Studio by clicking the Add to Inventory link in the following set of components.
From Studio's Window menu or Home tab toolbar, open the Toolbox.
In the Toolbox window, click the Inventory tab. The My Models sort displays.
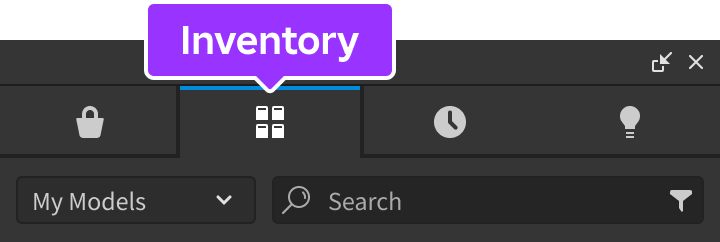
Click the Feature Package Core tile, Missions Feature Package tile, then the Season Passes Feature Package tile. All three package folders display in the Explorer window.
Drag the package folders into ReplicatedStorage.
Allow data store calls to track player purchases with the packages.
- Open Studio's File ⟩ Experience Settings window.
- Navigate to the Security tab, then enable Enable Studio Access to API Services.

Configure mission dependencies
For seasons to function properly, you must add logic so that the Season Passes feature package can track player progress and update its UI components. For simplicity, the example below uses the Missions feature package and calls SeasonPasses.addProgressToSeason() after players complete missions, but you can track player progress however you'd like. Whether you define missions or not, though, you must still add the Missions feature package to your game for the Season Passes code to function.
Missions each have a set of tasks that must be finished to complete the mission, configuration options, and optional display metadata. For an in-depth guide on how to configure missions and their tasks, see Define missions.
Add XP from missions to seasons
This example uses the Missions feature package to define missions that players can complete to gain experience (XP) and progress through the season. To award players XP when they complete a defined mission, you must add logic to the ReplicatedStorage.Missions.Server.Examples.MissionsExample server script so that it can import season pass data and reward players according to their progress.
local SeasonPasses = require(ReplicatedStorage.SeasonPasses.Server.SeasonPasses)

local function completeHandler(player: Player, missionId: Types.MissionId)
	print(`{player} completed mission {missionId}`)
	if missionId == "Walking" then
		SeasonPasses.addProgressToSeason(player, 100)
	end
	if missionId == "Walking2" then
		SeasonPasses.addProgressToSeason(player, 100)
	end
	if missionId == "Walking3" then
		SeasonPasses.addProgressToSeason(player, 100)
	end
	if missionId == "Availability" then
		SeasonPasses.addProgressToSeason(player, 100)
	end
	if missionId == "Manual" then
		SeasonPasses.addProgressToSeason(player, 100)
	end
	if missionId == "Minutely" then
		SeasonPasses.addProgressToSeason(player, 100)
	end
end
Add season tier reward icons
In addition to granting players XP when they complete missions, the Season Passes feature package uses the Missions feature package to define unique reward tiers within a season. If you want to add an on-screen icon for a tier reward that players can earn if they enough XP, add an asset ID in the Missions config for each season tier reward.
Configure seasons
After you have set up every mission you want to include in a season, it's time to configure the season pass itself. In ReplicatedStorage.SeasonPasses.Configs.Season, there is an example of a season configuration for your reference, and the following code samples are from that file.
Define passes
Passes allow you to charge players a one-time Robux fee in order to access a season pass's missions and potential rewards. After you create a pass with a unique asset ID, you can set the details of the pass in the premiumTrack field of your season. For example, the following code sample defines a pass with an example asset ID of 928192647 to represent a season pass, then it gives the season pass a track name of "Premium Track".
Configure tiers and rewards
Season tiers represent the milestones that players must meet in order to earn rewards throughout a season. To climb the tiers, players complete missions in order to earn XP, and when they earn enough XP, they graduate to the next tier and receive rewards for the tier they just completed. Tiers have an upperBoundXP property that sets the threshold of XP necessary to claim the rewards for a tier. Each tier can offer two types of rewards:
- Free - A reward that players can earn without purchasing the season pass.
- Premium - A reward that players can only earn by purchasing the season pass.
To demonstrate, review the following code sample for a season with one tier that requires 100 XP to earn a free ice lance reward and a premium blast shield reward. The icon is the asset ID of the UI image to display for a reward, and the displayName displays a name for the reward. Note that the displayName displays in the UI, but the rewardId is hidden from the player and is mainly used for data store purposes.
While this script is for illustration purposes on how to configure one tier at a time, most seasons include more than one tier. As you define multiple tiers and rewards for a season, make sure each rewardId is numeric and in increasing order so that your tiers display in the order that you define them in the tiers list.
Define season details
Now that you have a season pass with tiers and rewards, it's time to define your season's details:
- title - The name of your season.
- description - The description of your season.
- startUtc - The beginning of the season in coordinated universal time.
- endUtc - The end of the season in coordinated universal time.
- seasonId - Lets you track the XP a player gains throughout the given season.
The package uses startUtc and endUtc to display the countdown of the season.
Integrate server logic
Take a look at ReplicatedStorage.SeasonPasses.Server.Examples.SeasonPassesExample, which shows how your server will interact with the Season Passes Feature Package. The snippet below is from that script.
You mainly need to create a handler function for awarding claimed rewards to your players. For example, the following code sample creates a rewardClaimedHandlerFunction() function that tracks when players progress to the next tier, then rewards them either just the free reward, or both the free and premium rewards if they purchased the season pass.
For your purposes, replace the task.wait() call with logic that allows players to get the rewards that they have claimed in the season. This function must return a boolean: true if the server granted the reward, false if it did not.
local function rewardClaimedHandlerFunction(_player: Player, _rewardId: Types.RewardId): boolean
	task.wait(2)
	return true
end

local function initializeRewardClaimedHandlers()
	for tierId, tier in pairs(Season.tiers) do
		if tier then
			if tier.freeReward then
				SeasonPasses.setRewardClaimedHandler(tier.freeReward.rewardId, rewardClaimedHandlerFunction)
			end
			if tier.premiumReward then
				SeasonPasses.setRewardClaimedHandler(tier.premiumReward.rewardId, rewardClaimedHandlerFunction)
			end
		end
	end
end
Configure constants
Constants for the Core feature package live in two spots:
- Shared constants live in ReplicatedStorage.FeaturePackagesCore.Configs.SharedConstants.
- Package-specific constants, in this case the Season Passes feature package, live in ReplicatedStorage.SeasonPasses.Configs.Constants. The main things you might want to adjust to meet the design requirements of your game:
- Sound asset IDs
- Purchase effect duration and particle colors Additionally, you can find strings for translation broken out into one location: ReplicatedStorage.FeaturePackagesCore.Configs.TranslationStrings.
Customize UI components
By modifying the package objects, such as colors, font, and transparency, you can adjust the visual presentation of your season pass prompts. However, keep in mind that if you move any of the objects around hierarchically, the code will not be able to find them, and you'll need to make adjustments to your code.
A season is made up of the following high-level components that are programatically added to the Missions Feature Package UI components:
- SeasonBottomFrame – The frame that includes information about each track, a scrolling frame of the rewards for tiers, and tier data.
- SeasonDescriptionFrame - The frame in the header that displays the season title, description and countdown.
- TierRewardFrame - The frame that displays a specific reward for a tier.
- TierProgressFrame - The frame that displays the progress the player has made toward the current tier they are working on.
- PurchaseFrame - The frame that prompts the player to purchase a premium pass.
- SeasonProgressFrame - The frame that displays the player's progress bar throughout the entire season.
- RewardsButtonFrame - The frame that adds a button that allows the season's information to be shown through the SeasonBottomFrame.