Tạo ra một trò chơi chất lượng cao đòi hỏi nhiều kỹ năng như mô hình hóa, lập trình, thiết kế giao diện người dùng và sản xuất âm thanh. Thông thường, một người khó mà có đủ tất cả những kỹ năng này, điều đó khiến việc hợp tác giữa các vai trò khác nhau trở thành một phần thiết yếu trong quy trình phát triển.
Với các công cụ hợp tác tích hợp sẵn của Studio, các nhà phát triển có thể đóng góp cho các trò chơi một cách độc lập theo thời gian của riêng họ, hoặc làm việc cùng nhau với nhóm của họ cùng một lúc.

Yêu cầu hợp tác theo độ tuổi
Để sử dụng các công cụ hợp tác của Studio với các nhà phát triển khác, bạn phải hoàn thành kiểm tra độ tuổi bằng cách xác minh ID của bạn hoặc hoàn thành ước lượng độ tuổi qua khuôn mặt. Chủ sở hữu nhóm hoặc trò chơi phải hoàn thành kiểm tra độ tuổi để cho phép những người hợp tác còn lại tham gia vào trò chơi của họ.
Sau khi hoàn thành kiểm tra độ tuổi, bạn chỉ có thể hợp tác với các nhà phát triển trong các nhóm độ tuổi tương thích theo mặc định. Ví dụ, một nhà phát triển 16 tuổi có thể hợp tác với một nhà phát triển 17 tuổi và một người khác 21 tuổi. Tuy nhiên, một nhà phát triển dưới 13 tuổi phải là bạn bè đáng tin cậy của các đồng nghiệp lớn hơn hoặc có sự cho phép của cha mẹ để hợp tác với các nhà phát triển trên 18 tuổi.
| Nhóm tuổi của bạn | Có thể hợp tác với | Không thể hợp tác với |
|---|---|---|
| Dưới 9 | Người dùng dưới 13 | Người dùng 13 tuổi và lớn hơn |
| 9–12 | Người dùng dưới 16 | Người dùng 16 tuổi và lớn hơn |
| 13–15 | Người dùng từ 9–17 tuổi | Người dùng dưới 9 và 18+ |
| 16–17 | Người dùng 13 tuổi và lớn hơn | Người dùng dưới 13 tuổi |
| 18+ | Người dùng 16 tuổi và lớn hơn | Người dùng dưới 16 |
Để làm việc với các nhà phát triển ngoài nhóm tuổi của bạn, bạn phải đáp ứng ít nhất một trong các yêu cầu sau lần đầu tiên bạn tham gia vào một phiên Team Create:
Trở thành bạn bè đáng tin cậy với mọi người hợp tác đã truy cập vào trò chơi của bạn.
- Bạn có thể gửi yêu cầu trở thành bạn bè đáng tin cậy cho nhiều người cùng một lúc từ Studio. Yêu cầu bạn bè đáng tin cậy từ người dùng dưới 13 tuổi yêu cầu sự chấp thuận của cha mẹ. Ở một số khu vực, yêu cầu này cũng áp dụng cho thanh thiếu niên lớn tuổi hơn.
- Để xem những người hợp tác mà bạn cần trở thành bạn bè đáng tin cậy để mở khóa bản thân và những nhà phát triển nào hiện đang bị bạn chặn, hãy vào trò chơi của bạn trong Creator Hub và sau đó truy cập vào An toàn > Người hợp tác.
Nhận sự cho phép từ một tài khoản cha mẹ liên kết để hợp tác với các nhà phát triển của tất cả các nhóm tuổi thông qua kiểm soát cha mẹ hợp tác. Cha mẹ có thể sử dụng các điều khiển này để chọn các nhóm tuổi mà họ cảm thấy thoải mái cho phép con cái họ hợp tác.
- Các nhà phát triển dưới 16 tuổi có thể yêu cầu cha mẹ cập nhật cài đặt này. Cha mẹ liên kết có thể trực tiếp cập nhật cài đặt này từ kiểm soát cha mẹ của họ.
- Cài đặt này sẽ có hiệu lực cho đến khi cha mẹ thay đổi nó. Các nhà phát triển không cần yêu cầu sự cho phép mỗi khi họ sử dụng Team Create.
- Sự cho phép hợp tác với tất cả các nhóm tuổi không đảm bảo quyền truy cập vào mọi phiên hợp tác. Ví dụ, nếu một người hợp tác dưới 16 tuổi đã truy cập vào trò chơi trước bạn có quyền cấp phép cha mẹ của họ bị hạn chế đối với các nhóm tuổi tương tự hoặc bạn bè đáng tin cậy, bạn sẽ không thể hợp tác với họ trừ khi họ thêm bạn làm bạn bè đáng tin cậy.
Sau khi một nhà phát triển đáp ứng một trong các yêu cầu này và thành công tham gia vào một phiên Team Create, họ sẽ duy trì quyền truy cập trừ khi họ mất quyền bạn bè đáng tin cậy với một người hợp tác cần thiết hoặc một phụ huynh thu hồi quyền hợp tác của họ trong Studio.
Các người hợp tác không thể tham gia Team Create vì các yêu cầu hợp tác theo độ tuổi vẫn có quyền Chỉnh sửa. Họ có thể:
- Sử dụng Lưu Như để xuất bản một bản sao của trò chơi lên Roblox.
- Sử dụng Open Cloud APIs.
- Quản lý siêu dữ liệu của trò chơi trong Creator Hub.
Để biết thêm thông tin, xem Câu hỏi thường gặp về yêu cầu độ tuổi Team Create.
Quản lý người hợp tác
Các người hợp tác mà bạn thêm vào một trò chơi có các cài đặt quyền tương ứng với mức độ truy cập của họ vào trò chơi. Dưới đây là các cài đặt quyền người dùng khác nhau:
| Quyền | Mô tả |
|---|---|
| Chủ sở hữu | Người dùng là chủ sở hữu của trò chơi và có quyền cấu hình các quyền của người dùng khác. |
| Chỉnh sửa | Người dùng có quyền chỉnh sửa trò chơi. Điều này cũng cấp cho người dùng quyền Chơi. |
| Chơi | Người dùng có quyền chơi trò chơi một cách riêng tư. |
| Không có quyền truy cập | Người dùng không có cả quyền Chỉnh sửa cũng như Chơi. |
Có một số khác biệt nhỏ khi quản lý người hợp tác trong trò chơi thuộc nhóm so với trò chơi thuộc người dùng.
Trò chơi thuộc nhóm
Đối với các trò chơi nhóm, chỉ có chủ sở hữu nhóm hoặc những thành viên có quyền đủ có thể quản lý các vai trò trong nhóm, có thể là trên tất cả các trò chơi nhóm hoặc trên cơ sở từng trò chơi. Những người dùng như vậy cũng có thể thêm các người hợp tác cá nhân vào các trò chơi thuộc nhóm theo quy trình tương tự như các trò chơi thuộc người dùng, nhưng chỉ cho quyền Chơi.
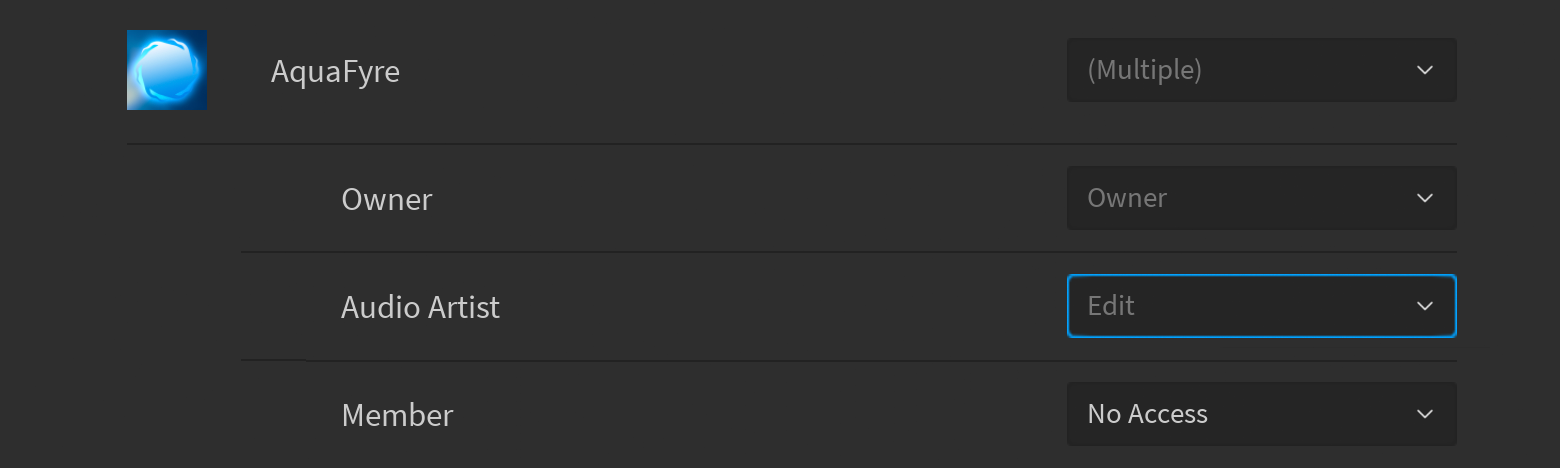
Nếu bạn là chủ sở hữu nhóm hoặc là một thành viên có quyền đủ, bạn có thể cấu hình hợp tác trên tất cả các trò chơi nhóm, chẳng hạn như cấp quyền Chỉnh sửa cho vai trò nhóm "Nhà nghe nhạc" để họ có thể điều chỉnh âm thanh phát lại trên nhiều trò chơi nhóm.
Từ Bảng điều khiển Nhà tạo, mở rộng trình chuyển đổi tài khoản ở phía trên bên trái và chọn nhóm.
Mở rộng trình chuyển đổi tài khoản một lần nữa, chọn Cài đặt dưới tên của nhóm, sau đó chọn Vai trò.
Kích hoạt Chỉnh sửa tất cả trải nghiệm nhóm cho các vai trò cần có quyền chỉnh sửa. Nhớ nhấn Lưu Thay đổi cho mỗi vai trò mà bạn thay đổi.
Trong cửa sổ Quản lý Người hợp tác của Studio cho bất kỳ trò chơi nào thuộc nhóm, các vai trò đủ điều kiện hiển thị quyền Chỉnh sửa nhưng bị tắt tiếng để chỉ ra rằng bạn không thể thay đổi mức độ quyền từ Studio.


Trò chơi thuộc người dùng
Đối với các trò chơi thuộc người dùng, bạn có thể cấp quyền Chơi cho bất kỳ người dùng nào hoặc nhóm, nhưng bạn chỉ có thể cấp quyền Chỉnh sửa cho các bạn Roblox.
Để cấp quyền Chỉnh sửa cho một người bạn trong một trò chơi mà bạn sở hữu:
Với trò chơi mở trong Studio, nhấn nút Hợp tác ở bên phải của thanh mezzanine.

Gõ vào thanh tìm kiếm ở trên cùng để tìm một người hợp tác để thêm vào. Một menu kéo xuống xuất hiện liệt kê các người hợp tác phù hợp, với bạn bè được chỉ định bởi nhãn Bạn bè. Chọn người hợp tác để thêm vào.
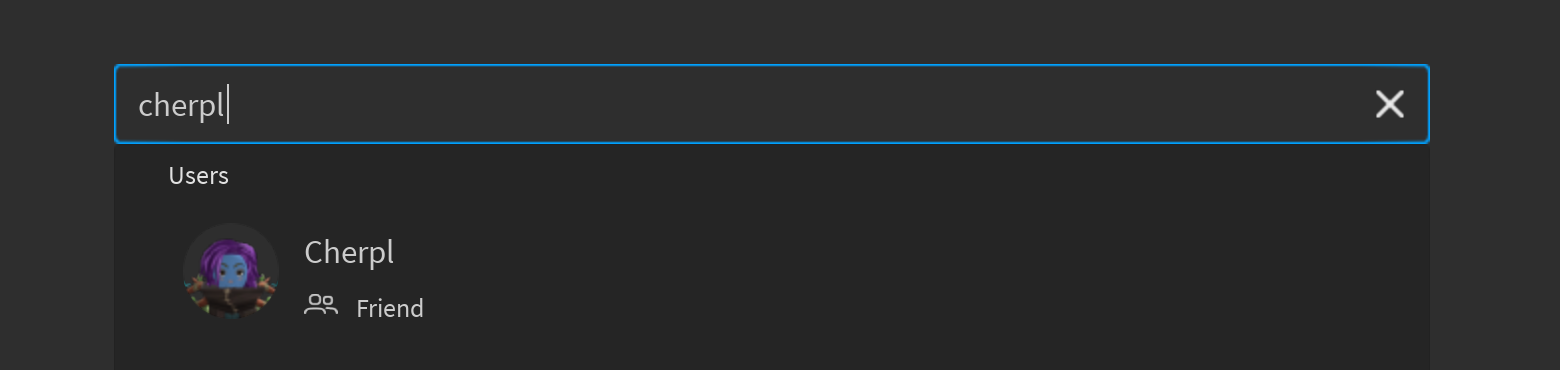
Chọn Chỉnh sửa từ menu kéo xuống quyền cho người bạn, sau đó nhấn Lưu để cài đặt hợp tác của bạn có hiệu lực.


Truy cập một phiên
Những người có quyền chỉnh sửa một trò chơi có thể tham gia vào một phiên hợp tác như sau:
Điều hướng đến Bảng điều khiển Nhà tạo.
Định vị trò chơi tùy thuộc vào việc nó thuộc nhóm hay người dùng.
Chọn nhóm từ menu chọn ở phía trên bên trái.
Đảm bảo rằng Sáng tạo được chọn ở bên trái và Trải nghiệm của Tôi trong bảng chính.
Trải nghiệm của TôiĐược chia sẻ với Tôi
Di chuột qua biểu tượng trò chơi và nhấn nút Chỉnh sửa trong Studio để hợp tác.


Xem người hợp tác
Trong khi làm việc trong một phiên hợp tác, bạn có thể thấy các người hợp tác hiện tại ở góc trên bên phải của Studio, mỗi người có một màu riêng biệt được chỉ định mà nhất quán trên tất cả các thiết bị của người hợp tác.

Để xem thêm chi tiết về các người hợp tác hiện tại, nhấn vào bất kỳ biểu tượng nào để mở cửa sổ Người Hợp tác Trực tiếp. Trong cửa sổ này, bạn có thể thấy liệu một người dùng có hoạt động hay không trong Studio, cũng như một chỉ báo cho thấy nơi người dùng đó đang làm việc. Người dùng trở nên không hoạt động nếu họ không sử dụng Studio trong hơn 5 phút.

Hiển thị lựa chọn
Theo mặc định, mã được chọn trong Trình chỉnh sửa Kịch bản và các đối tượng được chọn trong không gian 3D đều được làm nổi bật bằng màu sắc riêng biệt được giao cho từng người hợp tác. Thêm vào đó, cửa sổ Khám phá đánh dấu các đối tượng được chọn bằng các chấm màu trong những màu sắc được giao này để chỉ ra sự lựa chọn của các người hợp tác khác.


Để làm cho các lựa chọn của tất cả các người hợp tác không thể nhìn thấy đối với chỉ bạn trong khi vẫn thấy được công việc của họ, hãy bỏ chọn Hiện lựa chọn của người hợp tác ở dưới cùng của cửa sổ Người Hợp tác Trực tiếp.

Tham gia người hợp tác
Để nhanh chóng nhảy đến một vị trí trong không gian làm việc hoặc đến dòng chính xác trong một kịch bản mà một người hợp tác đang chỉnh sửa, hãy di chuột qua tên của họ trong cửa sổ Người Hợp tác Trực tiếp và nhấn Tham gia.

Bình luận
Roblox Studio có một tính năng bình luận cho phép bạn xác định một đối tượng trong không gian 3D và bắt đầu một cuộc trò chuyện với các người hợp tác của bạn, để lại ghi chú cần làm, và nhiều hơn nữa. Các bình luận được cập nhật trong thời gian thực cho phép bạn và nhóm của bạn nhận được và phản hồi ý kiến mà không làm gián đoạn quy trình làm việc của bạn trong Studio. Bạn cũng có thể nhận được thông báo cá nhân hóa để giúp bạn theo dõi phản hồi, ngay cả khi bạn không sử dụng Studio.
Quy trình làm việc
Để tạo một bình luận, nhấn nút Bình luận ở bên phải của thanh mezzanine của Studio (phím tắt C).

Trong không gian xem, con trỏ của bạn chuyển sang màu xanh. Nhấn vào bất kỳ đối tượng nào thừa hưởng từ BasePart (hầu hết đều có, bao gồm cả Terrain), gõ bình luận của bạn và nhấn Gửi.

Các bình luận xuất hiện trong cửa sổ Bình luận, có thể truy cập từ menu Cửa sổ ⟩ Hợp tác của Studio, với các bình luận mới nhất ở trên cùng. Từ trong cửa sổ Bình luận, bạn có thể:
- Nhấn đơn vào một bình luận để hiển thị toàn bộ cuộc trò chuyện trong không gian 3D.
- Nhấn đúp vào một bình luận để phóng to nó trong không gian xem.
- Sử dụng menu ⋯ ở góc trên bên phải để hiển thị các bình luận đã giải quyết, lọc chỉ các bình luận mà bạn đã được gán vào, hoặc ẩn các bình luận trong không gian xem.
- Giải quyết các bình luận khi bạn và nhóm của bạn giải quyết chúng. Sau khi bạn giải quyết một bình luận, nó biến mất khỏi cả không gian xem và danh sách chính, nhưng nó không hoàn toàn biến mất; bạn luôn có thể bỏ giải quyết nó sau.

Thông báo
Để giúp bạn theo dõi phản hồi ngay cả khi bạn không sử dụng Studio, bạn sẽ nhận được một tóm tắt qua email tổng hợp toàn bộ hoạt động gần đây. Mỗi tóm tắt qua email cung cấp một cái nhìn tổng quát đơn giản về hoạt động bình luận theo từng địa điểm, bao gồm:
- Khi ai đó đề cập (gán) bạn trong một bình luận, ví dụ @username.
- Khi ai đó bình luận trong một diễn đàn mà bạn đã từng trả lời hoặc được đề cập đến.
- Khi ai đó giải quyết một diễn đàn mà bạn đã từng trả lời hoặc được đề cập đến.
Từ trong cái nhìn tổng quát qua email, chỉ cần nhấn Xem trong Studio để đến ngay cuộc trò chuyện trong Roblox Studio.
Lập trình hợp tác
Trong một phiên hợp tác, bạn có thể lập trình cùng nhau trong thời gian thực thông qua lập trình trực tiếp, hoặc bạn có thể soạn thảo các kịch bản trong một môi trường tập trung hơn trước khi cam kết chúng vào kho lưu trữ chung mà các đối tác chia sẻ.
Lập trình trực tiếp
Lập trình trực tiếp cho phép các người hợp tác lập trình cùng nhau trong thời gian thực. Trong Trình chỉnh sửa Kịch bản, màu của con trỏ của mỗi người hợp tác tương ứng với màu sắc được giao của họ trong cửa sổ Người Hợp tác Trực tiếp.

Trong khi lập trình trực tiếp, các chỉnh sửa được tự động lưu mỗi 5 phút như cách lưu các chỉnh sửa địa điểm, và một người hợp tác có thể lưu một kịch bản thủ công bất kỳ lúc nào với CtrlS (⌘S). Các phiên bản đã lưu hoặc tự động lưu được ghi lại trong cửa sổ Lịch sử Kịch bản.
Chế độ nháp
Thông qua chế độ Nháp, bạn có thể độc lập chỉnh sửa và thử nghiệm các kịch bản mà không làm ảnh hưởng đến trò chơi của người khác. Sau khi bạn hoàn thành soạn thảo một kịch bản, bạn có thể commits vào kho lưu trữ chung và sử dụng kiểm tra hợp tác để kiểm tra phiên bản đã cam kết với người khác.
Cam kết nháp
Một khi bạn đã chỉnh sửa một kịch bản, nó sẽ xuất hiện trong cửa sổ Nháp, một cửa sổ không mặc định mà bạn phải thêm vào một tab tùy chỉnh trong thanh công cụ của Studio.

Các nháp được lưu vào hệ thống tệp cục bộ của bạn và tồn tại giữa các phiên Studio trên cùng một máy. Để cam kết các chỉnh sửa cục bộ của bạn vào kho lưu trữ, nhấn chuột trái vào một kịch bản, hoặc giữ Shift và nhấn chuột trái để chọn nhiều kịch bản. Sau đó nhấn Cam kết để cam kết tất cả các kịch bản đã chọn.

So sánh và hợp nhất các thay đổi
Nếu một người hợp tác khác cam kết thay đổi vào cùng một kịch bản mà bạn đang chỉnh sửa, một biểu tượng có biểu tượng ⊕ màu xanh lá xuất hiện trong cửa sổ Nháp. Để xem các thay đổi của họ, nhấp chuột phải vào kịch bản và chọn So sánh với Máy chủ.

Trong tab (Diff) mở ra trong Trình chỉnh sửa Kịch bản, mã mà các người hợp tác khác đã thay đổi hoặc xóa sẽ xuất hiện màu đỏ, trong khi mã mà bạn đã cập nhật sẽ xuất hiện màu xanh.

Để hợp nhất các thay đổi của họ vào kịch bản của bạn:
Trong cửa sổ Nháp, nhấp chuột phải vào kịch bản và chọn Hợp nhất từ Máy chủ.

Trong cửa sổ hợp nhất, bạn có thể chọn mã nào để giữ lại, hoặc thực hiện chỉnh sửa thủ công.
- Đánh dấu Nháp để giữ các thay đổi của bạn, hoặc để trống để từ bỏ chúng.
- Đánh dấu Máy chủ để hợp nhất các thay đổi đã cam kết vào nháp của bạn, hoặc để trống để bỏ qua chúng.
- Đánh dấu Khác để chỉnh sửa mã thủ công và lưu các thay đổi vào nháp của bạn.
Sau khi bạn đã xem trước việc giải quyết hợp nhất, nhấn Hợp nhất Tất cả để cập nhật kịch bản cục bộ của bạn.

Khôi phục các kịch bản đã xóa
Nếu một người hợp tác đã xóa một kịch bản mà bạn đang chỉnh sửa, một biểu tượng có biểu tượng ⊘ màu đỏ xuất hiện trong cửa sổ Nháp. Để khôi phục kịch bản, nhấp chuột phải vào nó và chọn Khôi phục Kịch bản. Các kịch bản được khôi phục về cây Workspace của địa điểm, vì vậy bạn có thể cần phải đặt lại chúng trở lại vị trí gốc.

Xem lịch sử kịch bản
Tất cả các thay đổi kịch bản, cho dù được một người hợp tác lưu, tự động lưu, hay cam kết bởi một người hợp tác thông qua chế độ Nháp, đều được ghi lại trong cửa sổ Lịch sử Phiên bản. Để truy cập nó:
Nhấp chuột phải vào kịch bản trong cửa sổ Khám phá và chọn Xem Lịch sử Kịch bản.
Trong cửa sổ Lịch sử Phiên bản mở ra, bạn sẽ thấy tất cả các phiên bản đã cam kết của kịch bản, ngày cam kết, người hợp tác đã cam kết, và thêm nữa. Từ cửa sổ này, các hành động sau có thể thực hiện:
Để so sánh bất kỳ phiên bản nào (trừ phiên bản cũ nhất) với phiên bản trước của nó, chọn nó và nhấn So sánh với Phiên bản Trước. Trong tab (Diff) mở ra trong Trình chỉnh sửa Kịch bản, mã từ phiên bản mới hơn sẽ xuất hiện màu xanh trong khi mã từ phiên bản cũ hơn sẽ xuất hiện màu đỏ.
Lưu và xuất bản
Trong khi một phiên hợp tác, Studio tự động lưu dự án lên đám mây mỗi bốn phút.
Khôi phục các phiên bản trước
Chủ sở hữu một trò chơi có thể khôi phục các thay đổi do các biên tập viên khác thực hiện. Xem tại đây để biết hướng dẫn.
Bạn cũng có thể muốn kiểm tra Lịch sử Hoạt động. Cái nhìn này cung cấp một nhật ký sự kiện theo thời gian giúp cải thiện sự hiển thị của nhóm vào các cài đặt trò chơi quan trọng.
Tắt hợp tác
Team Create là tính năng cốt lõi của Studio cho phép hợp tác. Các quy trình làm việc liên quan đến hộp thoại Quản lý Người hợp tác sẽ tự động bật tính năng này, nhưng bạn có thể tắt nó thủ công nếu cần.
Nếu cửa sổ Người Hợp tác Trực tiếp chưa mở, nhấn vào bất kỳ biểu tượng người hợp tác nào để mở nó.

Ở góc dưới bên phải của cửa sổ, nhấn nút ⋯ và chọn Tắt Team Create.

Khi được nhắc, xác nhận việc kết thúc phiên để tải lại địa điểm trong trạng thái không hợp tác.
