อินสแตนซ์ Path2D พร้อมกับเมธอดและคุณสมบัติ API ช่วยให้คุณสามารถสร้างสไปรน์ 2D และเส้นโค้ง 2D ที่มีประโยชน์สำหรับเอฟเฟกต์ UI เช่น การอนิเมชันที่อิงตามเส้นทางและตัวแก้กราฟ
สร้างเส้นทาง 2D
ในการเพิ่ม Path2D ลงบนหน้าจอหรือวัตถุในประสบการณ์:
ในหน้าต่าง Explorer ให้แทรกอินสแตนซ์ Path2D ภายใต้ ScreenGui หรือ SurfaceGui ที่มองเห็นได้ (ไม่จำเป็นต้องเป็นลูกโดยตรง)

เลือก Path2D ใหม่เพื่อแสดงวิจัยเครื่องมือในมุมมอง ในค่าเริ่มต้น เครื่องมือ Add Point จะถูกเลือก

เริ่มคลิกที่หน้าจอเพื่อเพิ่ม จุดที่ควบคุม เพื่อสร้างเส้นทาง จุดเริ่มต้นอาจไม่แม่นยำมากนัก แต่คุณสามารถ ปรับแต่ง ตำแหน่งของจุดที่ควบคุมใด ๆ ได้ในภายหลัง

เมื่อเสร็จสิ้น คลิกปุ่ม Done ของเครื่องมือหรือกด Enter.


แก้ไขจุดที่ควบคุม
เมื่อมีการเลือก Path2D ในลำดับชั้นของ Explorer คุณสามารถแก้ไขจุดที่ควบคุมแต่ละจุดรวมถึง แทนเจนต์ ของมันได้
เลื่อนจุด
เพื่อเลื่อนจุดที่ควบคุมเฉพาะบนเส้นทาง เปิดใช้เครื่องมือ Select (V) จากนั้นคลิกและลากมันไปยังตำแหน่งใหม่


สำหรับการกำหนดตำแหน่งอย่างแม่นยำ ให้เลือกจุดที่ควบคุมและจากนั้นในหน้าต่าง Properties กำหนดตำแหน่งใหม่สำหรับ SelectedControlPointData ของจุด (UDim2).

โปรดทราบว่าตำแหน่งของจุดไม่ได้อยู่ในรูปแบบสัมบูรณ์ แต่เป็น สัมพัทธ์ กับคอนเทนเนอร์หลักของเส้นทาง ตัวอย่างเช่น เปรียบเทียบจุดที่ควบคุมที่ 30% จากด้านซ้ายและ 20% จากด้านบนสำหรับเส้นทางภายใน ScreenGui กับเส้นทางที่เหมือนกันที่วางอยู่ภายใน Frame ที่ตั้งอยู่ในมุมขวาบนของ ScreenGui

เพิ่มจุด
จุดที่ควบคุมใหม่สามารถถูกเพิ่มเข้าไปใน Path2D ระหว่างสองจุดที่มีอยู่หรือจากทั้งสองจุดด้านท้ายโดยใช้เครื่องมือ Add Point (P).


ลบจุด
เพื่อที่จะลบจุดที่ควบคุม เลื่อนไปที่จุดนั้นแล้วคลิกขวา จากนั้นเลือก Delete Point จากเมนูป๊อปอัปตามบริบท

แทนเจนต์จุดควบคุม
แทนเจนต์ ของจุดควบคุมช่วยให้คุณสามารถสร้างและปรับแต่งเส้นโค้งในเส้นทาง

เพิ่มแทนเจนต์
เพื่อเพิ่มแทนเจนต์ให้กับจุดควบคุมใด ๆ ที่ไม่มีแทนเจนต์:
เปิดใช้งานเครื่องมือ Add Tangent ในวิจัยเครื่องมือ


ปรับแต่งแทนเจนต์
เพื่อปรับแต่งแทนเจนต์ที่มีอยู่สำหรับจุดควบคุมเฉพาะ:
เปิดใช้งานเครื่องมือ Select (V).

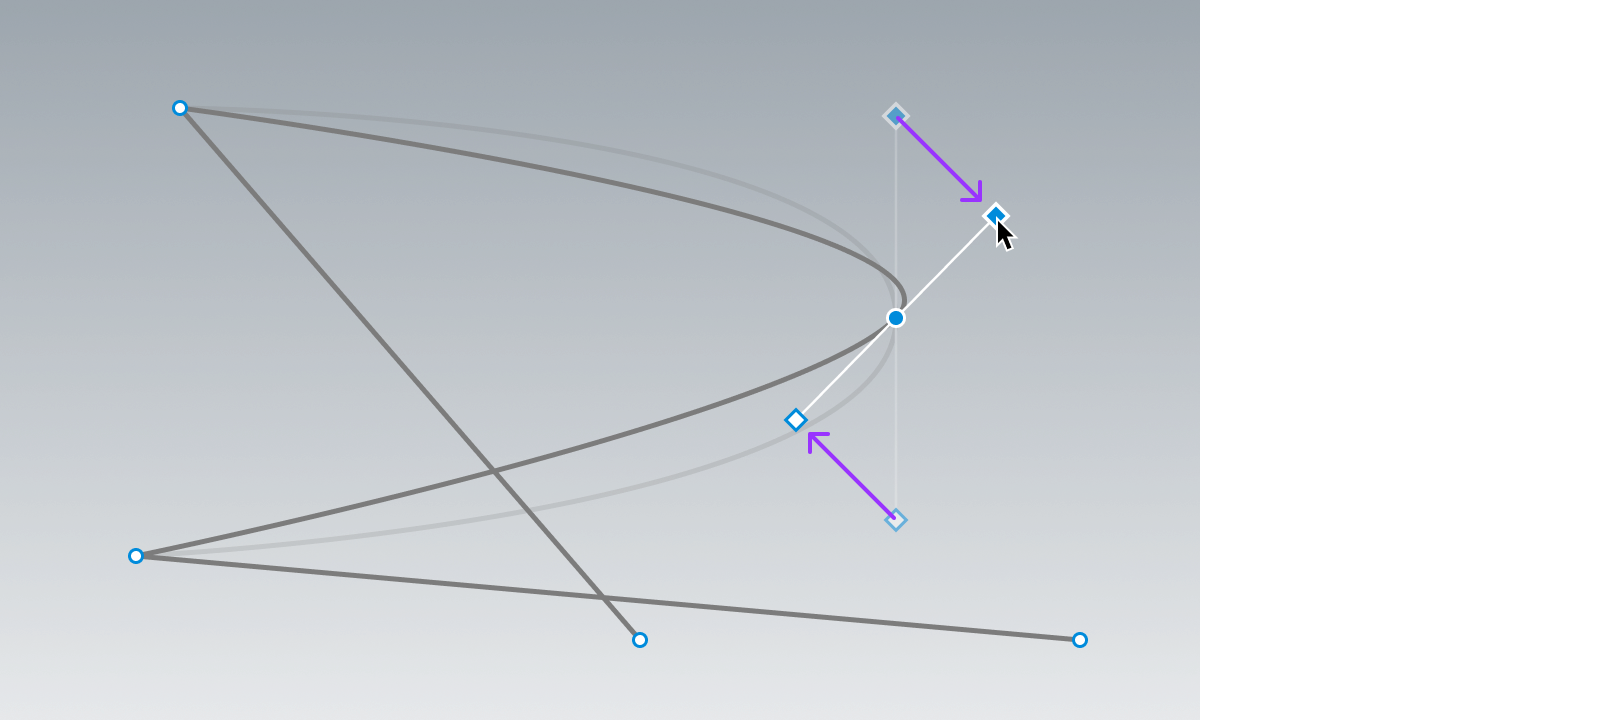
เลื่อนไปที่สัญลักษณ์แทนเจนต์ (ไม่ใช่จุดควบคุม) จากนั้นคลิกและลากไปยังตำแหน่งใหม่ หากแทนเจนต์สะท้อนกัน จุดแทนเจนต์ที่จับคู่จะเลื่อนไปพร้อมกัน
เพื่อตั้งค่าตำแหน่ง UDim2 เฉพาะสำหรับแทนเจนต์:
เปิดใช้งานเครื่องมือ Select (V) และเลือกจุดควบคุม ในหน้าต่าง Properties ให้ขยายฟิลด์ SelectedControlPointData เพื่อแสดงคุณสมบัติ LeftTangent และ RightTangent.

กำหนดตำแหน่งสำหรับ LeftTangent และ/หรือ RightTangent โปรดทราบว่านี่จะ ขัดจังหวะพฤติกรรมสะท้อน ของแทนเจนต์

ลบแทนเจนต์
ในการลบแทนเจนต์ทั้งสองจากจุดควบคุม ให้เลื่อนไปที่จุดนั้นและคลิกขวา จากนั้นเลือก Clear Tangents จากเมนูป๊อปอัปตามบริบท

เพื่อที่จะลบเพียงหนึ่งในแทนเจนต์ (ซ้ายหรือขวา) ให้เลื่อนไปที่สัญลักษณ์ของแทนเจนต์นั้นและคลิกขวา จากนั้นเลือก Delete Tangent.

ขัดและสะท้อน
โดยค่าเริ่มต้น แทนเจนต์จะสะท้อนซึ่งกันและกัน เมื่อคุณ ลากเพื่อปรับ สัญลักษณ์แทนเจนต์หนึ่ง สัญลักษณ์แทนเจนต์ที่จับคู่จะเลื่อนไปพร้อมกัน

เพื่อ "ขัด" แทนเจนต์เพื่อให้แต่ละแทนเจนต์สามารถเคลื่อนย้ายได้โดยอิสระจากกัน ให้เลื่อนไปที่จุดควบคุมที่เกี่ยวข้องและคลิกขวา จากนั้นเลือก Break Tangents จากเมนูป๊อปอัปตามบริบท เมื่อตัดขาดแล้ว คุณสามารถเคลื่อนย้ายสัญลักษณ์แทนเจนต์แต่ละตัวได้โดยไม่กระทบกัน

คุณสมบัติภาพพาธ
คุณสามารถปรับแต่งการปรากฏของ Path2D ด้วยคุณสมบัติต่อไปนี้:
| คุณสมบัติ | คำอธิบาย |
|---|---|
| Color3 | ตั้งค่าสีของเส้นทาง. |
| Thickness | ตั้งค่าความหนาของเส้นทางในพิกเซล. |
| Visible | ทำให้เส้นทางมองเห็นได้หรือไม่ในทั้งการแก้ไขและการทำงาน. |
| ZIndex | ลำดับที่เส้นทางเรนเดอร์เมื่อเปรียบเทียบกับ GUI อื่นๆ. |

Color3 = (125, 125, 125)

Color3 = (225, 0, 50)

การเขียนสคริปต์พาธ
การเขียนสคริปต์มีประโยชน์สำหรับหลายเวิร์กโฟลว์ที่เกี่ยวข้องกับเส้นทาง ตัวอย่างต่อไปนี้ใช้เมธอดเช่น GetControlPoints() ซึ่งคืนค่าว่ามีตารางของ Path2DControlPoints และ GetPositionOnCurveArcLength() ซึ่งคืนค่าตำแหน่ง UDim2 ณ ค่าที่กำหนด t ตลอดเส้นทาง
จัดเรียงวัตถุ UI บนเส้นทาง
local parent = script.Parent
local path = parent:FindFirstChildWhichIsA("Path2D")
local function arrangeChildren()
local segmentCount = #path:GetControlPoints()
local objectsToArrange = {}
for _, child in parent:GetChildren() do
if child:IsA("GuiObject") then
table.insert(objectsToArrange, child)
end
end
for idx, child in objectsToArrange do
local t = idx / (#objectsToArrange + 1)
child.Position = path:GetPositionOnCurveArcLength(t)
end
end
-- จัดเรียงวัตถุ UI เด็กในเส้นทางในตอนเริ่มต้น
arrangeChildren()
-- ฟังเด็กที่เพิ่ม/ลบเพื่อปรับการจัดเรียง
parent.ChildAdded:Connect(arrangeChildren)
parent.ChildRemoved:Connect(arrangeChildren)
อนิเมทวัตถุ UI บนเส้นทาง
local Tweenservice = game:GetService("TweenService")
local parent = script.Parent
local path = parent:FindFirstChildWhichIsA("Path2D")
local objectToAnimate = parent:FindFirstChildWhichIsA("GuiObject")
local TWEEN_DURATION = 4
local TWEEN_EASING_STYLE = Enum.EasingStyle.Cubic
local TWEEN_EASING_DIRECTION = Enum.EasingDirection.InOut
local pathSampleValue = Instance.new("NumberValue")
local tweenInfo = TweenInfo.new(TWEEN_DURATION, TWEEN_EASING_STYLE, TWEEN_EASING_DIRECTION, 0, true, 2)
local tween = Tweenservice:Create(pathSampleValue, tweenInfo, {Value = 1})
local function onSampleValueChanged()
objectToAnimate.Position = path:GetPositionOnCurveArcLength(pathSampleValue.Value)
end
pathSampleValue.Changed:Connect(onSampleValueChanged)
tween:Play()