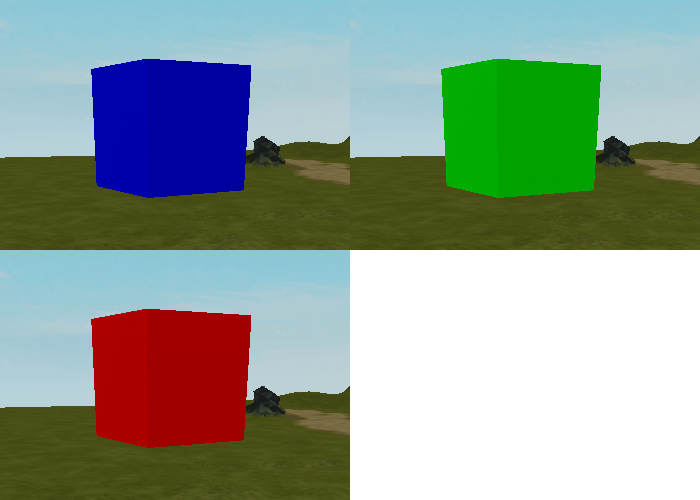
이 프로젝트는 조건문을 사용하여 터치할 때 파트의 색상에 따라 리더보드에 포인트를 주거나 차감하는 파트를 만드는 것입니다. 파트가 파란색일 경우 플레이어에게 몇 포인트를 주고, 초록색일 경우 많은 포인트를 주고, 빨간색일 경우 포인트를 차감합니다.
프로젝트 설정
포인트를 부여하는 파트는 포인트가 관련된 모든 프로젝트에 추가할 수 있습니다. 예를 들어, 플레이어가 포인트를 수집하는 어드벤처 게임이 될 수 있습니다.
포인트 추적
이 프로젝트를 설정하려면 포인트를 추적할 수 있는 리더보드와 색상을 변경하는 파트가 필요합니다. 리더보드에 대한 코드는 아래에 제공됩니다.
ServerScriptService에 Leaderboard라는 새 스크립트를 생성합니다. 아래 코드를 스크립트에 복사하여 붙여넣습니다.
--ServerScriptService에서 PlayerSetup라는 이름의 스크립트를 만들고 아래의 내용을 넣습니다.local Players = game:GetService("Players")local function onPlayerJoin(player)local leaderstats = Instance.new("Folder")leaderstats.Name = "leaderstats"leaderstats.Parent = player-- IntValue의 예local points = Instance.new("IntValue")points.Name = "Points"points.Value = 0points.Parent = leaderstatsend-- PlayerAdded 이벤트가 발생할 때 onPlayerJoin을 실행Players.PlayerAdded:Connect(onPlayerJoin)
색상 변경 파트
스크립트는 파트에 대해 세 가지 색상을 순환합니다. 각 색상은 RGB 값을 저장하는 변수를 가지며, RGB 값은 색상을 생성하는 세 개의 숫자(빨간색, 초록색, 파란색) 집합을 포함하는 데이터 타입입니다.
PointPart라는 이름의 파트를 만들고 PointScript라는 이름의 첨부 스크립트를 만듭니다.
PointScript에서 script.Parent를 사용하여 파트를 참조합니다.
local pointPart = script.Parent서로 다른 색상을 저장할 변수를 생성합니다. 각 변수는 Color3.fromRGB()로 설정해야 하며, 색상 값을 생성합니다.
- 파란색 (Some Points): (0, 0, 255)
- 초록색 (Many Points): (0, 255, 0)
- 빨간색 (Lose Points): (255, 0, 0)
local pointPart = script.Parent-- 색상local blue = Color3.fromRGB(0, 0, 255)local green = Color3.fromRGB(0, 255, 0)local red = Color3.fromRGB(255, 0, 0)소량의 포인트, 대량의 포인트, 포인트를 제거하기 위한 세 번째 변수를 추가합니다.
-- 색상local blue = Color3.fromRGB(0, 0, 255)local green = Color3.fromRGB(0, 255, 0)local red = Color3.fromRGB(255, 0, 0)-- 포인트 값local smallPoints = 10local largePoints = 50local losePoints = 100
플레이어 서비스 추가
포인트를 부여하려면 Explorer 아래의 Players에서 저장된 플레이어의 정보에 액세스해야 하며 이는 캐릭터 개체와는 별개입니다. 여기에는 리더보드 통계와 같은 정보가 포함되어 있습니다.
이를 위해 스크립트에 Players 서비스를 추가합니다. 서비스는 Roblox 엔지니어들이 시간을 절약하기 위해 만든 추가 세트의 미리 작성된 기능입니다.
다음을 입력하여 Players 서비스를 가져옵니다.
local Players = game:GetService("Players")
-- 포인트 값local smallPoints = 10local largePoints = 50local losePoints = 100-- 필요한 서비스local Players = game:GetService("Players")
함수 및 이벤트
PointsScript에는 두 개의 함수가 필요합니다. 첫 번째 함수는 포인트를 부여하고 차감하는 역할을 하고, 두 번째 함수는 플레이어가 파트를 터치했는지를 확인하는 역할을 합니다. 이 함수들은 파트가 터치될 때마다 실행되는 터치 이벤트와 연결됩니다.
givePoints()라는 새 함수와 player라는 매개변수를 생성합니다. 내부에 테스트용으로 사용할 print 문을 추가합니다.
local Players = game:GetService("Players")-- 포인트를 주거나 차감합니다local function givePoints(player)print("플레이어에게 포인트 주기")end그 아래에 partTouched()라는 두 번째 함수를 만들고 otherPart라는 매개변수를 추가합니다.
-- 포인트를 주거나 차감합니다local function givePoints(player)print("플레이어에게 포인트 주기")end-- 플레이어가 파트를 터치했는지 확인합니다local function partTouched(otherPart)end함수 내부에서 GetPlayerFromCharacter() 함수를 사용하여 otherPart 변수에 플레이어가 있는지 확인합니다.
-- 플레이어가 파트를 터치했는지 확인합니다local function partTouched(otherPart)local player = Players:GetPlayerFromCharacter(otherPart.Parent)end플레이어가 파트를 터치하면 player 변수에 저장됩니다. 그렇지 않으면 변수는 비어 있게 됩니다. 스스로:
- 함수 내부에서 player가 값이 있는지 확인합니다. 값이 있다면 givePoints(player)를 호출합니다.
- 함수 아래에 partTouched()를 pointPart의 Touched 이벤트에 연결합니다.
-- 플레이어가 파트를 터치했는지 확인합니다local function partTouched(otherPart)-- 파트를 터치한 플레이어를 가져옵니다local player = Players:GetPlayerFromCharacter(otherPart.Parent)if player thengivePoints(player)endendpointPart.Touched:Connect(partTouched)프로젝트를 실행하십시오. 플레이어가 파트를 터치할 때마다 Output 창에 "플레이어에게 포인트 주기"라는 메시지가 나타납니다.
문제 해결 팁:
- game:GetService("Players")의 "Players"가 대문자로 되어 있고 따옴표 안에 있는지 확인하세요.
- partTouched()가 pointPart의 Touched 이벤트에 연결되어 있는지 확인하세요.
색상 순환 만들기
색상을 순환하기 위해 스크립트는 몇 초마다 파트의 색상을 변경하는 while 루프를 사용할 것입니다. 이 루프의 조건은 true이며, 따라서 무한히 실행될 수 있습니다.
스크립트 맨 아래에 조건이 true인 새 while 루프를 생성하여 루프가 항상 실행되도록 합니다.
-- 플레이어가 파트를 터치했는지 확인합니다local function partTouched(otherPart)-- 파트를 터치한 플레이어를 가져옵니다local player = Players:GetPlayerFromCharacter(otherPart.Parent)if player thengivePoints(player)endendpointPart.Touched:Connect(partTouched)-- 색상을 순환합니다while true doend스스로, pointPart를 변경한 색상 변수를 사용하여 while true do 루프를 코딩합니다. 색상 사이에 task.wait()를 사용해야 하는 것을 잊지 마세요. 완료되면 아래의 버전과 비교하여 코드를 확인하세요.
-- 3가지 색상을 순환하며 각 색상 사이에 대기while true dopointPart.Color = bluetask.wait(3)pointPart.Color = greentask.wait(2)pointPart.Color = redtask.wait(1)end플레이테스트를 실행하여 모든 세 가지 색상이 멈추지 않고 반복되는지 확인합니다.

문제 해결 팁
이 시점에서 색상 순환이 의도한 대로 작동하지 않는 경우 다음 중 하나를 시도해 보세요.
- while 루프가 스크립트의 맨 아래쪽에 있는지 확인하십시오. Touched 이벤트 아래에 있어야 합니다. 루프가 바닥에 있지 않으면 스크립트의 다른 부분이 올바르게 실행되지 않습니다.
- Color3.fromRGB() 안의 각 색상이 올바르게 작성되어 있는지 확인하세요. 세 개의 숫자는 0과 255 사이의 숫자를 쉼표로 구분하여 입력해야 합니다. 예: (255, 50, 0).
플레이어에게 포인트 부여
플레이어는 파트를 터치할 때 파트의 현재 색상에 따라 포인트를 부여받습니다.
현재 색상 찾기
플레이어가 파트를 터치할 때마다 스크립트는 나중에 포인트를 부여하기 위해 파트의 현재 색상을 알아야 합니다.
givePoints()를 찾습니다. 테스트 메시지를 pointPart의 현재 색상에 대한 변수로 교체합니다. 이 변수는 플레이어가 얻거나 잃는 포인트를 결정합니다.
local function givePoints(player)local currentColor = pointPart.Colorend플레이어의 포인트에 영향을 주려면 해당 함수가 플레이어의 리더보드에 접근해야 합니다. 이를 위해 리더보드를 저장할 변수를 생성합니다.
local function givePoints(player)local currentColor = pointPart.Colorlocal playerStats = player:WaitForChild("leaderstats")end이제 플레이어의 Points 값을 가져오기 위해 변수를 추가합니다. 이 값은 그들의 리더보드의 자식입니다.
local function givePoints(player)local currentColor = pointPart.Colorlocal playerStats = player:WaitForChild("leaderstats")local playerPoints = playerStats:WaitForChild("Points")end
포인트 부여 또는 차감
다음으로 if 및 elseif를 사용하여 부여된 포인트 수에 따라 파트의 색상에 따라 포인트를 부여하거나 차감합니다. 파란색은 소량을 제공하고, 초록색은 많은 포인트를 제공하며, 빨간색은 포인트를 차감합니다.
givePoints() 내부의 변수 아래에 if 문을 사용하여 현재 색상이 파란색인지 확인하고, 그렇다면 플레이어의 현재 포인트에 smallPoints를 추가합니다.
local function givePoints(player)local currentColor = pointPart.Colorlocal playerStats = player:WaitForChild("leaderstats")local playerPoints = playerStats:WaitForChild("Points")if currentColor == blue thenplayerPoints.Value += smallPointsendend초록색을 확인하기 위해 else if 조건을 추가합니다. 초록색이면 플레이어의 포인트에 largePoints 변수를 추가합니다.
if currentColor == blue thenplayerPoints.Value += smallPointselseif currentColor == green thenplayerPoints.Value += largePointsendelse 문을 사용하여 pointsPart가 파란색이나 초록색이 아닌 경우 포인트를 차감합니다.
if currentColor == blue thenplayerPoints.Value += smallPointselseif currentColor == green thenplayerPoints.Value += largePointselseplayerPoints.Value -= losePointsend마지막으로, if 문 아래에 Destroy를 추가하여 스크립트가 계속해서 포인트를 부여하지 않도록 합니다.
if currentColor == blue thenplayerPoints.Value += smallPointselseif currentColor == green thenplayerPoints.Value += largePointselseplayerPoints.Value -= losePointsendpointPart:Destroy()플레이테스트를 실행하여 각 색상이 예상대로 포인트를 부여하는지 확인합니다. 세 가지 조건 모두 테스트해야 합니다.
플레이어에게 피드백 주기
PointPart는 작동하지만, 플레이어는 리더보드를 바라보지 않는 한 일어난 일을 알아채지 못할 수 있습니다. PointPart가 파괴될 때 입자를 생성하여 이를 수정합니다.
플레이어가 파트를 사용할 때 피드백을 추가하면 사운드, 흔들림 또는 입자와 같은 요소가 개체와의 상호작용을 더 만족스럽게 만듭니다.
입자 효과 생성
입자 효과는 터치할 때 파트와 같은 색상이 됩니다. 색상이 변수에 저장되어 있으므로 재사용하기 쉽습니다.
givePoints()의 하단에 새 ParticleEmitter 인스턴스를 생성합니다. 인스턴스 이름이 정확하게 표시된 대로 입력되었는지 확인하십시오.
local particle = Instance.new("ParticleEmitter")endParticleEmitters는 색상 속성을 제어하기 위해 색상 시퀀스를 사용합니다. 새 ColorSequence를 생성하고 현재 파트 색상을 전달합니다.
-- 파트를 파괴합니다pointPart:Destroy()-- 입자를 생성합니다local particle = Instance.new("ParticleEmitter")particle.Color = ColorSequence.new(currentColor)입자를 터치한 플레이어에게 부모로 할당해야 합니다. 플레이어의 Character 모델을 가져오기 위해 변수를 생성합니다. 그런 다음 입자를 플레이어의 머리에 부모로 두십시오.
local particle = Instance.new("ParticleEmitter")particle.Color = ColorSequence.new(currentColor)local playerCharacter = player.Characterparticle.Parent = playerCharacter:WaitForChild("Head")task.wait()를 사용하여 잠시 대기한 후 입자를 파괴합니다.
local particle = Instance.new("ParticleEmitter")particle.Color = ColorSequence.new(currentColor)local playerCharacter = player.Characterparticle.Parent = playerCharacter:WaitForChild("Head")task.wait(1)particle:Destroy()게임을 플레이테스트하고 입자가 각 색상에 터치한 후 잠시 플레이어를 따라오는지 확인합니다.
문제 해결 팁
이 시점에서 입자가 의도한 대로 작동하지 않는 경우 다음 중 하나를 시도해 보세요.
- 새 인스턴스를 생성할 때 ParticleEmitter가 정확히 표시된 대로 스펠링되었는지 확인하고 따옴표 안에 있어야 합니다.
- 입자를 부모로 추가할 때는 playerCharacter와 WaitForChild() 사이의 :를 사용하고, 사이에 공백을 제거해야 합니다.
완성된 PointScript
완성된 스크립트의 버전은 아래에서 참조할 수 있습니다.
local pointPart = script.Parent
--local storage = game:GetService("ServerStorage")
-- 일부 포인트 제공
local blue = Color3.fromRGB(0, 0, 255)
-- 더 많은 포인트 제공
local green = Color3.fromRGB(0, 255, 0)
-- 플레이어가 포인트를 잃게 만듭니다
local red = Color3.fromRGB(255, 0, 0)
-- 플레이어에게 제공되는 포인트
local smallPoints = 10
local largePoints = 50
local losePoints = 100
local Players = game:GetService("Players")
local function givePoints(player)
local currentColor = pointPart.Color
local playerStats = player:WaitForChild("leaderstats")
local playerPoints = playerStats:WaitForChild("Points")
-- 파트의 색상에 따라 플레이어에게 포인트를 부여합니다
if currentColor == blue then
	playerPoints.Value += smallPoints
elseif currentColor == green then
	playerPoints.Value += largePoints
else
	playerPoints.Value -= losePoints
end
-- 파트를 파괴하고 잠시 대기한 후 입자를 파괴합니다
pointPart:Destroy()
-- 스파클 효과를 생성하고 이를 파괴합니다
local playerCharacter = player.Character
local particle = Instance.new("ParticleEmitter")
particle.Color = ColorSequence.new(currentColor)
particle.Parent = playerCharacter:WaitForChild("Head")
task.wait(1)
particle:Destroy()
end
local function partTouched(otherPart)
local player = Players:GetPlayerFromCharacter(otherPart.Parent)
if player then
givePoints(player)
end
end
pointPart.Touched:Connect(partTouched)
-- 변수에 따라 파트의 색상을 변경합니다. 스크립트의 아래쪽에 있어야 합니다.
while true do
pointPart.Color = blue
task.wait(4)
pointPart.Color = green
task.wait(3)
pointPart.Color = red
task.wait(2)
end