Character animations include a series of key poses that programmatically flow together to make your characters appear as if they're moving in their environment. While Roblox provides a set of default character animations for every experience, creating custom animations for your characters helps players understand their unique personalities by how they carry themselves and interact with other characters.
Using the Walking Character Animations .rbxl file as a starting place, this tutorial shows you how to create a walk cycle character animation from start to finish, including guidance on:
- Adding a pre-built character rig to the 3D space that you can move and rotate into different key poses.
- Breaking down a reference image to guide your animation decisions and ensure each pose reflects your character's personality.
- Looping the animation to test how it looks at different speeds, angles, and easing styles.
- Publishing the animation so that you can use it across projects in different scripts and contexts.
After you complete this tutorial, you will have an assetID for your animation, and skills to create additional types of animations that meet the needs for your own characters and experiences.

Add rig
Rigs, or collections of parts connected by joints like Bone or Motor6D objects, are necessary to create character animations because they include the internal structure you need to move and rotate body parts into different poses. While you can create your own rigs using external 3D modeling tools, Studio provides several pre-built rigs that you can access through the Rig Builder tool.
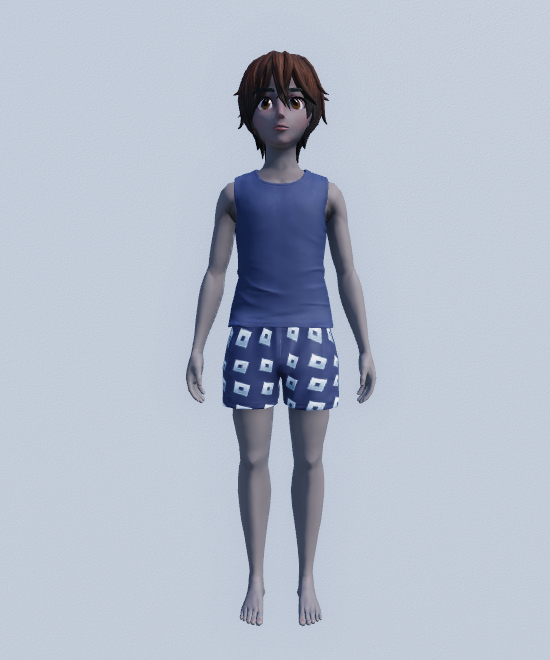
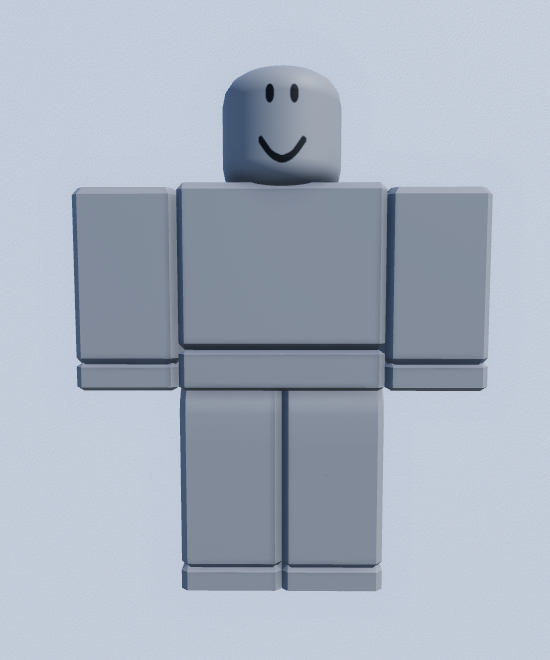
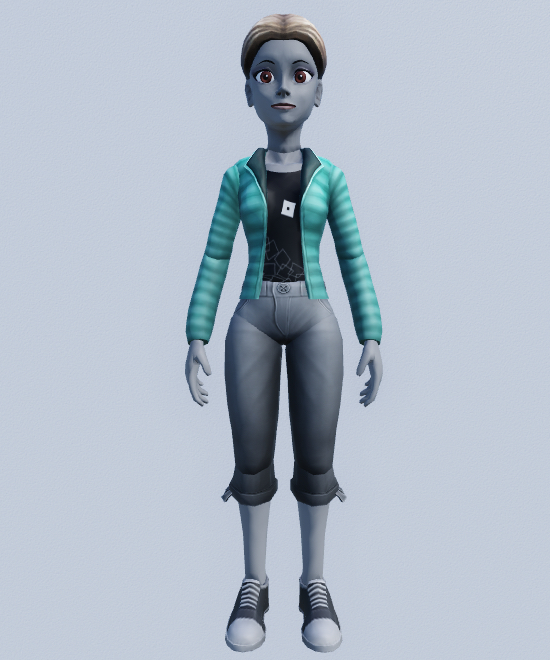
The rig you choose to animate is your first important design decision because the shape of the body directly influences how you animate the character. For example, a masculine block character has a lot of mass throughout its body with minimal range of motion, so the character may shuffle their weight as they walk with a slow, short stride. Conversely, a feminine rthro rig carries more mass near its hips with much more realistic range of motion, so the character may sway as they distribute their weight with a fast, long stride.
The rest of the tutorial provides an in-depth analysis of the different design decisions and techniques you can use while animating all different types of rigs. As you review these decisions for a rthro masculine rig, you will learn how to adjust your methods to meet the requirements of your own characters and world.
To add a pre-built rig to the 3D space:
From the toolbar's Avatar tab, click Rig Builder.
Select a rig type, body shape, then an avatar option. For example, this tutorial uses a R15 rig type, a masculine body shape, and an Rthro Avatar. The rig displays in the viewport.

Pose rig
Every animation is made up of a sequence of key poses at different frames, then Studio programmatically interpolates, or "fills in", the in-between frames to create smooth movement. For example, if you were to create a key pose of an arm reaching toward the sky at the 0:00 frame, then another key pose of the same arm reaching toward the ground at the 0:09 frame, Studio fills in the 0:01-0:08 frames between the poses.
This process is called tweening or inbetweening, and it means that you don't need to manually animate every single frame. Instead, you can just animate the key poses that you want your character to make to exaggerate their personality, then edit the interpolated frames until you're happy with the final result.
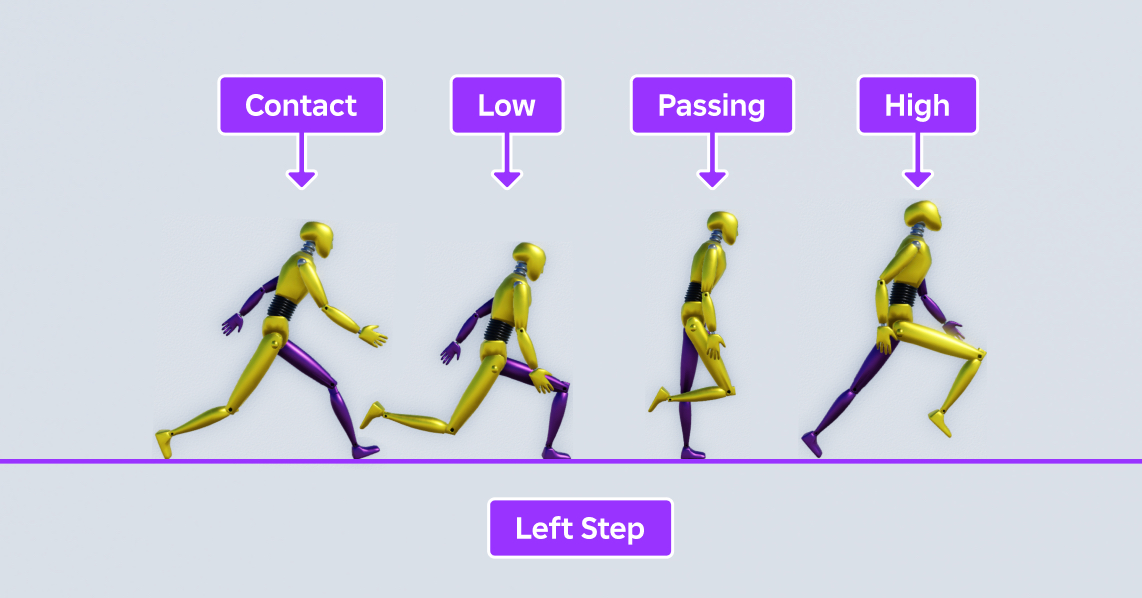
Walk cycles for humanoid characters typically have 4 key poses that repeat for each foot's step:
- Contact - The moment when one foot touches the ground in front of the character, and the other is about to lift off behind the character. Both feet support the character's weight.
- Low - The moment when the front foot fully supports the character's weight, and the back leg lifts off the ground.
- Passing - The midstep moment when the back leg passes the front leg, and the character's weight begins to shift from one foot to the other.
- High - The moment when the character lifts their body up onto their newly back foot, and the newly front foot is about to touch the ground.
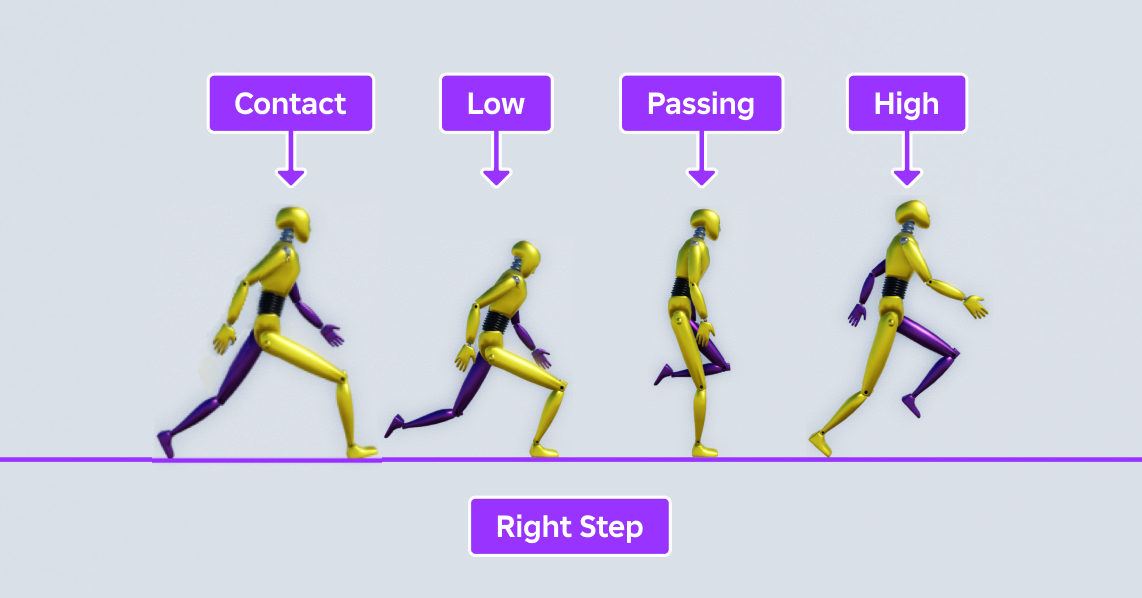
To demonstrate how this works, let's review the following walk cycle reference where a yellow humanoid robot takes a step first with their left foot, then with their right foot. Note that the robot's left arm and leg are purple to differentiate how each side of the body moves throughout the walk cycle.

As the robot transitions from the Contact to the Low pose, its weight falls forward and pulls the robot's body toward the ground. After the robot catches itself and stands back up, its weight falls backward and launches its body forward as the robot transitions from the Passing to the High pose. If you look at the character's head throughout the walk cycle, you can see how they fall and rise with each step.

While the central idea of these key poses remain the same for all walk cycles, different characters exaggerate different parts of the cycle depending on how they're feeling or who they are, such as their personality, age, gender expression, and well-being. For example:
- An elderly character may hunch forward and take slow steps that barely leave the ground.
- A timid character may keep their arms tucked and their head down to avoid eye contact.
- A cold character may cross their arms and take measured steps as they look around for warmth.
Animation is an art form, and the design decisions you make for your character may look different from the design decisions within this tutorial for the masculine Rthro rig. While the following instruction focuses on how to recreate the key poses for a confident character's walk cycle, feel free to adjust the learnings to meet the design needs for your own experiences.

Left step
The first course of action for a walk cycle is to create the four key poses that make up the character's left step, or the step they take to move forward with their left foot. As you complete each pose, consider how the character's weight shifts from an even distribution between both feet to balancing on a single foot, and how that affects movement throughout the rest of their body.
Contact
The Contact pose for the left step sequence represents the moment when the left foot touches the ground in front of the character while the right foot is about to lift off behind the character. Both of the character's arms swing opposite the direction of their respective legs; for example, because the left foot is in front of the character, their left arm is behind the character.
This is an important moment in a character's stride because both feet equally support the character's weight while they're in motion.
To create a first pass Contact pose for the left foot cycle:
From the toolbar's Avatar tab, click Animation Editor. The Animation Editor window displays.
Select your rig. A contextual menu displays.
In the Animation Name field, input a name for your animation, then click the Create button.
(Optional) Set the timeline to 24 frames per second.
In the editor's playback tools, click the gear icon.

From the contextual menu, set Frame Rate to 24 fps.
Add a keyframe for each of the rig's body parts to the Animation Editor's track list.
In the Animation Editor, click the + button. A contextual menu displays.

Select Add All Body. The Animation Editor's track list updates with all the rig's body parts.
Right-click on the top bar beneath the timeline, then in the contextual menu, select Add Keyframe. The Animation Editor adds a keyframe for every body part in the timeline.
Pose the rig's upper body in a bent position.
In the toolbar's Home tab, select the Rotate tool.
In the viewport, select and angle the UpperTorso body part so that the torso is slightly bent forward.

Select and angle the Head body part so that the rig's face is looking straight forward.

Pose the rig's legs so that the left foot touches the ground in front of the rig while the right foot touches the ground behind the rig.
In the viewport, select and angle the LeftUpperLeg, LeftLowerLeg, and LeftFoot body parts until the left leg is bent while the left foot is slightly raised.

Repeat this process for the RightUpperLeg, RightLowerLeg, and RightFoot body parts until the right leg is bent while the foot's toes skim the ground.

Pose the rig's arms so that each respective arm swings as far forward or behind the rig for the character's stride.
In the viewport, select and angle the LeftUpperArm and LeftLowerArm body parts until the left arm is visible and slightly bent behind the rig.

Repeat this process for the RightUpperArm and RightLowerArm body parts until the right arm is slightly bent in front of the rig.

Save the animation.
In the Media and Playback Controls, select the ellipsis button. A contextual menu displays.

Select Save.
Low
The Low pose for the left step sequence represents the moment when the left foot fully supports the character's weight as they fall toward the ground, and their right leg lifts off of the ground to offset the unequal weight distribution between their legs.
This key pose in both the left and right step sequences is when the character is as low to the ground as they will be in their stride because they are falling forward before their front foot stops their descent. The forward motion from this process also causes the upper body and head to tilt toward the ground, which you can exaggerate for more energetic characters.
To create a first pass Low pose for the left foot cycle:
In the Explorer window, click-and-drag the scrubber to the 3rd frame.
Pose the rig's upper body so that it leans even more toward the ground than the previous pose.
In the viewport, select and angle the UpperTorso body part so that the torso is significantly bent forward.

Select and angle the Head body part so that the rig's face is looking toward the ground.

Pose the rig's legs so that the rig's body weight is supported by its left leg.
In the viewport, select and angle the LeftUpperLeg, LeftLowerLeg, and LeftFoot body parts until the left leg is nearly bent at a 90 degree angle with a foot flat on the ground.

Repeat this process for the RightUpperLeg, RightLowerLeg, and RightFoot body parts until the right leg is nearly straight behind the rig with the bottom of its foot angled toward the sky.

Move the rig down so that its left foot touches the ground.
In the viewport, select the LowerTorso body part.
Move it down until the rig's left foot is parallel to the ground.

Pose the rig's arms so that they swing closer to the torso.
In the viewport, select and angle the LeftUpperArm and LeftLowerArm body parts until the left arm is closer to the character's waist.

Repeat this process for the RightUpperArm and RightLowerArm body parts until the right arm is closer to the character's waist.

Save the animation.
Passing
The Passing pose for the left step sequence represents the moment when the right leg passes the left leg, and the character's weight begins to shift from the left foot to the right foot. Both of the character's arms fall toward the waist as they swing in opposite directions, which causes the character to appear as though they are standing straight up like a flamingo.
To create a first pass Passing pose for the left foot cycle:
In the Explorer window, click-and-drag the scrubber to the 6th frame.
Pose the rig's upper body in a straight position.
In the viewport, select and angle the UpperTorso body part so that the torso is about 90 degrees with the ground.

Select and angle the Head body part so that the rig's face is looking forward again.

Pose the rig's legs so that the character balances its weight on its left leg while the right leg swings forward.
In the viewport, select and angle the LeftUpperLeg, LeftLowerLeg, and LeftFoot body parts until the left leg is nearly straight with a flat foot on the ground.

Repeat this process for the RightUpperLeg, RightLowerLeg, and RightFoot body parts until the right leg is bent at a 45 degree angle with the front of the foot angled toward the ground.

Move the rig up so that its left foot touches the ground.
In the viewport, select the LowerTorso body part.
Move it up until the rig's left foot is parallel to the ground.

Pose the rig's arms so that they fall on either side of the character's waist.
In the viewport, select and angle the LeftUpperArm and LeftLowerArm body parts until the left arm is nearly straight on the character's left side.

Repeat this process for the RightUpperArm and RightLowerArm body parts until the right arm is nearly straight on the character's right side.

Save the animation.
High
The High pose for the left step sequence represents the moment when the character lifts their body up onto their left foot while their right foot is about to touch the ground. Most of the character's weight balances on their toes, which in turn push off the ground to propel them forward.
This key pose in both the left and right step sequences is when the character is as high off the ground as they will be in their stride because they are pushing off of the floor. Note that the forward motion from this process also causes the upper body and head to tilt toward the sky, which you can exaggerate for more optimistic characters.
To create a first pass High pose for the left foot cycle:
In the Explorer window, click-and-drag the scrubber to the 9th frame.
Pose the rig's upper body so that the chest faces the sky.
In the viewport, select and angle the UpperTorso body part so that the character is slightly angled backward.

Select and angle the Head body part so that the rig's face is looking toward the sky.

Pose the rig's legs so that the character's weight shifts forward from the toes of its left foot to the thigh of its right leg.
In the viewport, select and angle the LeftUpperLeg, LeftLowerLeg, and LeftFoot body parts until the left leg is nearly straight with the foot almost perpendicular to the ground.

Repeat this process for the RightUpperLeg, RightLowerLeg, and RightFoot body parts until the right leg is bent at a near 90 degree angle in front of the character.

Move the rig up so that its left foot touches the ground.
In the viewport, select the LowerTorso body part.
Move it slightly up until the left foot's toes touch the ground.

Pose the rig's arms so that they swing further from the torso.
In the viewport, select and angle the LeftUpperArm and LeftLowerArm body parts until the left arm is further from the character's waist.

Repeat this process for the RightUpperArm and RightLowerArm body parts until the right arm is further from the character's waist.

Save the animation.
Right step
The second course of action for a walk cycle is to create the four key poses that make up the character's right step, or the step they take to move forward with their right foot. While this tutorial focuses on recreating the same process as the character's left foot sequence, you can make subtle adjustments that add personality to your walk cycle, such as a lean to the right or extra pep in their right step.
Contact
The Contact pose for the right step sequence represents the moment when the right foot touches the ground in front of the character while the left foot is about to lift off behind the character. Most of the process for creating this pose is the same as the left step sequence, but it's helpful to first position the rig at the same vertical orientation as the Contact pose for the left step sequence so that the character has a more consistent gait.
To create a first pass Contact pose for the right foot cycle:
In the Explorer window, click-and-drag the scrubber to the 12th frame.
Move the rig down so that the character is in the same starting vertical position as the left step's Contact pose.
In the viewport, select the LowerTorso body part.
Move it down until the rig's head is below the purple reference line.

Pose the rig's upper body in the same bent position as the left step's Contact pose.
In the viewport, select and angle the UpperTorso body part so that the torso is slightly bent forward.

Select and angle the Head body part so that the rig's face is looking straight forward.

Pose the rig's legs so that the right foot touches the ground in front of the rig while the left foot touches the ground behind the rig.
In the viewport, select and angle the LeftUpperLeg, LeftLowerLeg, and LeftFoot body parts until the left leg is bent while the foot's toes skim the ground.

Repeat this process for the RightUpperLeg, RightLowerLeg, and RightFoot body parts until the right leg is bent while the foot is slightly raised.

Pose the rig's arms so that each respective arm swings as far forward or behind the rig for the character's stride.
In the viewport, select and angle the LeftUpperArm and LeftLowerArm body parts until the left arm is visible and slightly bent in front of the rig.

Repeat this process for the RightUpperArm and RightLowerArm body parts until the right arm is slightly bent behind the rig.

Save the animation.
Low
The Low pose for the right step sequence represents the moment when the right foot fully supports the character's weight as they fall toward the ground, and their left leg lifts off of the ground to offset the unequal weight distribution between their legs. Similar to the previous pose, while not mandatory, it's useful to position the rig at the same vertical orientation as the Low pose for the left step sequence so that the character isn't falling more forward on their right leg than their left.
To create a first pass Low pose for the right foot cycle:
In the Explorer window, click-and-drag the scrubber to the 15th frame.
Move the rig down so that the character is in the same starting vertical position as the left step's Low pose.
In the viewport, select the LowerTorso body part.
Move it down until the rig's head is slightly above the gray reference line.

Pose the rig's upper body in the same bent position as the left step's Low pose.
In the viewport, select and angle the UpperTorso body part so that the torso is significantly bent forward.

Select and angle the Head body part so that the rig's face is looking toward the ground.

Pose the rig's legs so that the rig's body weight is supported by its right leg.
In the viewport, select and angle the LeftUpperLeg, LeftLowerLeg, and LeftFoot body parts until the left leg is nearly straight behind the rig with the bottom of its foot angled toward the sky.

Repeat this process for the RightUpperLeg, RightLowerLeg, and RightFoot body parts until the right leg is nearly bent at a 90 degree angle with a foot flat on the ground.

Pose the rig's arms so that they swing closer to the torso.
In the viewport, select and angle the LeftUpperArm and LeftLowerArm body parts until the left arm is closer to the character's waist.

Repeat this process for the RightUpperArm and RightLowerArm body parts until the right arm is closer to the character's waist.

Save the animation.
Passing
The Passing pose for the right step sequence represents the moment when the left leg passes the right leg, and the character's weight begins to shift from the right foot to the left foot.
To create a first pass Passing pose for the right foot cycle:
In the Explorer window, click-and-drag the scrubber to the 18th frame.
Move the rig up so that the character is in the same starting vertical position as the left step's Passing pose.
In the viewport, select the LowerTorso body part.
Move it up until the rig's head is slightly below the purple reference line.

Pose the rig's upper body in the same straight position as the left step's Passing pose.
In the viewport, select and angle the UpperTorso body part so that the torso is about 90 degrees with the ground.

Select and angle the Head body part so that the rig's face is looking forward again.

Pose the rig's legs so that the character balances its weight on its right leg while the left leg swings forward.
In the viewport, select and angle the LeftUpperLeg, LeftLowerLeg, and LeftFoot body parts until the left leg is bent at a 45 degree angle with the front of the foot angled toward the ground.

Repeat this process for the RightUpperLeg, RightLowerLeg, and RightFoot body parts until the right leg is nearly straight with a flat foot on the ground.

Pose the rig's arms so that they fall on either side of the character's waist.
In the viewport, select and angle the LeftUpperArm and LeftLowerArm body parts until the left arm is nearly straight on the character's left side.

Repeat this process for the RightUpperArm and RightLowerArm body parts until the right arm is nearly straight on the character's right side.

Save the animation.
High
The High pose for the right step sequence represents the moment when the character lifts their body up onto their right foot while their left foot is about to touch the ground.
To create a first pass High pose for the right foot cycle:
In the Explorer window, click-and-drag the scrubber to the 21st frame.
Move the rig up so that the character is in the same starting vertical position as the left step's High pose.
In the viewport, select the LowerTorso body part.
Move it up until the rig's head overlaps the purple reference line.

Pose the rig's upper body in the same angled position as the left step's High pose.
In the viewport, select and angle the UpperTorso body part so that the character is slightly angled backward.

Select and angle the Head body part so that the rig's face is looking toward the sky.

Pose the rig's legs so that the character's weight shifts forward from the toes of its right foot to the thigh of its left leg.
In the viewport, select and angle the LeftUpperLeg, LeftLowerLeg, and LeftFoot body parts until the left leg is bent at a near 90 degree angle in front of the character.

Repeat this process for the RightUpperLeg, RightLowerLeg, and RightFoot body parts until the right leg is nearly straight with the foot almost perpendicular to the ground.

Pose the rig's arms so that they swing further from the torso.
In the viewport, select and angle the LeftUpperArm and LeftLowerArm body parts until the left arm is further from the character's waist.

Repeat this process for the RightUpperArm and RightLowerArm body parts until the right arm is further from the character's waist.

Save the animation.
Test animation
After you complete your first pass of your key poses, it's important to test your animation to see how it flows together. If there are any inconsistencies or choppy transitions, you can make subtle adjustments to ensure the animation is as smooth as it should be for your character's body and personality.
In other words, if you want your character to be graceful and light on their feet, their movements should be fluid and flow together. However, if you want your character to be clumsy and stumble as they walk, smooth transitions may be less desirable for how you want them to present themselves in your experience.
To test your poses:
In the Animation Editor's playback tools, click the looping button to repeat the animation indefinitely.

Click the play button to start the animation.

Review your animation to see where it needs adjustments.
Slow your animation's speed.
- In the playback tools, click the gear icon.

- From the contextual menu, set Playback Speed to either 0.25x or 0.5x.
Evaluate the animation from multiple angles.
- In the View tab, select the View Selector button.
- In the viewport, click any of View Selector's 14 faces to move your camera to a different world orientation.

Select, move, and rotate your rig until the animation matches your character's personality.
Publish animation
In order to play your animation in your open experience, as well as store it for reuse in other projects, you must publish the animation to the cloud. This process creates a unique assetID for your animation that you can reference in scripts, which is especially important if you want to replace any of Roblox's default character animations.
To publish your animation:
In the upper-left corner of the Animation Editor, click the ellipsis button.

From the contextual menu, select Publish to Roblox. The Asset Configuration window displays.
Fill out all applicable fields, then click the Save button.
(Optional) You can copy the animation's assetID to use within scripts by clicking the copy icon.

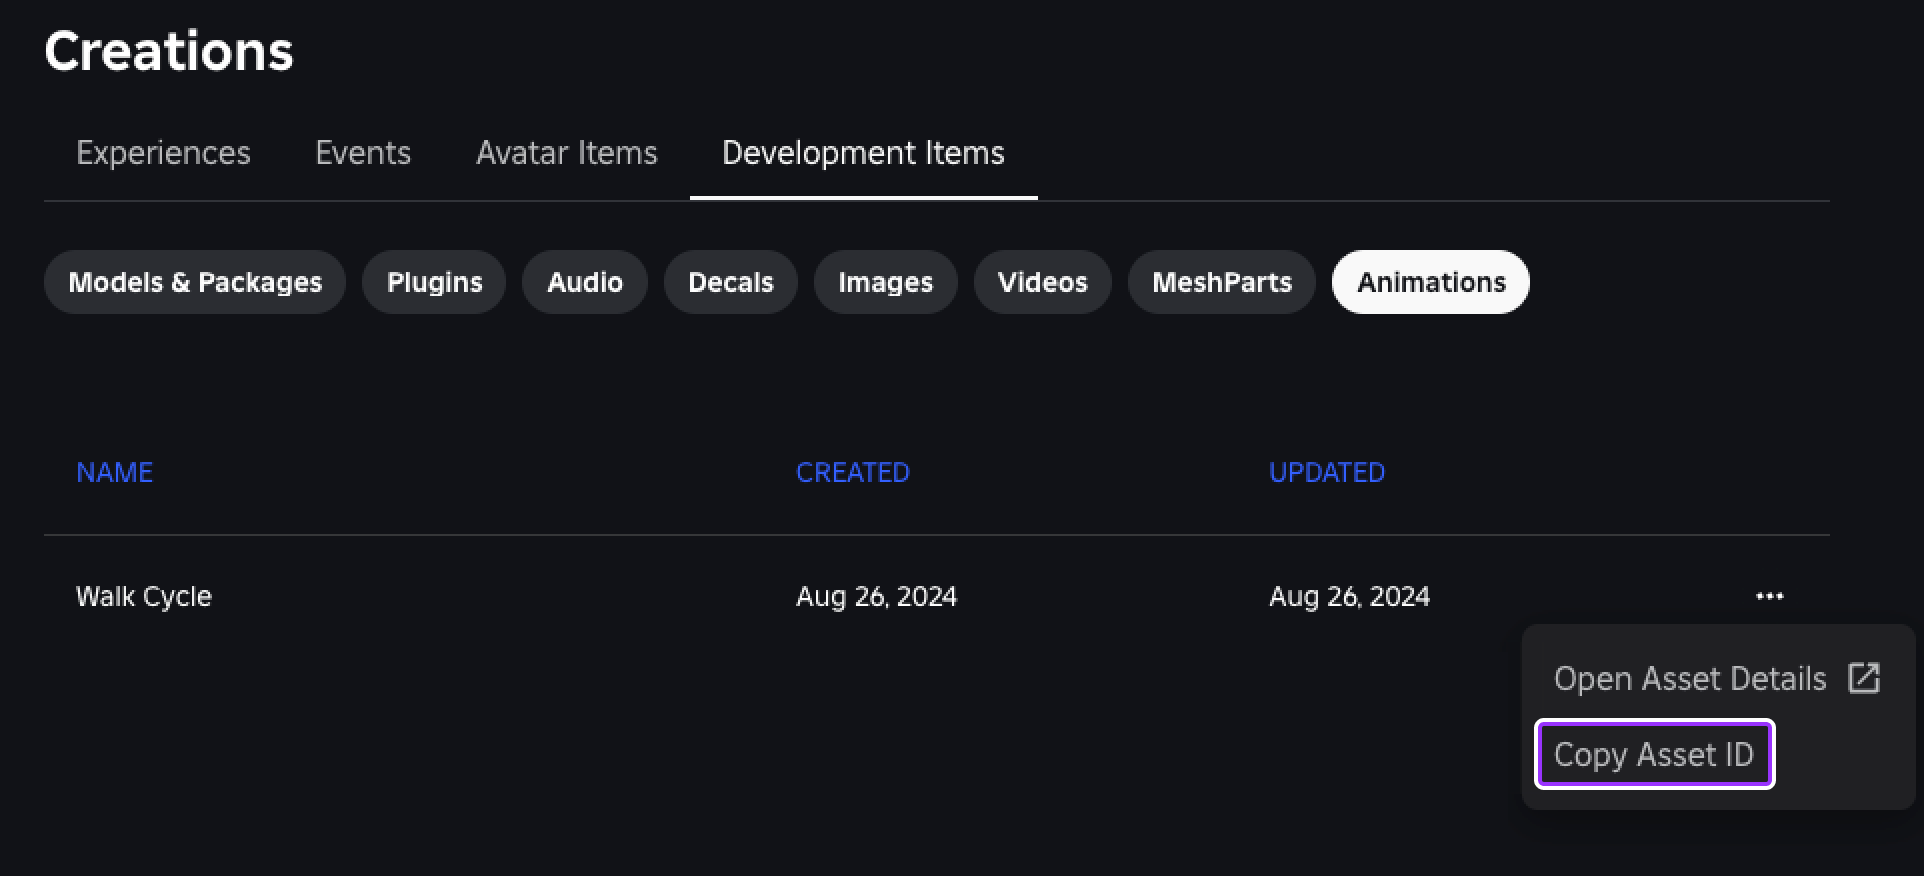
Now that your animation is in the cloud, you can find, edit, and reuse the asset across all of your projects through the Creator Dashboard under Development Items > Animations.
