路徑尋找是將角色或物體(代理)沿著邏輯路徑繞過障礙物移動以到達目的地的過程,可選擇避開危險材料或定義區域。
導航可視化
為了協助路徑尋找的佈局和除錯,Studio 可以渲染導航網格和 修改器 標籤。要啟用它們,請在 3D 视口的右上角從 可視化選項 小工具中開啟 導航 網格 和 路徑尋找 修改器。

啟用 導航網格 時,有色區域顯示角色可能行走或游泳的地方。小箭頭表示角色通過跳躍嘗試到達的區域。

實現
雖然路徑尋找可以通過 PathfindingService 及其相關方法 (例如 CreatePath()) 以多種方式實現,但本節將使用以下路徑尋找腳本來處理玩家的角色。
在閱讀的同時進行測試:
- 重要在 Explorer 中選擇 StarterPlayer 容器。然後在 Properties 窗口中,將 DevComputerMovementMode 和 DevTouchMovementMode 兩者都設置為 Scriptable。

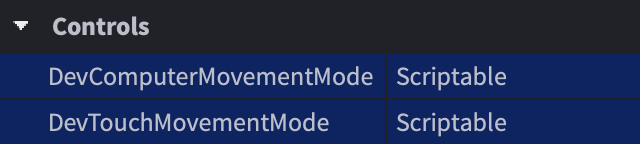
將以下代碼複製到 LocalScript 中的 StarterCharacterScripts ,或 獲取這個包 並將其放入 StarterCharacterScripts。
PlayerPathFollow (LocalScript in StarterCharacterScripts)local PathfindingService = game:GetService("PathfindingService")local Players = game:GetService("Players")local RunService = game:GetService("RunService")local DESTINATION = Vector3.new(20, 0.5, 20)local GROUND_WAIT = 0.01local VELOCITY_MULTIPLIER = 0.0625local path = PathfindingService:CreatePath({AgentCanClimb = true,Costs = {Water = 20}})local character = script.Parentlocal humanoid = character:WaitForChild("Humanoid")local waypointslocal nextWaypointIndexlocal blockedConnectionlocal currentWaypointReachedConnectionlocal currentWaypointPlaneNormal = Vector3.zerolocal currentWaypointPlaneDistance = 0local pathfinderWorking = falselocal function disconnectCurrentWaypointReachedConnection()if not currentWaypointReachedConnection then return endcurrentWaypointReachedConnection:Disconnect()currentWaypointReachedConnection = nilendlocal function isCurrentWaypointReached()if humanoid.FloorMaterial == Enum.Material.Air thenreturn falseendlocal reached = falseif currentWaypointPlaneNormal ~= Vector3.zero then-- 計算人形到目的地平面的距離local dist = currentWaypointPlaneNormal:Dot(humanoid.RootPart.Position) - currentWaypointPlaneDistance-- 計算人形速度向量在平面上的分量local velocity = -currentWaypointPlaneNormal:Dot(humanoid.RootPart.Velocity)-- 根據人形速度計算距離平面的閾值local threshold = math.max(1.0, VELOCITY_MULTIPLIER * velocity)-- 如果在平面前方的距離小於閾值,則認為到達了路點reached = dist < thresholdelsereached = trueendif reached thencurrentWaypointPlaneNormal = Vector3.zerocurrentWaypointPlaneDistance = 0moveToNextWaypoint()endendlocal function calculateNextWaypointApproach()nextWaypointIndex += 1if nextWaypointIndex > #waypoints thenreturn falseendlocal currentWaypoint = waypoints[nextWaypointIndex - 1]local nextWaypoint = waypoints[nextWaypointIndex]-- 根據下一個路點向當前路點構建目的地平面currentWaypointPlaneNormal = currentWaypoint.Position - nextWaypoint.Position-- 當不向上攀爬時,設置法線垂直於 Y 平面if nextWaypoint.Label ~= "Climb" thencurrentWaypointPlaneNormal = Vector3.new(currentWaypointPlaneNormal.X, 0, currentWaypointPlaneNormal.Z)endif currentWaypointPlaneNormal.Magnitude > 0.000001 thencurrentWaypointPlaneNormal = currentWaypointPlaneNormal.UnitcurrentWaypointPlaneDistance = currentWaypointPlaneNormal:Dot(nextWaypoint.Position)endreturn trueendlocal function resetWaypointData()humanoid:Move(Vector3.zero)currentWaypointPlaneNormal = Vector3.zerocurrentWaypointPlaneDistance = 0disconnectCurrentWaypointReachedConnection()pathfinderWorking = falseendlocal function waitForGround()while humanoid.FloorMaterial == Enum.Material.Air dotask.wait(GROUND_WAIT)endendfunction moveToNextWaypoint()if calculateNextWaypointApproach() thendisconnectCurrentWaypointReachedConnection()currentWaypointReachedConnection = RunService.Heartbeat:Connect(isCurrentWaypointReached)local nextWaypointPosition = waypoints[nextWaypointIndex].Positionlocal nextWaypointAction = waypoints[nextWaypointIndex].Actionhumanoid:Move(nextWaypointPosition - humanoid.RootPart.Position)if waypoints[nextWaypointIndex + 1] and waypoints[nextWaypointIndex + 1].Label == "UseBoat" thennextWaypointIndex += 1-- 調用您自己的自定義函數使代理使用小艇elseif nextWaypointAction == Enum.PathWaypointAction.Jump thenhumanoid:ChangeState(Enum.HumanoidStateType.Jumping)while humanoid.FloorMaterial ~= Enum.Material.Air dotask.wait(GROUND_WAIT)endhumanoid:Move(nextWaypointPosition - humanoid.RootPart.Position)endelseresetWaypointData()endendlocal function findStartingPoint(waypoints)nextWaypointIndex = 1while nextWaypointIndex + 1 <= #waypoints dolocal dist = waypoints[nextWaypointIndex + 1].Position - humanoid.RootPart.Positiondist = Vector3.new(dist.X, 0, dist.Z)if dist.magnitude >= 2 thenreturnendnextWaypointIndex += 1endendlocal function followPath()-- 計算路徑pathfinderWorking = truewaitForGround()local success, errorMessage = pcall(function()path:ComputeAsync(character.PrimaryPart.Position, DESTINATION)end)if not success or path.Status ~= Enum.PathStatus.Success thenwarn("路徑未計算!", errorMessage)returnend-- 獲取路徑路點waypoints = path:GetWaypoints()-- 檢查路徑是否被阻擋blockedConnection = path.Blocked:Connect(function(blockedWaypointIndex)-- 檢查障礙物是否在路徑的更深處if blockedWaypointIndex >= nextWaypointIndex then-- 在重新計算路徑之前停止檢測路徑阻塞blockedConnection:Disconnect()resetWaypointData()-- 調用函數重新計算新路徑followPath()endend)findStartingPoint(waypoints)moveToNextWaypoint()endfollowPath()繼續閱讀以下各節以了解路徑計算和角色移動。


路徑創建
路徑尋找是通過 PathfindingService 以及其 CreatePath() 方法啟動的 (
| 鍵 | 描述 | 類型 | 默認值 |
|---|---|---|---|
| AgentRadius | 代理半徑,以 Stud 為單位。用於決定與障礙物的最小距離。 | 整數 | 2 |
| AgentHeight | 代理高度,以 Stud 為單位。小於此值的空間,比如樓梯下方的空間,將被標記為不可通過。 | 整數 | 5 |
| AgentCanJump | 決定在路徑尋找時是否允許跳躍。 | 布林值 | true |
| AgentCanClimb | 決定在路徑尋找時是否允許攀爬 TrussParts。可攀爬的路徑有一個名為 Climb 的 Label,而可攀爬路徑的 成本 默認為 1。 | 布林值 | false |
| WaypointSpacing | 路徑中中間路點之間的間距。如果設置為 math.huge,則不會有中間路點。 | 數字 | 4 |
| Costs | 材料或定義的 PathfindingModifiers 的表及其通過的成本。這對於使代理偏好某些材料/區域而非其他材料很有用。詳細信息請參見 修改器。 | 表 | nil |
路徑計算
在您使用 CreatePath() 創建有效路徑後,必須通過調用 Path:ComputeAsync() 並提供 Vector3 來計算起點和目的地 (

一旦 Path 被計算出來,它將包含一系列從起點到終點的 路點。這些點可以使用 Path:GetWaypoints() 方法來獲取 (

路徑移動
每個 PathWaypoint 由 Position (Vector3) 和 Action (PathWaypointAction) 組成。要從路點到路點移動具有 Humanoid 的角色,例如典型的 Roblox 角色,最好的方法是從路點到路點調用 Humanoid:Move() ,並使用腳本的 isCurrentWaypointReached() 回調 (
被阻擋的路徑
許多 Roblox 世界是動態的;部件可能會移動或掉落,地面可能會崩潰。這樣可能會阻塞計算出的路徑,並阻止角色到達目的地。為了處理此情況,可以連接 Path.Blocked 事件並重新計算道路,以繞過阻塞的部分 (
路徑尋找修改器
默認情況下,Path:ComputeAsync() 返回起始點和目的地之間的 最短 路徑,但不考慮跳躍。在某些情況下,這看起來不自然;例如,一條路徑可能會穿過沼澤水,而不是繞過它,只是因為水中的路徑在幾何上更短。

為了進一步優化路徑尋找,您可以實現 路徑尋找修改器 以計算更智能的路徑,穿越各種 材料、繞過定義的 區域,或 忽略障礙物。
材料成本
在處理 Terrain 和 BasePart 材料時,可以在 CreatePath() 中包含 Costs 表,以使某些材料比其他材料更易於通過。所有材料的默認成本為 1,任何材料都可以通過將其值設置為 math.huge 定義為不可通過。
Costs 表中的鍵應是表示 Enum.Material 名稱的 字符串 名稱,例如 Water 代表 Enum.Material.Water 或 CrackedLava 代表 Enum.Material.CrackedLava。
local PathfindingService = game:GetService("PathfindingService")
local Players = game:GetService("Players")
local RunService = game:GetService("RunService")

local DESTINATION = Vector3.new(20, 0.5, 20)
local GROUND_WAIT = 0.01
local VELOCITY_MULTIPLIER = 0.0625

local path = PathfindingService:CreatePath({
	AgentCanClimb = true,
	Costs = {
		Water = 20, CrackedLava = 100, Slate = 20
	}
})配置區域
在某些情況下, 材料偏好 不夠。例如,您可能希望角色避免定義的 區域,無論腳下的材料為何。這可以通過將 PathfindingModifier 對象添加到一個部件來實現。
在該區域周圍創建一個 Anchored 部件,並將其 CanCollide 屬性設置為 false。

在該部件上插入一個 PathfindingModifier 實例,找到其 Label 屬性,並賦予有意義的名稱,如 DangerZone。
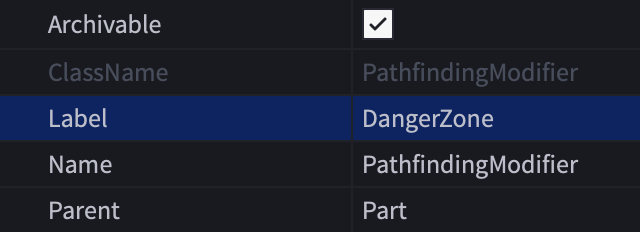
在 CreatePath() 的 Costs 表中包含一個相匹配的 DangerZone 鍵及其相關數值。通過將修改器的值設置為 math.huge ,可以將其定義為不可通過。
PlayerPathFollow (LocalScript)local PathfindingService = game:GetService("PathfindingService")local Players = game:GetService("Players")local RunService = game:GetService("RunService")local DESTINATION = Vector3.new(20, 0.5, 20)local GROUND_WAIT = 0.01local VELOCITY_MULTIPLIER = 0.0625local path = PathfindingService:CreatePath({AgentCanClimb = true,Costs = {DangerZone = math.huge, Water = 20, CrackedLava = 20, Slate = 20}})


忽略障礙物
在某些情況下,通過實體障礙物尋路是有用的,就好像它們不存在一樣。這允許您計算穿過特定物理阻擋的路徑,而不是計算直接失敗。
在該對象周圍創建一個 Anchored 部件,並將其 CanCollide 屬性設置為 false。

在該部件上插入一個 PathfindingModifier 實例,然後啟用其 PassThrough 屬性。
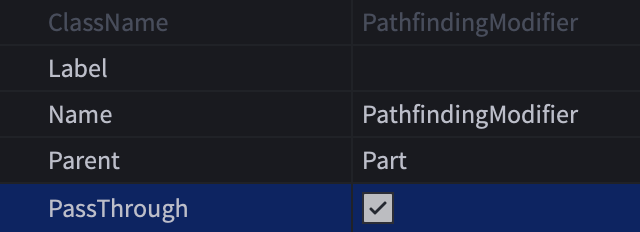
現在,當從喪屍 NPC 到玩家角色計算路徑時,該路徑將擴展越過門,即使喪屍無法打開門,它仍然會像是“聽到”門後的角色一樣反應。


路徑尋找鏈接
有時需要在通常無法穿越的空間中找到路徑,例如越過深淵,並採取自定義動作以達到下一個路點。這可以通過 PathfindingLink 對象來實現。
使用上面的示例,您可以使代理使用小艇。

要使用此示例創建 PathfindingLink :
在小艇的座位上和小艇的登陸點附近各創建兩個 Attachments。

為其 Label 屬性賦予有意義的名稱,例如 UseBoat。該名稱用作路徑尋找腳本中的標誌,當代理到達起始鏈接點時觸發自定義動作。
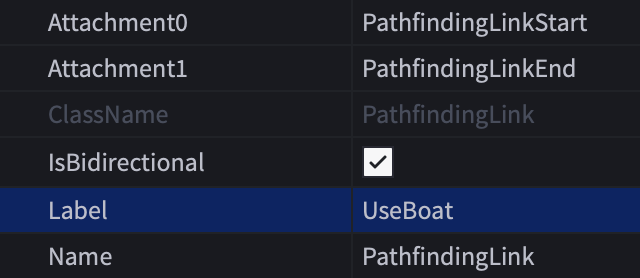
在 CreatePath() 中包含一個 Costs 表,該表包含 Water 鍵和與 Label 屬性名稱相匹配的自定義鍵。將自定義鍵的值設置為 低於 Water 的值。
PlayerPathFollow (LocalScript)local PathfindingService = game:GetService("PathfindingService")local Players = game:GetService("Players")local RunService = game:GetService("RunService")local DESTINATION = Vector3.new(20, 0.5, 20)local GROUND_WAIT = 0.01local VELOCITY_MULTIPLIER = 0.0625local path = PathfindingService:CreatePath({AgentCanClimb = true,Costs = {UseBoat = 2, Water = 20}})在 moveToNextWaypoint() 函數中 (
第 93–114 行),可以為 Label 修改器名稱進行自定義檢查,以執行不同於 Humanoid:Move() 的操作;在這種情況下,您可以調用一個函數來使代理坐在小艇上,將小艇移過水面,在小艇的登陸點下車,然後讓代理的路徑繼續到最終目標。


串流兼容性
在遊戲中 實例串流 是一種強大的功能,可以在玩家的角色移動於世界時動態加載和卸載 3D 內容。當他們探索 3D 空間時,新子集會流式傳輸到他們的設備,而一些現有的子集可能會被卸載。
考慮在啟用串流的遊戲中使用 PathfindingService 的以下最佳做法:
串流可以在角色沿著路徑移動時阻塞或解除阻塞給定路徑。例如,當角色在森林中奔跑時,樹木可能會在他們前方的某個地方流入並 obstruct 路徑。為了使路徑尋找能與串流無縫配合,強烈建議您使用 處理被阻擋的路徑 技術,並在必要時重新計算路徑。
在路徑尋找中,常見的方法是使用現有對象的坐標進行 計算,例如將路徑目的地設置為世界中現有 TreasureChest 模型的位置。這種方法與伺服器端的 Scripts 完全兼容,因為伺服器隨時擁有整個世界的視野,但在客戶端運行的 LocalScripts 和 ModuleScripts 可能會失敗,如果它們嘗試計算指向未被串流的對象的路徑。
要解決這個問題,考慮將目的地設置為持久性模型中的 BasePart 的位置,該模型使用 持久性。持久模型在玩家加入後不久進行加載,並且永遠不會卸載,因此客戶端腳本可以連接 PersistentLoaded 事件,並在事件觸發後安全地訪問模型以創建路徑點。
限制與失敗因素
路徑尋找引擎有特定的限制,以確保高效的處理和最佳的性能。此外,如下所述,路徑尋找的 計算 可能因各種原因失敗。