Distributing assets to the Creator Store is the only way to make your assets publicly available to all users to use within their own experiences in Studio. You can distribute any mesh or image that you have imported through the Asset Manager, or any model or plugin that you have uploaded to your inventory.
Every asset that you import must adhere to the Community Rules and Terms of Use, and respect the DMCA Guidelines regarding copyright. In addition, there are limits on the number of assets you can distribute per 30 days, depending on whether you've verified your account:
| Mesh Assets | Image Assets | Model Assets | Plugins | |
|---|---|---|---|---|
| Verified account | 200 | 200 | 200 | 10 |
| Unverified account | 10 | 10 | 10 | 2 |
You can also choose to sell plugins on the Creator Store for United States Dollars. Roblox offers a market-leading revenue share for these sales, as only taxes and payment processing fees are deducted. Note that you can only set USD pricing for plugins through the Creator Dashboard. For more information, see Selling on the Creator Store.
Through Creator Dashboard
The Creator Dashboard is the best place to manage your distributed assets. It's also the only way to list an asset for sale on the Creator Store and set a USD price for a plugin.
To distribute an asset through the dashboard:
Navigate to the Creator Dashboard.
In the horizontal navigation, select DEVELOPMENT ITEMS. All assets you have previously imported display within their respective category.
Select the asset that you want to distribute. The asset's Configure page displays.
In the Settings section, enable the Distribute on Creator Store toggle.
(Optional) If you have a seller account and are distributing a plugin, set a price in USD for the asset in the USD Pricing field. If you keep the default value of Free, the asset will be free to all creators.
Click the Save button.
The asset is now public and visible to everyone within the Creator Store.
Through Studio
You can upload assets directly in Studio from the Toolbox or Explorer window. However, you must use the Creator Dashboard to list an asset for sale on the Creator Store or set a USD price for a plugin.
From the Toolbox
If your asset is already in your Toolbox Inventory and you want to distribute it on the Creator Store, Studio provides a direct link to the Creator Dashboard asset configuration page:
Navigate to the View tab of the menu bar and select Toolbox.

Select the Creations tab.
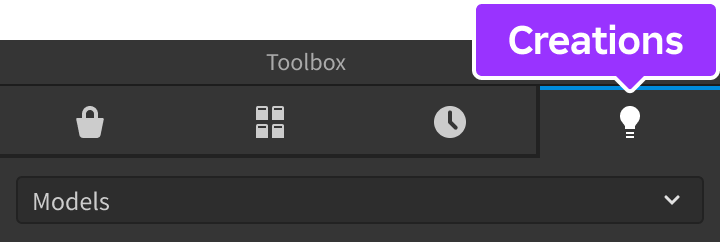
Click the category selector dropdown and select the asset type you'd like to upload. All assets you have previously imported display within the chosen category.

Right-click on your desired asset to distribute and select Edit Asset.
(Optional) Make changes to basic asset information, such as Title, Description, or Category, and click Save.
Click the Creator Dashboard link to the asset. Your web browser opens. Then follow the instructions in Through Creator Dashboard.


With the Explorer Window
You can upload any models you create in an open project from the Explorer window. Assets that you upload using this method automatically appear in your inventory.
Right-click the asset you want to upload and select Save to Roblox....
Make changes to basic asset information, such as Title, Description, or Category, and click Save. After you hit Save, note how the Asset Configuration window provides a direct link to the asset configuration webpage.
Click the Creator Dashboard link. Your web browser opens. Then follow the instructions in Through Creator Dashboard.