Neon signs are bright and colorful electric signage that draws attention to something within a game, such as where users can enter a building or purchase an item. By combining modeling and lighting techniques, you can create and use neon signs to elevate the immersion within your environments.
As with all 3D creation, there are many ways to achieve any particular goal. In this guide, you can quickly create your own neon sign using tools and methods available only within Studio with only a few basic assets, including a .obj file for the 3D text of the sign model.
In the following method to create a neon sign, follow each section to learn how to:
- Create the signage's backboard and border with basic parts.
- Shape the sign using Studio's solid modeling tools.
- Incorporate 3D text with your sign and save the sign as a model.
Create the backboard and border
A Part is Roblox's primary building block that you can move, resize, rotate, and customize to change their appearance, such as their color and material. Using basic parts to create the foundation of neon signs is useful because the signage's backboard and border only require basic shapes.
To create the backboard and border:
Navigate to Studio's Home or Model tab toolbar.
Click the dropdown arrow on the Part button and select Block. A block part displays in the workspace that's about to become the backboard of your neon sign.
In the Explorer window, select the block, then in the Properties window,
Set BrickColor to Black.
Set Size to 8,4,1.
Set Name to Backboard.
Enable the Anchored property.

In the Explorer window, select Backboard, then press CtrlD (⌘D) to duplicate the part.
In the toolbar, select the Move tool and use one of the axis arrows to pull the duplicate backboard part away from the original position so you can see each object.
In the Explorer window, select the duplicate backboard part that's about to become the border of your neon sign, then in the Properties window,
Set BrickColor to Lime Green.
Set Size to 7.75, 3.75, 0.25.
Set Name to Border.

In the Explorer window, select Border, then press CtrlD (⌘D) to duplicate the part. Do not move this new part because it needs to be in its current position for the next sculpting step.


Now that you have three parts that make up the basic shapes of your neon sign, you can sculpt the border's shape.
Shape the neon border
Using solid modeling, you can join and separate parts in unique ways to form more complex shapes known as unions. This process enables you to resize and modify the duplicate border part to become the neon border.
To create the neon border shape:
In the Explorer window, select the duplicate border part, then in the Properties window, set the Size to 7.5, 3.5, 1.0.

With the duplicate border part still selected, click the Negate button in the toolbar. The border part turns translucent and its Name property automatically changes to NegativePart.
With NegativePart still selected, hold Ctrl/⌘ and click on the original border part to select both parts at the same time.

In the toolbar, select Union to fuse both parts together. A border-shaped part displays, and the Name property automatically changes to Union.
In the Explorer window, select the union, then in the Properties window,
- Set Name to Border. This helps organize all objects within the workspace.
- Set Material to Neon. This allows the part to glow.
In the toolbar, select the Move tool and use one of the axis arrows to pull Border in front of Backboard.


Now that you have a complete backboard and a glowing neon border, you can create extruding neon 3D text for the words of the sign.
Incorporate neon 3D text
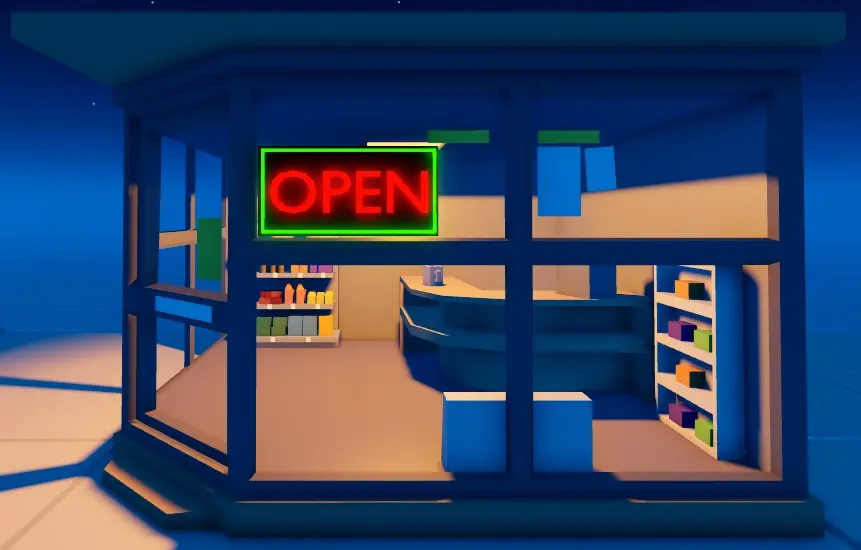
Since Studio doesn't natively support 3D text, this guide provides an open-text.obj file for you to import into your scene that contains a 3D model of text that spells the word "OPEN". You can also use other methods to create 3D texts or custom designs for this process, such as using your own models from third-part modeling software, working with community plugins, or creating your own text manually in Studio through solid modeling.
To incorporate neon 3D text from the open-text .obj file:
Import the open-text .obj file.
- From Studio's File menu, select Import. A file browser displays.
- Select the open-text .obj file, then click the Open button. The Import Preview window displays.
- Keep the default import settings, then click the Import button. The open text models display within the viewport.
In the toolbar, select the Move tool and use one of the axis arrows to center the text on the sign.

In the Properties window,
- Set Color to 170,0,0.
- Set Material to Neon.
In the Explorer window, select the text models, Border, and Backboard, then press CtrlG (⌘G) to group them into a single Model object.
Rename the new model to NeonSign.
In the Explorer window, right-click NeonSign. A contextual menu displays.
Select Save to Roblox.

After you save the asset in your Toolbox, you can use it within any of your games. In addition, you can distribute your asset to the Creator Store to make it publicly available to all creators to use within their games too.